Creamy Banana Pudding Cheesecake Cones in Waffle Cones
Print it, save it, or add it to your recipe binder.
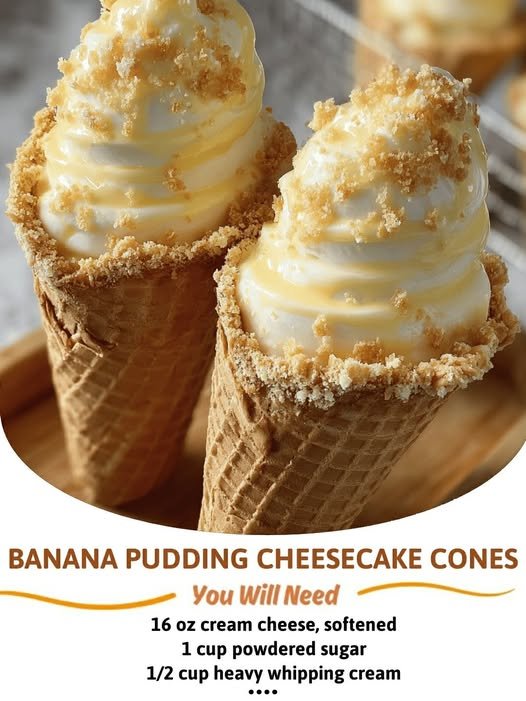
Banana Pudding Cheesecake Cones
Banana Pudding Cheesecake Cones are the kind of dessert that instantly gets attention. They’re playful, creamy, packed with banana pudding flavor, and served in a crisp cone that makes every bite feel extra special. If you love classic banana pudding and rich no-bake cheesecake, this recipe brings the best of both worlds together in one handheld treat.
What makes these cones so irresistible is the contrast in textures. You get the smooth, velvety cheesecake-banana filling, fresh banana slices, a buttery vanilla wafer crunch, and the crisp snap of the cone. Topped with whipped cream and a drizzle of caramel or chocolate, they look party-ready but are easy enough to make anytime you want a fun dessert that feels a little over the top in the best way.
They’re perfect for birthdays, baby showers, summer get-togethers, family movie nights, or whenever you want a no-bake dessert that feels fresh, nostalgic, and just plain delicious.
Why I Love This Recipe
I love this recipe because it transforms a familiar comfort dessert into something creative and eye-catching. Banana pudding is always a crowd favorite, but serving it in cones makes it more portable, more festive, and honestly, more fun to eat.
Another reason I keep coming back to these is that there’s no baking involved. That makes them especially great for warm weather, parties, or busy days when you want a homemade dessert without turning on the oven.
The filling is also wonderfully rich without being too heavy. The cream cheese gives it that cheesecake tang, while the banana pudding mix adds sweetness and classic flavor. It’s the kind of dessert that tastes like comfort food dressed up for a celebration.
Ingredients
For the Cheesecake Filling
- 16 oz cream cheese, softened
- 1 cup powdered sugar
- 1/2 cup heavy whipping cream
- 1 teaspoon vanilla extract
- 1 package (3.4 oz) instant banana pudding mix
- 1 1/2 cups cold milk
For the Cones
- 10 to 12 waffle cones or sugar cones
- 1 cup crushed vanilla wafer cookies
- 2 tablespoons melted butter
- 2 bananas, sliced
- 1/2 cup whipped cream, for topping
- 1/4 cup caramel sauce or chocolate drizzle, optional
Swaps and Notes
This is an easy recipe to customize depending on your style and what you have on hand.
- Waffle cones make a sturdier, more dramatic presentation, while sugar cones are a little lighter and easier to find.
- Crushed graham crackers can work in place of vanilla wafers, but the wafers really reinforce that classic banana pudding flavor.
- For extra banana flavor, you can add a few mashed banana spoonfuls to the filling, though this may slightly loosen the texture.
- Chocolate drizzle gives the cones a dessert-shop feel, while caramel adds a warm, buttery finish.
- For a firmer filling, chill the cheesecake mixture for 10 to 15 minutes before piping it into the cones.
One important note: bananas are best added just before serving or shortly before chilling so they stay fresh and appealing.

Creamy Banana Pudding Cheesecake Cones in Waffle Cones
They’re perfect for birthdays, baby showers, summer get-togethers, family movie nights, or whenever you want a no-bake dessert that feels fresh, nostalgic, and just plain delicious.
Prep: min | Cook: min | Total: min
Servings:
Ingredients
- For the Cheesecake Filling:
- 16 oz cream cheese, softened
- 1 cup powdered sugar
- 1/2 cup heavy whipping cream
- 1 teaspoon vanilla extract
- 1 package (3.4 oz) instant banana pudding mix
- 1 1/2 cups cold milk
- For the Cones:
- 10 to 12 waffle cones or sugar cones
- 1 cup crushed vanilla wafer cookies
- 2 tablespoons melted butter
- 2 bananas, sliced
- 1/2 cup whipped cream, for topping
- 1/4 cup caramel sauce or chocolate drizzle, optional
Instructions
- Prepare the banana pudding: In a medium bowl, whisk the instant banana pudding mix with cold milk until thickened. Set it aside for a few minutes so it can fully set.
- Make the cheesecake base: In a separate large mixing bowl, beat the softened cream cheese and powdered sugar until smooth and creamy.
- Add the vanilla: Mix in the vanilla extract until well combined.
- Combine the fillings: Fold the prepared banana pudding mixture into the cream cheese mixture until fully incorporated and smooth.
- Make the wafer crunch: In a small bowl, stir together the crushed vanilla wafer cookies and melted butter until the crumbs are evenly coated.
- Coat the cones: Lightly coat the inside of each cone with the vanilla wafer mixture. This adds flavor, a bit of crunch, and helps create a barrier that keeps the cones from getting soggy too quickly.
- Fill the cones: Spoon or pipe the cheesecake-banana pudding mixture into the cones, layering in sliced bananas as you go.
- Top and garnish: Finish each cone with whipped cream and a drizzle of caramel or chocolate sauce, if desired.
- Chill before serving: Place the filled cones in the refrigerator for 20 to 30 minutes before serving for the best texture.
Nutrition
- Calories: 290
- Fat: 16g
- Carbs: 32g
- Protein: 4g
Rate This Recipe
Average Rating: 0 (0 votes)
How to Make Banana Pudding Cheesecake Cones
1. Prepare the banana pudding
In a medium bowl, whisk the instant banana pudding mix with cold milk until thickened. Set it aside for a few minutes so it can fully set.
2. Make the cheesecake base
In a separate large mixing bowl, beat the softened cream cheese and powdered sugar until smooth and creamy.
3. Add the vanilla
Mix in the vanilla extract until well combined.
4. Combine the fillings
Fold the prepared banana pudding mixture into the cream cheese mixture until fully incorporated and smooth.
5. Make the wafer crunch
In a small bowl, stir together the crushed vanilla wafer cookies and melted butter until the crumbs are evenly coated.
6. Coat the cones
Lightly coat the inside of each cone with the vanilla wafer mixture. This adds flavor, a bit of crunch, and helps create a barrier that keeps the cones from getting soggy too quickly.
7. Fill the cones
Spoon or pipe the cheesecake-banana pudding mixture into the cones, layering in sliced bananas as you go.
8. Top and garnish
Finish each cone with whipped cream and a drizzle of caramel or chocolate sauce, if desired.
9. Chill before serving
Place the filled cones in the refrigerator for 20 to 30 minutes before serving for the best texture.
Tips for Success
Use softened cream cheese so the filling blends up silky smooth without lumps. Cold or partially softened cream cheese can leave the filling uneven.
A piping bag makes filling the cones much neater and faster, especially if you’re serving these for a party. If you don’t have one, a zip-top bag with the corner snipped works well too.
Try not to overfill the cones too early if you’re making them ahead. They’re best assembled fairly close to serving time so the cone stays crisp.
For another nostalgic dessert that celebrates the same classic flavor, this Big Family Banana Pudding is a must-try.
Serving Suggestions and Pairings
These Banana Pudding Cheesecake Cones are ideal for dessert tables because they’re easy to serve and instantly eye-catching. Arrange them upright in cups or a tray filled with sugar for a fun presentation.
They pair beautifully with chilled coffee drinks, iced tea, or a simple glass of milk. If you’re building a no-bake dessert spread, serve them alongside other easy favorites like No-Bake Oreo Cream Pie for a creamy chocolate contrast.
For a richer dessert table, Pecan Pie Bars bring a buttery, make-ahead option that balances the cool freshness of these cones.
If you want a playful dessert lineup for a summer party, Easy Ice Cream Sandwich Cake is another fun, crowd-pleasing choice. And for a dip-style sweet treat that guests can snack on casually, Brownie Batter Dip makes a great addition.
Nutritional Information Per Serving
Estimated per cone, depending on cone size and toppings:
- Calories: 290
- Carbohydrates: 32g
- Fat: 16g
- Protein: 4g
- Sugar: 21g
- Sodium: 180mg
These values are approximate and may vary based on the specific brands and toppings used.
Storage and Leftover Tips
These cones are best enjoyed the same day they are assembled for maximum crunch and freshness. If you need to prep ahead, store the filling separately in the refrigerator for up to 2 days.
You can also prepare the vanilla wafer crumb mixture in advance and keep it in an airtight container until ready to use.
For the best texture, assemble the cones shortly before serving, then chill briefly. This keeps the cones crisp and the banana slices fresher.
More Recipes You Will Love
If you loved these Banana Pudding Cheesecake Cones, here are a few more easy dessert ideas to try next:
- Big Family Banana Pudding for a true comfort dessert classic
- No-Bake Oreo Cream Pie for another cool and creamy no-bake favorite
- Brownie Batter Dip for a quick chocolate fix
- Pecan Pie Bars for a rich dessert bar option
- Easy Ice Cream Sandwich Cake for a fun, freezer-friendly party dessert
Final Thoughts
Banana Pudding Cheesecake Cones are one of those desserts that feel both nostalgic and brand new at the same time. They take the classic flavors of banana pudding, blend them with creamy cheesecake richness, and package everything into a crisp cone that’s made for sharing, celebrating, and showing off a little.
They’re fun, easy, no-bake, and guaranteed to stand out on any dessert table. Whether you’re making them for a party or just want a creative way to serve a family-favorite flavor, these cones are a sweet little showstopper.
If you make these Banana Pudding Cheesecake Cones, share your favorite topping twist and keep following along for more easy, crowd-pleasing recipes from Jason Griffith at Chef Maniac.