Crispy Chocolate Peanut Butter Crunch Bars You Can Make Without Baking
Print it, save it, or add it to your recipe binder.
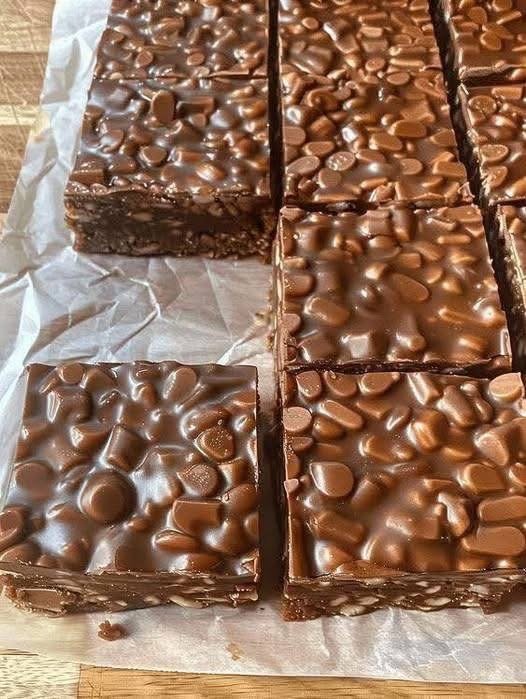
No Bake Chocolate Peanut Butter Crunch Bars
If you love the classic combination of chocolate and peanut butter, these No Bake Chocolate Peanut Butter Crunch Bars are about to become a staple in your dessert rotation. They are rich, creamy, crispy, and incredibly easy to make, with no oven required. That alone makes them a winner for busy days, warm-weather baking, or anytime you want a quick homemade treat without a lot of effort.
What makes these bars especially irresistible is the texture. You get that smooth, sweet peanut butter base, a satisfying crunch in every bite, and a luscious chocolate layer on top that ties everything together. They taste like a cross between a candy bar and a homemade dessert square, which means they fit in perfectly at parties, potlucks, holiday trays, or late-night snack runs to the kitchen.
Why I Love This Recipe
I love a dessert that feels impressive but comes together with minimal fuss, and these bars absolutely deliver. Since they are no-bake, there is no need to heat up the kitchen or worry about timing an oven just right. The process is simple, the ingredients are familiar, and the payoff is huge.
These bars are also ideal for making ahead. Once chilled, they slice beautifully and store well, which makes them perfect for entertaining or meal-prepping sweet treats for the week. And because chocolate and peanut butter are such a universally loved pairing, this is the kind of dessert that tends to disappear quickly wherever it is served.
Another reason this recipe stands out is how easy it is to customize. You can make them extra crunchy, slightly salty, or even add a little flair with toppings. It is a reliable base recipe that welcomes creativity.
Ingredients
- Peanut butter
- Chocolate
- Butter
- Powdered sugar or sweetener
- Crunchy cereal or crispy mix-in
- Vanilla extract
- Pinch of salt, optional
Since ingredient versions can vary depending on the original method, the key to success is keeping the balance between creamy, sweet, and crunchy. The peanut butter mixture should be thick enough to hold shape once chilled, while the chocolate topping should spread easily over the top.
Swaps and Notes
Creamy peanut butter gives the smoothest texture, but crunchy peanut butter can add even more bite if you want extra texture throughout. If using natural peanut butter, stir it very well first so the bars set properly and do not become oily.
For the crunchy layer, crispy rice cereal is a classic option because it stays light and crisp, but crushed cornflakes or similar cereal can also work depending on the texture you want. Semi-sweet chocolate is usually the best choice for balance, since it keeps the dessert from becoming overly sweet, though milk chocolate will give you a softer, more candy-like finish.
A pinch of salt is worth adding if your peanut butter is unsalted. It helps deepen the chocolate-peanut butter flavor and makes the bars taste more balanced overall.

Crispy Chocolate Peanut Butter Crunch Bars You Can Make Without Baking
No Bake Chocolate Peanut Butter Crunch Bars
Prep: min | Cook: min | Total: min
Servings:
Ingredients
- Peanut butter
- Chocolate
- Butter
- Powdered sugar or sweetener
- Crunchy cereal or crispy mix-in
- Vanilla extract
- Pinch of salt, optional
Instructions
- Prepare an 8x8-inch or 9x9-inch pan by lining it with parchment paper. This makes the bars much easier to lift and slice later.
- In a saucepan or microwave-safe bowl, gently melt the butter and peanut butter together until smooth.
- Stir in the vanilla and powdered sugar until the mixture is creamy and well combined.
- Fold in the crunchy cereal or crispy mix-in until everything is evenly coated.
- Press the mixture firmly into the prepared pan, smoothing the top into an even layer.
- Melt the chocolate separately until smooth, then spread it evenly over the peanut butter layer.
- Chill the bars in the refrigerator until firm, usually about 1 to 2 hours.
- Lift from the pan, slice into squares or rectangles, and serve chilled or slightly softened.
Nutrition
- Calories: 260
- Fat: 16g
- Carbs: 27g
- Protein: 5g
Rate This Recipe
Average Rating: 3.67 (3 votes)
How to Make No Bake Chocolate Peanut Butter Crunch Bars
- Prepare an 8×8-inch or 9×9-inch pan by lining it with parchment paper. This makes the bars much easier to lift and slice later.
- In a saucepan or microwave-safe bowl, gently melt the butter and peanut butter together until smooth.
- Stir in the vanilla and powdered sugar until the mixture is creamy and well combined.
- Fold in the crunchy cereal or crispy mix-in until everything is evenly coated.
- Press the mixture firmly into the prepared pan, smoothing the top into an even layer.
- Melt the chocolate separately until smooth, then spread it evenly over the peanut butter layer.
- Chill the bars in the refrigerator until firm, usually about 1 to 2 hours.
- Lift from the pan, slice into squares or rectangles, and serve chilled or slightly softened.
Tips for Success
The biggest tip for this recipe is to press the base firmly into the pan. If it is too loose, the bars can crumble when sliced. Use the back of a spoon or the bottom of a measuring cup to compact the mixture evenly.
When melting the chocolate, go slowly. Gentle heat keeps it smooth and glossy, while overheating can make it thick or grainy. If needed, a small amount of butter mixed into the chocolate can help it spread more easily and set with a softer bite.
For clean slices, chill the bars thoroughly before cutting and wipe your knife between cuts. That extra step makes a big difference in presentation, especially if you are serving them for guests or photographing them.
Serving Suggestions and Pairings
These bars are fantastic straight from the fridge, but they are also lovely served on a dessert tray with other sweet bites. If you are building a peanut butter and chocolate themed spread, pair them with The Best Peanut Butter Brownies I’ve Ever Made — And I’ve Made a Lot for an extra indulgent dessert table.
For a no-bake dessert lineup, these bars fit right in with This Brownie Batter Dip Is My Favorite No-Bake Dessert for Instant Chocolate Cravings and This No-Bake Oreo Cream Pie Is My Favorite Quick Dessert Hack. They also make a fun addition to casual gatherings alongside coffee, cold milk, or a dessert board.
Nutritional Information Per Serving
Nutritional values will vary based on the exact brands and quantities used, but here is a general estimate per bar:
- Calories: 260
- Fat: 16g
- Carbohydrates: 27g
- Sugar: 18g
- Protein: 5g
- Fiber: 2g
These are approximate values and should be adjusted based on your final ingredient list and serving size.
Storage and Leftover Tips
Store these bars in an airtight container in the refrigerator for up to 1 week. Because they are no-bake and contain a chocolate topping, they hold their shape best when chilled. You can stack them with parchment between layers to keep them neat.
They also freeze very well. Place sliced bars in a freezer-safe container with parchment between layers and freeze for up to 2 months. Let them sit at room temperature for a few minutes before serving so the texture softens slightly.
This make-ahead quality is one of the best things about the recipe. You can prepare them in advance for parties, lunchbox treats, or easy dessert cravings throughout the week.
More Recipes You Will Love
If you enjoy quick sweets that do not require much effort, there are a few more recipes you should absolutely bookmark. These No-Bake Peanut Butter Oatmeal Bars Are My Favorite Snack to Keep on Hand are another great option when you want a chewy, peanut buttery treat with easy prep.
And for something fun and spoonable, This Edible Cookie Dough Is My Favorite No-Bake Treat for Late-Night Cravings is a must-try. All of these recipes bring that same easy, satisfying homemade dessert energy without adding stress to your day.
Final Thoughts
No Bake Chocolate Peanut Butter Crunch Bars are everything a simple dessert should be. They are easy, fast, crowd-pleasing, and loaded with the kind of flavor combination that never goes out of style. The creamy peanut butter, crisp crunch, and smooth chocolate topping create a treat that feels both nostalgic and irresistible.
Whether you are making them for a party, a family dessert night, or just because you need something sweet in the fridge, these bars are a recipe worth keeping close. If you make them, I would love to hear how you put your own spin on them. Share your favorite mix-ins or toppings, and keep following along for more easy, crave-worthy recipes from Jason Griffith.