Jelly Cheesecake Slice – A No-Bake Dream with a Fruity Finish

Print it, save it, or add it to your recipe binder.
Jelly Cheesecake Slice
A Chilled No-Bake Dessert with Layers of Cream and Fruit
Introduction
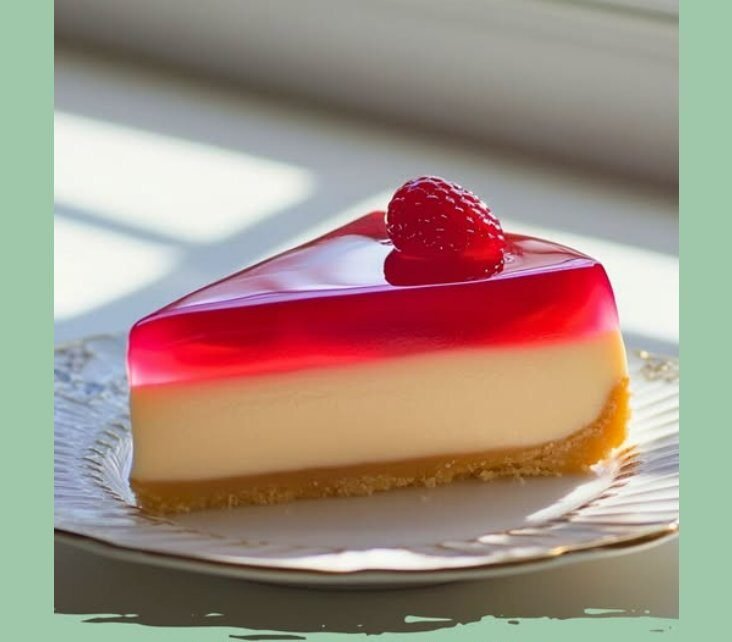
Looking for a no-bake dessert that’s equal parts creamy, fruity, and nostalgic? This Jelly Cheesecake Slice combines the richness of whipped cheesecake with a playful layer of jelly on top—all set over a buttery digestive biscuit base. It’s the perfect chilled treat for summer gatherings, potlucks, or just a refreshing end to dinner.
Why I Love This Recipe
This dessert is effortless but makes a big impression. It has layers of texture and flavor: the crunch of biscuits, the silky cheesecake middle, and the jewel-toned jelly on top. It’s endlessly customizable too—choose any jelly flavor to match your mood, theme, or craving. No oven, no gelatin tricks—just simple layering and chilling.
Ingredients
For the Base:
- 200g digestive biscuits
- 100g butter, melted
For the Cheesecake Layer:
- 400g cream cheese
- 100g sugar
- 2 cups heavy cream
- 1 tsp vanilla extract (optional but recommended)
For the Jelly Layer:
- 1 packet flavored jelly
- 2 cups boiling water
Instructions
1. Make the Base
Crush the digestive biscuits (use a food processor or rolling pin). Mix with melted butter and press firmly into a greased baking dish. Chill in the fridge while preparing the filling.
2. Make the Cheesecake Layer
In a bowl, beat cream cheese, sugar, and vanilla extract (if using) until smooth.
In a separate bowl, whip the heavy cream until stiff peaks form. Gently fold the whipped cream into the cream cheese mixture until fully combined and airy.
Spread this mixture evenly over the biscuit base.
3. Add the Jelly Layer
Prepare the jelly packet using 2 cups boiling water (as per instructions). Let it cool slightly—just enough so it won’t melt the cheesecake layer, but still pourable.
Gently pour the jelly over the cream layer. Use the back of a spoon to soften the pour if needed to prevent breaking the surface.
4. Chill & Slice
Refrigerate for at least 4 hours, or overnight, until fully set.
Slice into squares and serve chilled.
Tips for Success
- Cool the jelly slightly before pouring to avoid melting the cheesecake layer.
- Use vanilla or lemon extract for extra flavor in the cheesecake base.
- Try adding sliced fruit (like strawberries or kiwi) between the cream layer and jelly.
- A springform pan works great if you want to remove the whole slice cleanly.
Serving Suggestions & Pairings
This cool dessert pairs perfectly with:
- A tall glass of Blueberry Lemonade
- A side of Cake Mix Cookies for a bake-sale-worthy platter
- A no-bake dessert party featuring Pumpkin Delight or Oreo Cream Pie
- Or go all-in on indulgence with Cookie Dough Brownie Bombs
Storage Tips
- Fridge: Store in an airtight container for up to 5 days.
- Freezer: Not recommended, as jelly may lose texture when thawed.
- Slice carefully with a hot knife for clean layers.
More Recipes You’ll Love
Final Thoughts
This Jelly Cheesecake Slice is the perfect marriage of creamy indulgence and fruity freshness. It’s easy to prep, fun to customize, and always a hit with kids and adults alike. Make it ahead and slice when ready—it’s a no-bake win from top to bottom.
If you whip this up, tag @ChefManiac to share your slice! And follow us for more fun, fridge-friendly recipes every week.
Chill sweetly,
Jason Griffith – ChefManiac.com
Jelly Cheesecake Slice – A No-Bake Dream with a Fruity Finish
A Chilled No-Bake Dessert with Layers of Cream and Fruit
Prep: min | Cook: min | Total: min
Servings:
Ingredients
- For the Base:
- 200g digestive biscuits
- 100g butter, melted
- For the Cheesecake Layer:
- 400g cream cheese
- 100g sugar
- 2 cups heavy cream
- 1 tsp vanilla extract (optional but recommended)
- For the Jelly Layer:
- 1 packet flavored jelly
- 2 cups boiling water
- Instructions:
- 1. Make the Base:
- 2. Make the Cheesecake Layer:
- 3. Add the Jelly Layer:
- 4. Chill & Slice:
- Tips for Success:
- Cool the jelly slightly before pouring to avoid melting the cheesecake layer.
- Use vanilla or lemon extract for extra flavor in the cheesecake base.
- Try adding sliced fruit (like strawberries or kiwi) between the cream layer and jelly.
- A springform pan works great if you want to remove the whole slice cleanly.
- Serving Suggestions & Pairings:
- A tall glass of Blueberry Lemonade
- A side of Cake Mix Cookies for a bake-sale-worthy platter
- A no-bake dessert party featuring Pumpkin Delight or Oreo Cream Pie
- Or go all-in on indulgence with Cookie Dough Brownie Bombs
- Storage Tips:
- Fridge: Store in an airtight container for up to 5 days.
- Freezer: Not recommended, as jelly may lose texture when thawed.
- Slice carefully with a hot knife for clean layers.
- More Recipes You’ll Love:
- Pumpkin Delight Dessert
- No-Bake Oreo Cream Pie
- Cake Mix Cookies
- Final Thoughts:
Instructions
- Make the Base: Crush the digestive biscuits (use a food processor or rolling pin). Mix with melted butter and press firmly into a greased baking dish. Chill in the fridge while preparing the filling.
- Make the Cheesecake Layer: In a bowl, beat cream cheese, sugar, and vanilla extract (if using) until smooth.
- In a separate bowl, whip the heavy cream until stiff peaks form. Gently fold the whipped cream into the cream cheese mixture until fully combined and airy.
- Spread this mixture evenly over the biscuit base.
- Add the Jelly Layer: Prepare the jelly packet using 2 cups boiling water (as per instructions). Let it cool slightly—just enough so it won’t melt the cheesecake layer, but still pourable.
- Gently pour the jelly over the cream layer. Use the back of a spoon to soften the pour if needed to prevent breaking the surface.
- Chill & Slice: Refrigerate for at least 4 hours, or overnight, until fully set.
- Slice into squares and serve chilled.
- Tips for Success: Cool the jelly slightly before pouring to avoid melting the cheesecake layer.
- Use vanilla or lemon extract for extra flavor in the cheesecake base.
- Try adding sliced fruit (like strawberries or kiwi) between the cream layer and jelly.
- A springform pan works great if you want to remove the whole slice cleanly.
- Serving Suggestions & Pairings: This cool dessert pairs perfectly with:
- A tall glass of : Blueberry Lemonade
- A side of : Cake Mix Cookies for a bake-sale-worthy platter
- A no-bake dessert party featuring : Pumpkin Delight or Oreo Cream Pie
- Or go all-in on indulgence with : Cookie Dough Brownie Bombs
- Storage Tips: Fridge: Store in an airtight container for up to 5 days.
- Freezer: Not recommended, as jelly may lose texture when thawed.
- Slice carefully with a hot knife for clean layers.
- More Recipes You’ll Love: Pumpkin Delight Dessert
- No-Bake : Oreo Cream Pie
- Cake : Mix Cookies
- Final Thoughts: This Jelly Cheesecake Slice is the perfect marriage of creamy indulgence and fruity freshness. It's easy to prep, fun to customize, and always a hit with kids and adults alike. Make it ahead and slice when ready—it’s a no-bake win from top to bottom.
- If you whip this up, tag @ChefManiac to share your slice! And follow us for more fun, fridge-friendly recipes every week.
- Chill sweetly,: Jason Griffith – ChefManiac.com
Nutrition
- Calories:
- Fat:
- Carbs:
- Protein:
Rate This Recipe
Average Rating: 0 (0 votes)