How to Make a Peppermint Crisp Caramel Cake with Coconut and Creamy Mousse
Print it, save it, or add it to your recipe binder.
Introduction
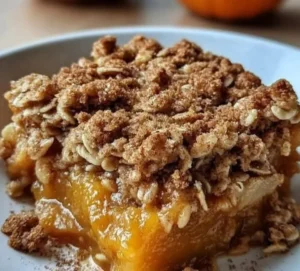
If you’re looking for a cake that’s rich, festive, and completely unforgettable, this Caramel Peppermint Crisp Cake is the one. With layers of tender coconut sponge, creamy caramel mousse, crushed biscuits, and shards of peppermint crisp chocolate, it’s a dessert that screams celebration. Whether you’re making it for a birthday, holiday, or just because life needs more cake, this recipe is guaranteed to impress.
Why I Love This Recipe
This cake is:
- Layered with texture and flavor—soft sponge, airy mousse, creamy caramel, and crunchy chocolate
- Surprisingly simple, thanks to shortcuts like tinned caramel and crushed biscuits
- Beautiful to serve, with bold flavors and eye-catching topping ideas
- A modern twist on the South African peppermint crisp tart, turned into a bakery-worthy cake
Ingredients
For the Cake:
- 120g butter, softened
- 400g Natura Golden Caster Sugar
- 360g cake flour
- 1½ tbsp baking powder
- 40g desiccated coconut, toasted
- Pinch of salt
- 3 large eggs
- 360ml coconut milk
For the Caramel Mousse Filling:
- 2 tsp gelatine powder (or 3 gelatine sheets)
- 3 tbsp water
- 2 x 400g tins condensed milk, boiled (or use tinned caramel)
- 1 tsp vanilla extract
- Pinch of salt
- 500ml cream, whipped to stiff peaks
- 400g peppermint crisp chocolate, crushed
- 200g coconut tea biscuits (or tennis biscuits), crumbled

How to Make a Peppermint Crisp Caramel Cake with Coconut and Creamy Mousse
rich, festive, and completely unforgettable
Prep: min | Cook: min | Total: min
Servings:
Ingredients
- For the Cake:
- 120g butter, softened
- 400g Natura Golden Caster Sugar
- 360g cake flour
- 1½ tbsp baking powder
- 40g desiccated coconut, toasted
- Pinch of salt
- 3 large eggs
- 360ml coconut milk
- For the Caramel Mousse Filling:
- 2 tsp gelatine powder (or 3 gelatine sheets)
- 3 tbsp water
- 2 x 400g tins condensed milk, boiled (or use tinned caramel)
- 1 tsp vanilla extract
- 500ml cream, whipped to stiff peaks
- 400g peppermint crisp chocolate, crushed
- 200g coconut tea biscuits (or tennis biscuits), crumbled
Instructions
- Step 1: Bake the Coconut Cake Layers: Preheat oven to 170°C (340°F). Line 3 x 20cm springform tins with parchment paper.
- In a large mixing bowl, beat butter, caster sugar, flour, baking powder, toasted coconut, and salt on low speed until a sandy texture forms.
- In a jug, whisk the eggs with coconut milk.
- Slowly pour wet ingredients into dry while mixing on low, until a smooth batter forms.
- Divide batter evenly between prepared tins.
- Bake for 20–25 minutes, or until golden and a skewer comes out clean.
- Cool slightly in the tins, then transfer to a wire rack. Level the tops once fully cooled.
- Step 2: Prepare the Caramel Mousse: Sprinkle gelatine over water and let bloom for 5 minutes.
- Microwave in short bursts until melted, then stir in half a tin of caramel, vanilla, and salt.
- Gently fold in the whipped cream until fully incorporated.
- Step 3: Assemble the Cake: Place one cake layer inside a cleaned springform pan.
- Spread a thin layer of reserved caramel over the cake.
- Pour on half the caramel mousse, then top with 1/3 crushed peppermint crisp and 1/3 biscuit crumbs.
- Add the second cake layer and repeat: caramel, mousse, crushed peppermint, biscuits.
- Top with final cake layer. Refrigerate for 2 hours, or until fully set.
- Step 4: Decorate and Serve: Unmould the cake using a warm palette knife.
- Decorate with extra peppermint crisp shards, crumbled biscuits, and caramel drizzle.
- Slice, serve, and enjoy every decadent bite.
Nutrition
- Calories:
- Fat:
- Carbs:
- Protein:
Rate This Recipe
Average Rating: 0 (0 votes)
Instructions
Step 1: Bake the Coconut Cake Layers
- Preheat oven to 170°C (340°F). Line 3 x 20cm springform tins with parchment paper.
- In a large mixing bowl, beat butter, caster sugar, flour, baking powder, toasted coconut, and salt on low speed until a sandy texture forms.
- In a jug, whisk the eggs with coconut milk.
- Slowly pour wet ingredients into dry while mixing on low, until a smooth batter forms.
- Divide batter evenly between prepared tins.
- Bake for 20–25 minutes, or until golden and a skewer comes out clean.
- Cool slightly in the tins, then transfer to a wire rack. Level the tops once fully cooled.
Step 2: Prepare the Caramel Mousse
- Sprinkle gelatine over water and let bloom for 5 minutes.
- Microwave in short bursts until melted, then stir in half a tin of caramel, vanilla, and salt.
- Gently fold in the whipped cream until fully incorporated.
Step 3: Assemble the Cake
- Place one cake layer inside a cleaned springform pan.
- Spread a thin layer of reserved caramel over the cake.
- Pour on half the caramel mousse, then top with 1/3 crushed peppermint crisp and 1/3 biscuit crumbs.
- Add the second cake layer and repeat: caramel, mousse, crushed peppermint, biscuits.
- Top with final cake layer. Refrigerate for 2 hours, or until fully set.
Step 4: Decorate and Serve
- Unmould the cake using a warm palette knife.
- Decorate with extra peppermint crisp shards, crumbled biscuits, and caramel drizzle.
- Slice, serve, and enjoy every decadent bite.
Tips for Success
- Boil condensed milk in advance or use pre-made tinned caramel for ease.
- Use a springform pan for neat layers and easy unmoulding.
- Whip cream to stiff peaks for mousse that holds its shape.
- Crush peppermint crisp finely for an even texture, but reserve some big shards for dramatic topping.
Serving Suggestions and Pairings
Make your dessert spread even sweeter with these perfect companions:
- Add a no-bake contrast with our Pumpkin Delight Dessert or Oreo Cream Pie.
- Balance richness with Easy Coconut Macaroons.
- Serve a crowd with fun bites like Caramel Apple Nachos or Cookie Dough Brownie Bombs.
- Beverage pairing: Try with a vanilla latte, rooibos tea, or sparkling rosé.
Storage Tips
- Fridge: Store leftovers in the refrigerator for up to 4 days.
- Freezing: Individual slices can be frozen, tightly wrapped, for up to 1 month.
- Make-ahead: Bake the cakes the day before and assemble the next day.
More Recipes You’ll Love
- Oreo Cream Pie – fast, creamy, crowd-pleasing
- Pumpkin Delight Dessert – light, seasonal, spiced
- Coconut Macaroons – chewy and simple
- Caramel Apple Nachos – fall fun in snack form
- Brownie Bombs – outrageous and indulgent
Final Thoughts
This Caramel Peppermint Crisp Cake is everything a celebration dessert should be: sweet, creamy, crunchy, nostalgic, and absolutely unforgettable. It’s a playful, decadent treat that’s as fun to make as it is to eat—especially with a little help from peppermint crisp and caramel.
💬 Tried it? Share your layered masterpiece with us—tag #ChefManiacEats!
👉 Follow Chef Maniac for more no-bake favorites, layered desserts, and crowd-pleasing sweets.