Gooey S’mores Bars You Can Make Anytime of Year
Print it, save it, or add it to your recipe binder.
Easy S’mores Bars Recipe That Brings Campfire Flavor Indoors
By Jason Griffith
Introduction
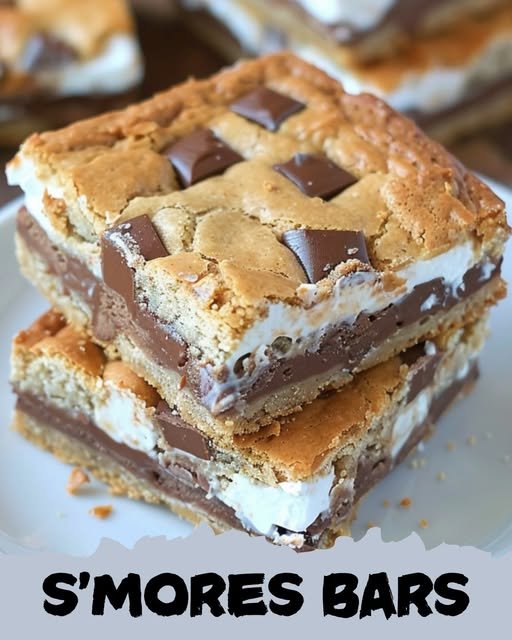
There is something about s’mores that instantly feels nostalgic. The mix of chocolate, marshmallow, and graham cracker always brings back memories of summer nights, backyard fires, and sticky fingers reaching for one more bite. But let’s be honest: sometimes you want all that classic flavor without building a fire or dealing with the mess. That is exactly why these S’mores Bars are such a favorite in my kitchen.
They are rich, gooey, buttery, and layered with everything we love about traditional s’mores, all baked into easy-to-slice dessert bars. The graham cracker crust gives them structure, the sweetened condensed milk creates an extra luscious layer, and the toasted marshmallows on top make them feel every bit as fun and irresistible as the original treat. These bars are perfect for parties, potlucks, family movie nights, or anytime you want a dessert that feels familiar and crowd-pleasing.
Why I Love This Recipe
I love this recipe because it delivers maximum payoff with very little fuss. You do not need any fancy equipment, and the ingredients are all easy to find. Once everything is layered into the pan, the oven does the hard work. The result is a dessert that looks impressive, tastes decadent, and disappears fast.
Another reason I keep coming back to these bars is that they are easy to serve. Unlike traditional s’mores, there is no assembly line, no open flame, and no waiting around while everyone builds their own. You can make the whole batch ahead of time, chill it, and slice it into neat squares when you are ready to serve.
For anyone who already loves s’mores-inspired desserts, This S’mores Bark Is My Favorite No-Campfire Treat for Anytime Cravings and These Campfire Cones Are My Favorite Mess-Free Way to Enjoy S’mores are also worth bookmarking.
Ingredients
Here is everything you need to make these S’mores Bars:
- 1/2 cup (1 stick) unsalted butter, melted
- 1 cup graham cracker crumbs
- 1/2 cup granulated sugar
- 1/8 teaspoon salt
- 1 (14 oz) can sweetened condensed milk
- 2 cups milk chocolate chips
- 2 cups mini marshmallows
- 1 cup crushed graham crackers
Swaps and Notes
This recipe is wonderfully simple, but there are a few easy ways to make it work for your pantry and preferences:
- Chocolate chips: Milk chocolate gives the most classic s’mores flavor, but semisweet works well if you want a slightly less sweet bar.
- Graham crackers: You can use finely crushed crumbs for the crust and a more rustic crush on top for extra texture.
- Mini marshmallows: These toast evenly and cover the top nicely, but regular marshmallows cut into smaller pieces can work in a pinch.
- Butter: Unsalted butter gives you more control over the flavor, especially since the filling is already sweet.
- Sweetened condensed milk: Do not substitute evaporated milk here. Sweetened condensed milk is key to the gooey, rich texture.
If you enjoy easy layered desserts like this, These Pecan Pie Bars Are My Favorite Make-Ahead Holiday Dessert are another great option to add to your baking list.

Gooey S’mores Bars You Can Make Anytime of Year
Easy S’mores Bars Recipe That Brings Campfire Flavor Indoors
Prep: min | Cook: min | Total: min
Servings:
Ingredients
- 1/2 cup (1 stick) unsalted butter, melted
- 1 cup graham cracker crumbs
- 1/2 cup granulated sugar
- 1/8 teaspoon salt
- 1 (14 oz) can sweetened condensed milk
- 2 cups milk chocolate chips
- 2 cups mini marshmallows
- 1 cup crushed graham crackers
Instructions
- Prepare the pan: Preheat your oven to 350°F (175°C). Line a 9x13-inch baking dish with parchment paper or lightly coat it with nonstick spray.
- Make the crust: In a medium bowl, stir together the melted butter, graham cracker crumbs, sugar, and salt until the mixture is fully combined. Press it firmly into the bottom of the prepared pan to form an even crust.
- Add the sweetened condensed milk: Pour the sweetened condensed milk evenly over the crust. Take your time so it spreads across the surface as evenly as possible.
- Add the chocolate: Sprinkle the milk chocolate chips evenly over the condensed milk layer.
- Bake the base: Bake for 20 to 25 minutes, or until the edges begin to brown and the chocolate is softened.
- Top with marshmallows: Remove the pan from the oven and immediately sprinkle the mini marshmallows across the top in an even layer.
- Bake again: Return the pan to the oven for 5 to 7 minutes, or until the marshmallows are puffed and golden brown.
- Finish with graham cracker topping: Take the bars out of the oven and immediately sprinkle the crushed graham crackers over the toasted marshmallows.
- Cool and slice: Let the bars cool completely before cutting. For the cleanest slices, chill them in the refrigerator for at least 1 hour before slicing into squares.
Nutrition
- Calories: 220
- Fat: 10g
- Carbs: 31g
- Protein: 3g
Rate This Recipe
Average Rating: 0 (0 votes)
How to Make S’mores Bars
1. Prepare the pan
Preheat your oven to 350°F (175°C). Line a 9×13-inch baking dish with parchment paper or lightly coat it with nonstick spray.
2. Make the crust
In a medium bowl, stir together the melted butter, graham cracker crumbs, sugar, and salt until the mixture is fully combined. Press it firmly into the bottom of the prepared pan to form an even crust.
3. Add the sweetened condensed milk
Pour the sweetened condensed milk evenly over the crust. Take your time so it spreads across the surface as evenly as possible.
4. Add the chocolate
Sprinkle the milk chocolate chips evenly over the condensed milk layer.
5. Bake the base
Bake for 20 to 25 minutes, or until the edges begin to brown and the chocolate is softened.
6. Top with marshmallows
Remove the pan from the oven and immediately sprinkle the mini marshmallows across the top in an even layer.
7. Bake again
Return the pan to the oven for 5 to 7 minutes, or until the marshmallows are puffed and golden brown.
8. Finish with graham cracker topping
Take the bars out of the oven and immediately sprinkle the crushed graham crackers over the toasted marshmallows.
9. Cool and slice
Let the bars cool completely before cutting. For the cleanest slices, chill them in the refrigerator for at least 1 hour before slicing into squares.
Tips for Success
To make sure your bars turn out just right, keep these tips in mind:
- Press the crust down firmly so it holds together when sliced.
- Watch the marshmallows closely during the final bake since they can go from golden to too dark very quickly.
- Let the bars cool completely before cutting so the layers can set.
- Use parchment paper if possible for easier lifting and cleaner slicing.
- Chill before serving if you want extra neat, bakery-style squares.
These small steps make a big difference in both texture and presentation.
Serving Suggestions and Pairings
These S’mores Bars are rich enough to stand on their own, but they also pair beautifully with a few fun dessert-table additions. If you are building a sweet spread, This No-Bake Oreo Cream Pie Is My Favorite Quick Dessert Hack adds a cool and creamy contrast. For a summer party, This Easy Ice Cream Sandwich Cake Is My Favorite No-Bake Summer Dessert makes another easy crowd-pleaser.
You can also serve these bars slightly chilled with coffee, hot chocolate, or a scoop of vanilla ice cream for an extra-indulgent dessert plate.
Nutritional Information Per Serving
Nutritional values are approximate and will vary depending on the exact brands used and portion size. Based on cutting the pan into 24 bars, each serving is approximately:
- Calories: 220
- Fat: 10g
- Carbohydrates: 31g
- Sugar: 24g
- Protein: 3g
- Sodium: 85mg
These are definitely a treat, but one that is worth every gooey, chocolatey bite.
Storage and Leftover Tips
Store leftover S’mores Bars in an airtight container at room temperature for up to 2 days or in the refrigerator for up to 5 days. If stacking them, place parchment paper between layers to keep them from sticking.
They are especially good chilled, which makes them an ideal make-ahead dessert for gatherings. You can also freeze them in a tightly wrapped container for up to 2 months. Thaw in the refrigerator before serving.
More Recipes You Will Love
If you loved these S’mores Bars, here are a few more Chef Maniac recipes to explore:
- This S’mores Bark Is My Favorite No-Campfire Treat for Anytime Cravings
- These Campfire Cones Are My Favorite Mess-Free Way to Enjoy S’mores
- This No-Bake Oreo Cream Pie Is My Favorite Quick Dessert Hack
- These Pecan Pie Bars Are My Favorite Make-Ahead Holiday Dessert
- This Easy Ice Cream Sandwich Cake Is My Favorite No-Bake Summer Dessert
Final Thoughts
These S’mores Bars are everything a good dessert bar should be: easy, nostalgic, rich, and completely crowd-pleasing. They bring that classic campfire flavor into a simple oven-baked recipe that works any time of year. Whether you make them for a holiday tray, a bake sale, a birthday party, or just because you are craving something sweet and gooey, they are bound to be a hit.
If you try them, I’d love to hear how they turned out. Leave your feedback, share them with fellow dessert lovers, and follow along for more easy, indulgent recipes from Chef Maniac.