Easy Banana Cheesecake Pudding Cones: the No-Bake Dessert Recipe
Print it, save it, or add it to your recipe binder.
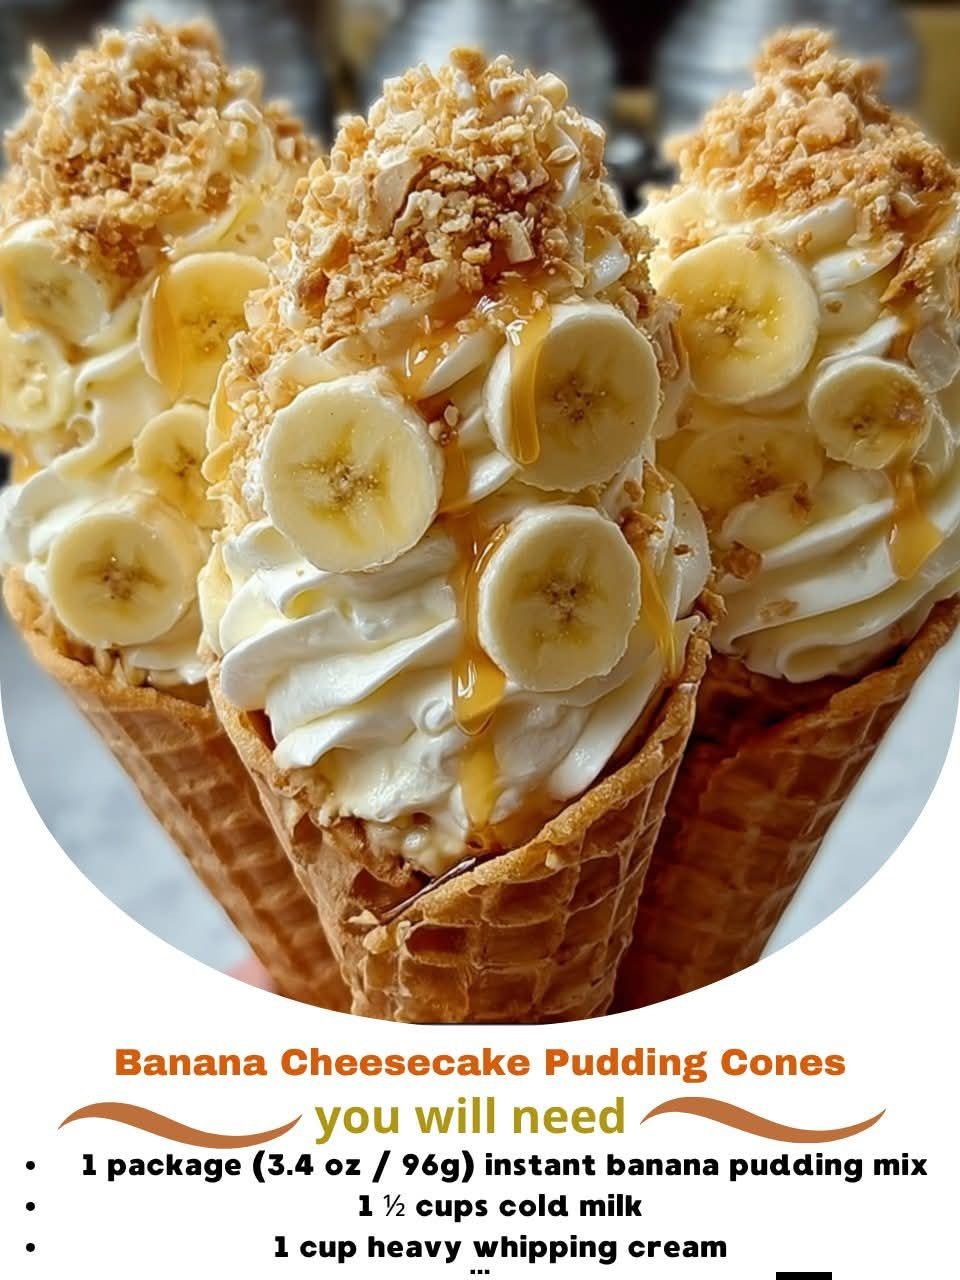
Banana Cheesecake Pudding Cones: The Fun No-Bake Dessert That Always Gets Attention
By Jason Griffith
Some desserts are delicious, and some desserts are just plain fun. These Banana Cheesecake Pudding Cones manage to be both. They take the creamy, nostalgic flavor of banana pudding, blend it with the rich tang of cheesecake filling, and serve it all inside a crisp cone for a treat that feels playful, easy, and surprisingly impressive.
This is the kind of dessert that instantly brightens up a table. It is portable, no-bake, and layered with the kind of creamy banana flavor that makes people go back for seconds. Whether you are making them for a birthday party, summer get-together, baby shower, or just a weekend treat for the family, Banana Cheesecake Pudding Cones bring something a little extra special without asking for a lot of effort.
What makes them so lovable is the combination of textures. You get the crunchy cone, the smooth cheesecake-style filling, the soft banana element, and all the sweet pudding flavor wrapped into one easy-to-serve dessert. It feels whimsical, but the flavor is pure comfort food.
Why I Love This Recipe
I love any recipe that looks adorable but is secretly simple, and this one fits that description perfectly. It has that eye-catching presentation people expect from a party dessert, but it comes together with easy ingredients and very little hands-on work.
It is also a great twist on classic banana pudding. Instead of layering everything in a bowl or baking dish, you turn it into a handheld dessert that feels fresh and creative. The cheesecake element gives the filling a richer, silkier texture, which makes it feel a little more elevated than standard pudding alone.
Another reason this recipe works so well is that it is easy to customize. You can top the cones with crushed wafers, mini chocolate chips, whipped cream, caramel drizzle, or extra banana slices depending on the occasion. It is flexible enough for casual family dessert night and cute enough for a themed dessert table.
Ingredients
Here is what you will need to make Banana Cheesecake Pudding Cones:
- 8 waffle cones or sugar cones
- 1 package instant banana pudding mix
- 1 1/2 cups cold milk
- 8 ounces cream cheese, softened
- 1/2 cup powdered sugar
- 1 teaspoon vanilla extract
- 1 cup whipped topping, plus more for garnish if desired
- 1 to 2 bananas, sliced
- 1/2 cup crushed vanilla wafers
- Caramel sauce or honey drizzle, optional
- Mini chocolate chips or sprinkles, optional for topping
Swaps and Notes
Instant banana pudding is the easiest option here and gives the filling its signature flavor quickly. If you want an even stronger banana taste, you can fold in a little mashed ripe banana, but do not overdo it or the filling can become too loose.
Cream cheese should be softened before mixing so the filling turns out smooth and creamy. Full-fat cream cheese gives the best cheesecake flavor and texture, though reduced-fat can work in a pinch.
Waffle cones are especially fun because they hold more filling and have a sturdier crunch, but sugar cones work well too. If you are making these ahead for a short time, consider brushing the inside of the cones with a thin layer of melted white chocolate and letting it set. That helps keep them crisp longer.

Banana Cheesecake Pudding Cones: The No-Bake Dessert Everyone Wants First
Banana Cheesecake Pudding Cones: The Fun No-Bake Dessert That Always Gets Attention
Prep: min | Cook: min | Total: min
Servings:
Ingredients
- 8 waffle cones or sugar cones
- 1 package instant banana pudding mix
- 1 1/2 cups cold milk
- 8 ounces cream cheese, softened
- 1/2 cup powdered sugar
- 1 teaspoon vanilla extract
- 1 cup whipped topping, plus more for garnish if desired
- 1 to 2 bananas, sliced
- 1/2 cup crushed vanilla wafers
- Caramel sauce or honey drizzle, optional
- Mini chocolate chips or sprinkles, optional for topping
Instructions
- Prepare the pudding: In a medium bowl, whisk together the banana pudding mix and cold milk until it begins to thicken. Let it sit for a few minutes so it can fully set.
- Make the cheesecake mixture: In a separate mixing bowl, beat the softened cream cheese until smooth. Add the powdered sugar and vanilla extract, and mix until creamy and well combined.
- Fold everything together: Gently fold the prepared banana pudding into the cream cheese mixture. Then fold in the whipped topping until the filling is light, fluffy, and smooth.
- Fill the cones: Spoon or pipe the banana cheesecake pudding filling into the cones. Add a few banana slices inside each cone if you want extra banana texture throughout.
- Add the toppings: Top each cone with more filling if needed, then sprinkle with crushed vanilla wafers. Finish with whipped topping, mini chocolate chips, or a drizzle of caramel sauce if desired.
- Chill briefly and serve: For the best texture, chill the filled cones for 10 to 15 minutes before serving. Serve soon after filling so the cones stay crisp.
Nutrition
- Calories: 260
- Fat: 13g
- Carbs: 32g
- Protein: 4g
Rate This Recipe
Average Rating: 0 (0 votes)
How to Make Banana Cheesecake Pudding Cones
1. Prepare the pudding
In a medium bowl, whisk together the banana pudding mix and cold milk until it begins to thicken. Let it sit for a few minutes so it can fully set.
2. Make the cheesecake mixture
In a separate mixing bowl, beat the softened cream cheese until smooth. Add the powdered sugar and vanilla extract, and mix until creamy and well combined.
3. Fold everything together
Gently fold the prepared banana pudding into the cream cheese mixture. Then fold in the whipped topping until the filling is light, fluffy, and smooth.
4. Fill the cones
Spoon or pipe the banana cheesecake pudding filling into the cones. Add a few banana slices inside each cone if you want extra banana texture throughout.
5. Add the toppings
Top each cone with more filling if needed, then sprinkle with crushed vanilla wafers. Finish with whipped topping, mini chocolate chips, or a drizzle of caramel sauce if desired.
6. Chill briefly and serve
For the best texture, chill the filled cones for 10 to 15 minutes before serving. Serve soon after filling so the cones stay crisp.
Tips for Success
The biggest trick with this recipe is timing. Because the filling is soft and creamy, the cones are best assembled not too far in advance. That way they keep their crunch and do not soften from the moisture in the filling.
Using a piping bag or zip-top bag with the corner snipped off makes filling the cones much easier and neater than spooning alone. It also gives the tops a prettier, more bakery-style finish.
Banana slices can brown over time, so if presentation matters, add the freshest slices possible right before serving. You can also skip banana slices on top and rely on the pudding flavor if you want the dessert to hold up a little better.
Serving Suggestions and Pairings
These Banana Cheesecake Pudding Cones are ideal for spring and summer parties, but they work any time you want a cheerful, no-bake dessert. They pair beautifully with other creamy or nostalgic sweets on a dessert table. For a classic banana-lover’s pairing, serve them alongside This Big Family Banana Pudding Is My Favorite Classic Dessert to Feed a Crowd, which brings that familiar comfort-food flavor in a more traditional format.
If you are building out a no-bake dessert spread, This No-Bake Oreo Cream Pie Is My Favorite Quick Dessert Hackfits right in. For warm-weather celebrations, This Easy Ice Cream Sandwich Cake Is My Favorite No-Bake Summer Dessert is another crowd-pleasing option that keeps the easy-prep theme going.
And if you want to add a smaller sweet bite to the table, These Chocolate Chip Cookie Bites Are My Favorite Little Treat to Bake Anytime are a great contrast to the creamy cones.
Nutritional Information Per Serving
Approximate nutrition per serving, based on 8 cones:
- Calories: 260
- Protein: 4g
- Carbohydrates: 32g
- Fat: 13g
- Saturated Fat: 7g
- Sugar: 20g
- Fiber: 1g
- Sodium: 210mg
These values can vary depending on the cones, pudding mix, and toppings you use.
Storage and Leftover Tips
The filling can be made ahead and stored in an airtight container in the refrigerator for up to 2 days. That makes party prep much easier since you can simply fill the cones closer to serving time.
Once assembled, the cones are best enjoyed the same day. The longer they sit, the softer the cone will become. If you know you will not serve them all at once, keep the filling chilled separately and assemble only as many cones as you need.
If you end up with extra filling, do not let it go to waste. Spoon it into small cups, top with crushed vanilla wafers, and enjoy it like a banana cheesecake pudding parfait.
More Recipes You Will Love
If fun, easy desserts are your thing, there are plenty of other sweet ideas worth saving. This Edible Cookie Dough Is My Favorite No-Bake Treat for Late-Night Cravings is a great choice when you want something indulgent without turning on the oven.
For a classic dessert vibe, This Big Family Banana Pudding Is My Favorite Classic Dessert to Feed a Crowd is an obvious next pick. And if you want another easy dessert that is always party-friendly, This No-Bake Oreo Cream Pie Is My Favorite Quick Dessert Hack is one of those recipes that never stays on the table for long.
Final Thoughts
Banana Cheesecake Pudding Cones are the kind of dessert that instantly makes people smile. They are creamy, crunchy, sweet, and full of nostalgic banana flavor, but the cone presentation makes them feel fresh and playful at the same time.
They are easy enough for beginners, fun enough for parties, and tasty enough to earn a permanent spot in your no-bake dessert rotation. Once you make them, do not be surprised if everyone starts requesting them for every gathering.
Share your results in the comments, let me know how you topped yours, and follow along for more creative comfort-food desserts from Jason Griffith at Chef Maniac.