Chocolate Peanut Butter Dream Casserole – The No-Bake Dessert Everyone Wants Seconds Of
Print it, save it, or add it to your recipe binder.
Chocolate Peanut Butter Dream Casserole
Author: Jason Griffith
Prep Time: 20 minutes
Chill Time: 4 hours
Total Time: 4 hours 20 minutes
Yield: 9–12 servings
Category: Dessert
Method: No-Bake
Cuisine: American
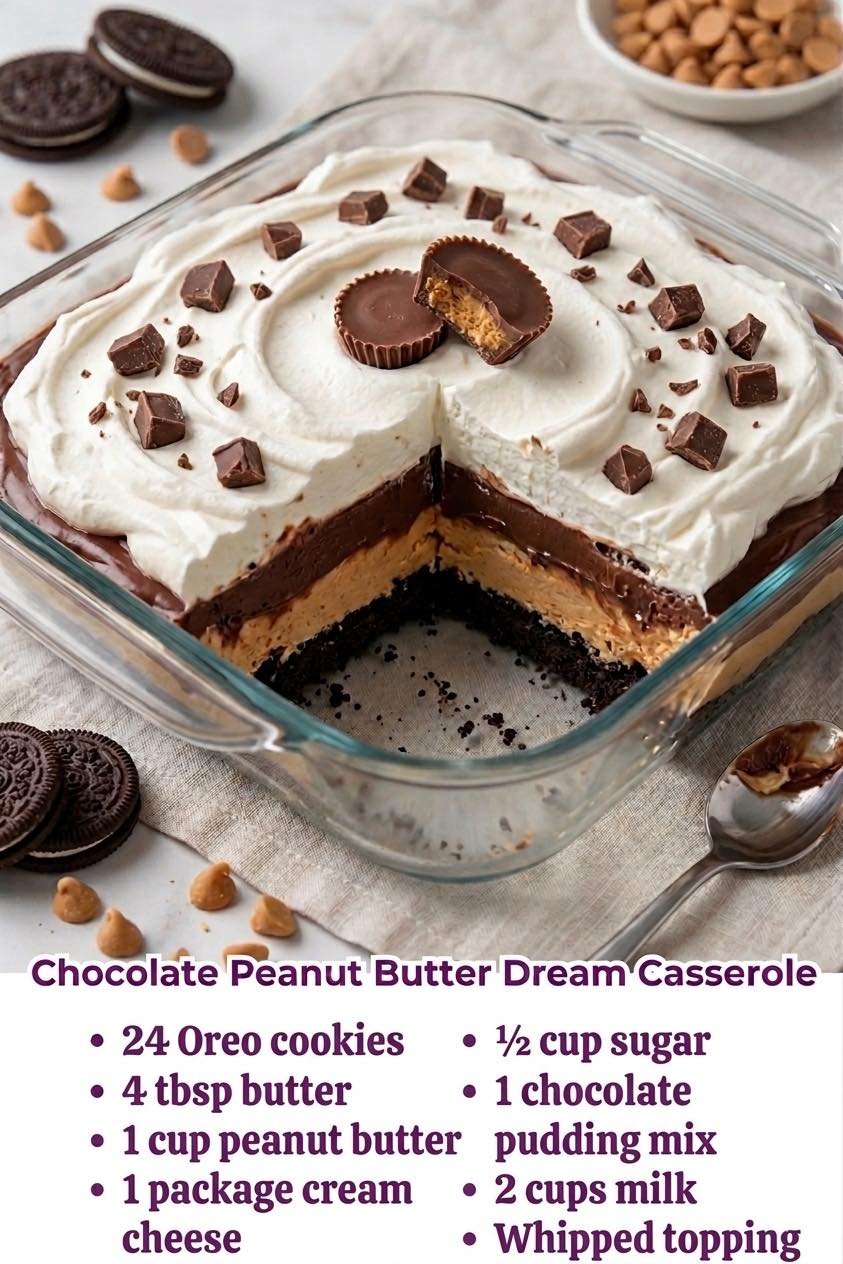
If there’s one kind of dessert that never fails to get attention at a party, it’s a layered, creamy, no-bake treat loaded with chocolate and peanut butter. This Chocolate Peanut Butter Dream Casserole checks every box. It starts with a buttery Oreo crust, gets piled high with a rich peanut butter cheesecake-style layer, then finishes with cool chocolate pudding, fluffy whipped topping, and a final sprinkle of crushed cookies for extra texture.
This is the kind of dessert that feels nostalgic in the best way. It’s easy, crowd-friendly, and made with simple ingredients that come together into something that tastes far more indulgent than the effort required. Whether you’re bringing dessert to a potluck, making something fun for a holiday table, or just need a guaranteed hit for a family gathering, this recipe delivers every time.
Why I Love This Recipe
I love this recipe because it gives you all the big dessert satisfaction of a layered pie or icebox cake without any baking stress. It’s rich and creamy, but still easy to assemble. Every layer brings something different to the table: the Oreo crust adds crunch and chocolate flavor, the peanut butter cream cheese filling gives it a tangy richness, and the pudding layer keeps the whole thing smooth and luscious.
It’s also the kind of recipe that works for nearly any occasion. You can make it ahead, keep it chilled, and slice it when you’re ready to serve. That alone makes it a great entertaining dessert. And because chocolate and peanut butter are one of those universally loved combinations, it tends to disappear fast.
Ingredients
Here’s what you’ll need to make this easy dessert casserole:
- 24 Oreo cookies
- 4 tablespoons butter, melted
- 1 cup peanut butter
- 1 package cream cheese, softened
- 1/2 cup sugar
- 1 package chocolate pudding mix
- 2 cups milk
- Whipped topping
- Extra crushed Oreos, for topping if desired
Swaps and Notes
This dessert is wonderfully flexible, which is part of why it’s such a keeper. Regular creamy peanut butter works best for that smooth filling, but you can use a slightly chunky peanut butter if you want a little added texture. Just keep in mind that the filling will be less silky.
If you want an even richer chocolate flavor, use a dark chocolate pudding mix. If you like your desserts a little less sweet, use less whipped topping on top and let the peanut butter and chocolate layers do most of the work. You can also use chocolate sandwich cookies from another brand if that’s what you have on hand, but Oreo-style cookies give the most classic result.
For presentation, this recipe looks especially good in a glass baking dish where the layers can really show off. If you’re serving it for a holiday or special occasion, a drizzle of melted peanut butter or chocolate over the whipped topping can make it feel even more dessert-table worthy.

Chocolate Peanut Butter Dream Casserole – The No-Bake Dessert Everyone Wants Seconds Of
If there’s one kind of dessert that never fails to get attention at a party, it’s a layered, creamy, no-bake treat loaded with chocolate and peanut butter. This
Prep: 20 min | Cook: min | Total: 4 min
Servings: 9–12 servings
Ingredients
- 24 Oreo cookies
- 4 tablespoons butter, melted
- 1 cup peanut butter
- 1 package cream cheese, softened
- 1/2 cup sugar
- 1 package chocolate pudding mix
- 2 cups milk
- Whipped topping
- Extra crushed Oreos, for topping if desired
Instructions
- Crush the : Oreo cookies into fine crumbs. You can do this in a food processor or by placing them in a zip-top bag and crushing them with a rolling pin.
- Mix the cookie crumbs with the melted butter until evenly combined.
- Press the mixture firmly into the bottom of a casserole dish or square baking dish to form the crust. Place it in the refrigerator to firm up while you prepare the next layer.
- In a mixing bowl, beat the softened cream cheese, sugar, and peanut butter together until smooth and creamy.
- Spread the peanut butter mixture evenly over the chilled Oreo crust.
- In a separate bowl, whisk the chocolate pudding mix with the milk until thickened.
- Spread the pudding evenly over the peanut butter layer.
- Top everything with a generous layer of whipped topping.
- Finish with crushed : Oreos sprinkled over the top.
- Chill for at least 4 hours before slicing and serving.
Nutrition
- Calories: 350–450
- Fat: 22–30g
- Carbs: 30–38g
- Protein: 6–9g
Rate This Recipe
Average Rating: 0 (0 votes)
How to Make Chocolate Peanut Butter Dream Casserole
- Crush the Oreo cookies into fine crumbs. You can do this in a food processor or by placing them in a zip-top bag and crushing them with a rolling pin.
- Mix the cookie crumbs with the melted butter until evenly combined.
- Press the mixture firmly into the bottom of a casserole dish or square baking dish to form the crust. Place it in the refrigerator to firm up while you prepare the next layer.
- In a mixing bowl, beat the softened cream cheese, sugar, and peanut butter together until smooth and creamy.
- Spread the peanut butter mixture evenly over the chilled Oreo crust.
- In a separate bowl, whisk the chocolate pudding mix with the milk until thickened.
- Spread the pudding evenly over the peanut butter layer.
- Top everything with a generous layer of whipped topping.
- Finish with crushed Oreos sprinkled over the top.
- Chill for at least 4 hours before slicing and serving.
Tips for Success
The biggest key to success with this dessert is making sure each layer is smooth and evenly spread. Softened cream cheese is especially important here. If it’s too cold, it won’t blend properly with the peanut butter and sugar, and your filling can turn lumpy.
It also helps to chill the crust for a few minutes before adding the filling so it firms up and holds together better when sliced. When spreading the peanut butter layer over the crust, do it gently so you don’t pull up the cookie base. An offset spatula or the back of a spoon works really well for this.
And don’t rush the chill time. This dessert needs time in the refrigerator to fully set so the layers hold together cleanly when served. If you can make it the night before, even better.
Serving Suggestions and Pairings
This dessert is rich, cool, and creamy, so it pairs beautifully with coffee, cold milk, or even a simple scoop of vanilla ice cream if you really want to lean into the indulgence. Because it’s a chilled dessert, it’s especially good for warm-weather gatherings, but honestly, it works year-round.
If you love chocolate and peanut butter desserts, you should absolutely check out The Best Peanut Butter Brownies I’ve Ever Made—and I’ve Made a Lot and These No-Bake Peanut Butter Oatmeal Bars Are My Favorite Snack to Keep on Hand.
For more easy dessert-table favorites, pair this with This No-Bake Oreo Cream Pie Is My Favorite Quick Dessert Hack, This Brownie Batter Dip Is My Favorite No-Bake Dessert for Instant Chocolate Cravings, or These Chocolate Chip Cookie Dough Brownie Bombs Are My Favorite Sweet Obsession.
Nutritional Information Per Serving
Nutritional values will vary depending on the brands you use, the amount of whipped topping added, and the size of each slice, but here’s a general estimate per serving:
- Calories: 350–450
- Fat: 22–30g
- Carbohydrates: 30–38g
- Sugar: 20–28g
- Protein: 6–9g
Because this is a rich layered dessert, a modest square goes a long way.
Storage and Leftover Tips
Store leftovers covered in the refrigerator for up to 4 days. This dessert actually holds up very well, which makes it perfect for making ahead. In fact, the texture is often even better after it’s had several hours to chill fully.
If you want to freeze it, you can. Slice it first, then freeze individual portions in airtight containers. Let them thaw in the refrigerator before serving. The texture of the whipped topping may change slightly after freezing, but it will still taste delicious.
More Recipes You Will Love
If this Chocolate Peanut Butter Dream Casserole sounds like your kind of dessert, here are a few more Chef Maniac recipes to add to your must-make list:
- The Best Peanut Butter Brownies I’ve Ever Made—and I’ve Made a Lot
- This No-Bake Oreo Cream Pie Is My Favorite Quick Dessert Hack
- This Brownie Batter Dip Is My Favorite No-Bake Dessert for Instant Chocolate Cravings
- These No-Bake Peanut Butter Oatmeal Bars Are My Favorite Snack to Keep on Hand
- These Chocolate Chip Cookie Dough Brownie Bombs Are My Favorite Sweet Obsession
Final Thoughts
Chocolate Peanut Butter Dream Casserole is exactly the kind of dessert the name promises: dreamy, creamy, chocolatey, and completely satisfying. It’s easy to make, easy to serve, and almost impossible to stop sneaking bites of from the fridge.
Whether you bring it to a gathering or keep it all to yourself for a few days of chilled dessert bliss, it’s one of those recipes that earns repeat requests fast. And honestly, any dessert built on Oreos, peanut butter, pudding, and whipped topping already knows it’s going to be a hit.