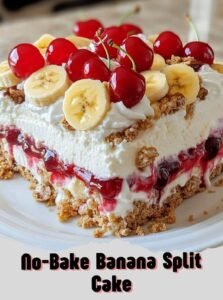
No-Bake Banana Split Cake Recipe: All the Flavors of a Classic Sundae in One Dish
Print it, save it, or add it to your recipe binder.
Introduction
There is something undeniably magical about a classic banana split. The combination of cold cream, ripe fruit, and that signature chocolate drizzle hits every nostalgia nerve I have. But let’s be honest: trying to serve individual banana splits to a crowd is a logistical nightmare. By the time you’ve finished the fourth bowl, the first one is a puddle of rainbow-colored soup.
That is exactly why this No-Bake Banana Split Cake is a permanent fixture in my recipe tin. It captures every single iconic layer of the soda fountain classic—the buttery crust, the creamy center, and the trifecta of fruit—but serves it up in easy-to-cut squares. It’s the ultimate “icebox cake” style dessert that requires absolutely zero oven time, making it a lifesaver for hot summer days or busy holiday weekends.
Why I Love This Recipe
If you’ve followed my work here at Chefmaniac, you know I’m a sucker for a good “hack.” This recipe is essentially the Swiss Army knife of desserts. Here is why it’s a winner:
- Zero Baking Required: When the temperature climbs, the last thing I want to do is turn on the oven. Like my easy ice cream sandwich cake, this stays cool from start to finish.
- Make-Ahead Friendly: This cake actually needs time to sit. The flavors meld together and the crust softens just enough to create a perfect bite.
- Texture Overload: You get the crunch of the graham crackers, the velvety cream cheese, the snap of fresh strawberries, and the juicy burst of pineapple.
- Visually Stunning: When you pull this out of the fridge, the vibrant layers and the cherry on top make it look like you spent hours in the kitchen, even though it’s incredibly simple to assemble.
The Ingredients
To make this masterpiece, you’ll need to gather a few pantry staples and a trip to the produce aisle.
- 2 cups Graham Cracker Crumbs: For that classic, sandy base.
- 1/2 cup Unsalted Butter: Melted to bind the crust.
- 8 oz Cream Cheese: Make sure it is softened to room temperature for a smooth filling.
- 1/4 cup Granulated Sugar: To sweeten the base layer.
- 1 cup Powdered Sugar: For the fluffy texture of the filling.
- 1 tsp Vanilla Extract: Pure vanilla is always best!
- 4 Bananas: Sliced into rounds.
- 20 oz Crushed Pineapple: Be sure to drain this very well (more on that later).
- 16 oz Strawberries: Sliced into thin rounds or halves.
- 12 oz Whipped Topping: Like Cool Whip, thawed.
- Garnishes: Chocolate syrup, maraschino cherries, and chopped nuts (walnuts or pecans work great).
Swaps and Notes
- The Crust: If you want an even deeper chocolate flavor, swap the graham crackers for crushed Oreo cookies.
- The Fruit: While bananas, pineapple, and strawberries are the “traditional” trio, feel free to add blueberries for a patriotic twist.
- Dairy-Free: You can use a vegan cream cheese and a coconut-based whipped topping if you have dietary restrictions.
- The Pineapple Tip: This is the most important note—drain your pineapple thoroughly. I usually put it in a fine-mesh sieve and press down with a spoon. If it’s too juicy, your cake will become soggy.
Step-by-Step Instructions
1. Prepare the Crust
In a medium bowl, mix the graham cracker crumbs and melted butter until it feels like wet sand. Press the mixture firmly into the bottom of a 9×13 inch baking dish. I like to use the bottom of a measuring cup to get a flat, even surface. Place this in the refrigerator to set while you work on the next step.
2. Make the Filling
In a large mixing bowl, beat the softened cream cheese and granulated sugar until smooth. Gradually add the powdered sugar and vanilla extract. Beat until the mixture is light and airy. Spread this evenly over your chilled crust using an offset spatula.
3. Add the Fruit Layers
Now comes the fun part! Layer the sliced bananas directly onto the cream cheese. Follow with the well-drained crushed pineapple, spreading it to the edges. Finally, add a beautiful layer of sliced strawberries.
4. Top and Garnish
Spread the whipped topping over the strawberries, sealing the fruit inside. Drizzle generously with chocolate syrup, sprinkle with nuts, and dot with maraschino cherries for that iconic look.
5. Chill and Serve
Cover with plastic wrap and refrigerate for at least 2 hours. This gives the layers time to “set” so you get clean slices.
Tips for Success
- Softened Cream Cheese: If your cream cheese is cold, you will end up with lumps. If you’re in a rush, microwave the unwrapped block for 15-20 seconds.
- The Banana Barrier: I like to place the bananas directly on the cream cheese layer. The cream cheese helps protect them from air, which slows down the browning process.
- Sharp Knife: Use a long, sharp knife to cut the squares, and wipe the blade between slices for that “pro” look.
Serving Suggestions and Pairings
This cake is quite rich, so I love serving it with something refreshing. A glass of cold blueberry lemonade is the perfect tart counterpoint to the sweet cream.
If you are hosting a large gathering and want a full “no-bake” spread, you could also serve this alongside some brownie batter dip and fresh fruit skewers.
Nutritional Information (Per Serving)
Estimate based on 15 servings
- Calories: 345 kcal
- Total Fat: 18g
- Carbohydrates: 42g
- Sugars: 28g
- Protein: 4g
Storage and Leftover Tips
Keep this cake refrigerated at all times. Because of the fresh bananas and strawberries, it is best enjoyed within 2-3 days. After that, the bananas may begin to soften too much. I do not recommend freezing this cake, as the texture of the fresh strawberries and pineapple will change significantly once thawed.
More Recipes You Will Love
If you enjoyed this fruity, creamy dessert, you have to try these other fan favorites from the site:
- Big Family Banana Pudding – Another classic that feeds a whole army!
- Chocolate Chip Oatmeal Breakfast Cookies – For when you want something sweet but a little more substantial for the morning.
Final Thoughts
This No-Bake Banana Split Cake is more than just a recipe; it’s a memory-maker. Whether it’s a birthday, a potluck, or just a Tuesday where you need a win, this dish delivers every single time.
Did you try this recipe? I’d love to hear how it turned out! Drop a comment below or tag us on social media. Your feedback helps me create better content for the Chefmaniac community! Don’t forget to follow us for more easy, delicious home-cooked inspiration.
No-Bake Banana Split Cake Recipe: All the Flavors of a Classic Sundae in One Dish
If you've followed my work here at Chefmaniac, you know I’m a sucker for a good "hack." This recipe is essentially the Swiss Army knife of desserts. Here is why it’s a winner:
Prep: min | Cook: min | Total: min
Servings:
Ingredients
- 2 cups Graham Cracker Crumbs: For that classic, sandy base.
- 1/2 cup Unsalted Butter: Melted to bind the crust.
- 8 oz Cream Cheese: Make sure it is softened to room temperature for a smooth filling.
- 1/4 cup Granulated Sugar: To sweeten the base layer.
- 1 cup Powdered Sugar: For the fluffy texture of the filling.
- 1 tsp Vanilla Extract: Pure vanilla is always best!
- 4 Bananas: Sliced into rounds.
- 20 oz Crushed Pineapple: Be sure to drain this very well (more on that later).
- 16 oz Strawberries: Sliced into thin rounds or halves.
- 12 oz Whipped Topping: Like Cool Whip, thawed.
- Garnishes: Chocolate syrup, maraschino cherries, and chopped nuts (walnuts or pecans work great).
Instructions
Nutrition
- Calories: 345 kcal
- Fat: 18g
- Carbs: 42g
- Protein: 4g
Rate This Recipe
Average Rating: 5 (2 votes)