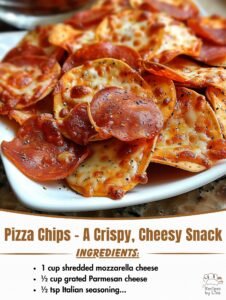
2-Ingredient Keto Pizza Chips: The Ultimate Crispy Low-Carb Snack
Print it, save it, or add it to your recipe binder.
Introduction
If you are following a ketogenic lifestyle or just looking for a way to slash carbs without sacrificing flavor, you know that the “crunch factor” is often the hardest thing to replace. Enter the 2-Ingredient Pizza Chips. This recipe is a total game-changer for anyone who misses the salty, savory bite of a traditional thin-crust pizza but wants to stay in ketosis.
I’m Jason Griffith, and here at Chefmaniac, I’m always on the hunt for snacks that deliver maximum satisfaction with minimal effort. These chips aren’t just a “substitute”—they are a legitimate powerhouse snack that stands on its own. With only two main ingredients and about 10 minutes of your time, you can transform simple mozzarella and pepperoni into a crispy, golden treat that rivals any bagged potato chip.
Why I Love This Recipe
There are a few reasons why this has skyrocketed into my top five favorite keto snacks:
- Zero Prep Work: You don’t have to chop, sauté, or marinate anything. It’s a “pile and bake” situation.
- Macro-Friendly: At only 1g of net carbs per serving, it fits perfectly into almost any diet plan, especially for those focusing on high protein and healthy fats.
- The Crunch: When baked correctly, the mozzarella lace hardens into a crisp shell that perfectly complements the spicy, chewy pepperoni.
- Kid-Approved: Even if you aren’t keto, these taste like the “burnt cheese” edges of a lasagna, which—let’s be honest—is everyone’s favorite part.
Ingredients
To make these pizza chips, you only need two base ingredients, plus whatever seasonings your heart desires:
- 8 tbsp Shredded Mozzarella: Low-moisture part-skim mozzarella works best for achieving a crisp texture.
- 8 Slices Pepperoni: Use standard sandwich-style or mini pepperonis (if using mini, use 3 per chip).
- Seasonings (Optional but recommended): Dried oregano, Italian seasoning, garlic powder, or red pepper flakes.
Swaps and Notes
- The Cheese: While mozzarella is classic, you can swap it for sharp cheddar or Monterey Jack for a different flavor profile. Just ensure it is shredded cheese, as slices don’t crisp up quite the same way in small piles.
- The Meat: Not a fan of pepperoni? Try a small piece of cooked bacon or a thin slice of Canadian bacon.
- Salt Secret: As noted in the instructions, adding a tiny pinch of salt or Italian seasoning helps draw out moisture, making the chips less greasy and extra crispy.
- The Wrap Alternative: If you love easy, low-carb swaps like this, you should also check out this 3-ingredient egg wrap for your morning routine.
Step-by-Step Instructions
- Prep the Oven: Preheat your oven to 350°F (175°C). Line a large baking sheet with parchment paper. This is crucial—if you bake these directly on the metal, they will stick!
- Build the Piles: Create 8 even piles of shredded mozzarella on the parchment paper (approx. 1 tbsp per pile). Space them at least 2 inches apart as the cheese will spread.
- Top it Off: Place one pepperoni slice in the center of each cheese pile. Press down slightly so it’s embedded.
- Season: Sprinkle your Italian seasoning or oregano over the top.
- Bake: Slide the tray into the oven and bake for 7 minutes.
- The Crisp Factor: For extra crunch, turn the broiler on for the last 60–90 seconds. Watch them like a hawk! You want them golden brown, not black.
- Cool and Set: Remove from the oven. Let them sit on the tray for at least 2–3 minutes. They will “crisp up” as they cool.
Tips for Success
- Parchment is King: Do not use aluminum foil unless it is heavily greased, and even then, parchment paper is the superior choice for cheese chips.
- Don’t Overcrowd: If the cheese piles touch, they will fuse into one giant pizza sheet. While still delicious, it’s harder to eat as “chips.”
- Drain the Grease: If your pepperoni is particularly oily, you can blot the tops with a paper towel immediately after taking them out of the oven.
Serving Suggestions and Pairings
These chips are fantastic on their own, but they also make a great addition to a larger spread. If you are hosting a party, try serving them alongside:
- Dipping Sauce: Serve with a side of low-sugar marinara or a zesty ranch.
- Appetizer Spread: These fit right in next to this baked kosher salami for a high-protein snack platter.
- Party Favorites: If you’re looking for more “handheld” party ideas, these pair well with the vibe of this walking taco bar.
Nutritional Information (Per Serving)
Serving size: 4 chips. Recipe makes 2 servings.
| Metric | Amount |
| Calories | 130 |
| Fat | 10g |
| Protein | 9g |
| Net Carbs | 1g |
| Fiber | 0g |
Export to Sheets
Storage and Leftover Tips
These are best enjoyed fresh and warm. However, if you have leftovers:
- Storage: Keep them in an airtight container at room temperature for up to 24 hours, or in the fridge for 3 days.
- Re-Crisping: If they get soft, pop them back into a toaster oven or air fryer at 350°F for 1–2 minutes. Avoid the microwave, as it will make them rubbery.
More Recipes You Will Love
If you enjoyed this quick and easy snack, you might also like these other crowd-pleasers from the Chefmaniac kitchen:
- For a fun twist on nachos, try these Totchos (Tater Tot Nachos).
- Need a sweet treat that’s easy to grab? Check out these no-bake monster cookie energy balls.
Final Thoughts
These 2-ingredient pizza chips prove that you don’t need a long list of ingredients to create something spectacular. They satisfy that primal craving for pizza in a fraction of the time and with none of the “carb coma” afterward.
Did you try these? I’d love to hear what seasonings you used! Drop a comment below or tag us on social media with your creations. Don’t forget to follow Chefmaniac for more easy, delicious recipes delivered straight to your feed.
2-Ingredient Keto Pizza Chips: The Ultimate Crispy Low-Carb Snack
If you are following a ketogenic lifestyle or just looking for a way to slash carbs without sacrificing flavor, you know that the "crunch factor" is often the hardest thing to replace. Enter the
Prep: min | Cook: min | Total: min
Servings:
Ingredients
- 8 tbsp Shredded Mozzarella: Low-moisture part-skim mozzarella works best for achieving a crisp texture.
- 8 Slices Pepperoni: Use standard sandwich-style or mini pepperonis (if using mini, use 3 per chip).
- Seasonings (Optional but recommended): Dried oregano, Italian seasoning, garlic powder, or red pepper flakes.
Instructions
Nutrition
- Calories:
- Fat:
- Carbs:
- Protein:
Rate This Recipe
Average Rating: 0 (0 votes)