DIY Dried Kiwi Slices: Naturally Sweet & Zesty Treat
Print it, save it, or add it to your recipe binder.
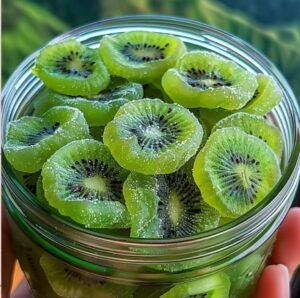
Get ready to enjoy a sweet and tangy snack with these incredible Homemade Dried Kiwi Slices! Perfect for on-the-go munching, adding to trail mix, or garnishing desserts, these chewy fruit slices are bursting with concentrated kiwi flavor. It’s a surprisingly easy and healthy way to preserve and enjoy this vibrant fruit, whether you use a dehydrator or your oven.
Why I Love This Recipe
These Homemade Dried Kiwi Slices are an absolute gem for healthy snacking, and I absolutely adore them! What I love most is how effortlessly they transform fresh kiwis into a chewy, intensely flavorful treat that’s perfect for satisfying a sweet craving without any added refined sugars (unless you add optional lemon juice). The simple process, whether in a dehydrator or a low oven, concentrates the kiwi’s natural sweetness and tang. And that little touch of lemon juice to prevent browning is a brilliant trick that truly enhances their vibrant color and zest! They’re a fantastic, portable snack, a great addition to breakfasts, and a wonderful way to enjoy kiwi all year round.
Ingredients
Here’s what you’ll need to create these delicious Homemade Dried Kiwi Slices:
- 5-6 ripe kiwis
- Optional: 1-2 teaspoons lemon juice (freshly squeezed)
Swaps and Notes
- Kiwis: Choose ripe but firm kiwis. They should yield slightly to gentle pressure. Green kiwis are standard, but golden kiwis can also be dried.
- Lemon Juice (Optional): This helps prevent the kiwi slices from browning during the drying process, maintaining their vibrant green color, and adds a touch of extra tang. Don’t use too much, just a light brush.
- Dehydrator: A food dehydrator with adjustable temperature settings is ideal for consistent and efficient drying.
- Oven: If using an oven, it’s crucial to use its lowest possible temperature setting and keep the door slightly ajar to allow moisture to escape and air to circulate.
- Parchment Paper: Essential for preventing slices from sticking to the baking sheet, especially in an oven.
- Even Slices: Slicing the kiwis into consistent 1/4-inch rounds is key for even drying. A mandoline can help achieve this.
DIY Dried Kiwi Slices: Naturally Sweet & Zesty Treat
Get ready to enjoy a sweet and tangy snack with these incredible
Prep: min | Cook: min | Total: min
Servings:
Ingredients
- 5-6 ripe kiwis
- Optional: 1-2 teaspoons lemon juice (freshly squeezed)
Instructions
- Let's get these delicious : Homemade Dried Kiwi Slices drying!
- Prepare the : Kiwis: Start by peeling the 5-6 ripe kiwis. Using a sharp knife or a mandoline (for consistency), slice them into even 1/4-inch thick rounds. This uniform thickness is important for them to dry at the same rate.
- Add : Lemon Juice (Optional Zing & Color): If you want to add a little extra zing and help prevent browning, lightly brush both sides of the kiwi slices with lemon juice. Trust me, that touch of tang makes a difference and helps retain their vibrant green color!
- Arrange : Slices: Lay the kiwi slices out on a dehydrator tray or a baking sheet lined with parchment paper. Make sure to leave a little space between each piece to allow for proper air circulation during drying. Do not overlap them.
- Dehydrator : Method (Option 1): If you're using a food dehydrator, set it to 135°F (57°C). Let those delicious slices dry for about 4-6 hours. Check them periodically. The drying time can vary depending on the thickness of your slices, the humidity in your environment, and your dehydrator model. Continue drying until they’re perfectly dried – chewy and pliable but free of any moisture when pressed.
- Oven : Drying Method (Option 2): If using an oven, preheat it to its lowest setting (ideally around 140°F to 170°F, or as low as your oven goes). Place your baking sheet with the kiwi slices in the oven. It's crucial to prop the oven door open a little (you can use a wooden spoon) to allow moisture to escape and air to circulate, preventing the kiwis from just baking.
- Dry in : Oven: Dry for approximately 4-6 hours, flipping the slices halfway through (after 2-3 hours) to ensure they dry evenly on both sides. Continue drying until they are chewy and free of moisture when pressed. Again, drying times vary.
- Cool & : Store: Once the dried kiwi slices feel perfectly chewy and are free of moisture, remove them from the dehydrator or oven. Allow them to cool completely at room temperature on the rack/sheet before storing. Once fully cooled, store your dried kiwi slices in an airtight container in a cool, dry place.
- Enjoy your sweet and tangy homemade dried kiwi slices!
Nutrition
- Calories:
- Fat:
- Carbs:
- Protein:
Rate This Recipe
Average Rating: 0 (0 votes)
Directions
Let’s get these delicious Homemade Dried Kiwi Slices drying!
- Prepare the Kiwis: Start by peeling the 5-6 ripe kiwis. Using a sharp knife or a mandoline (for consistency), slice them into even 1/4-inch thick rounds. This uniform thickness is important for them to dry at the same rate.
- Add Lemon Juice (Optional Zing & Color): If you want to add a little extra zing and help prevent browning, lightly brush both sides of the kiwi slices with lemon juice. Trust me, that touch of tang makes a difference and helps retain their vibrant green color!
- Arrange Slices: Lay the kiwi slices out on a dehydrator tray or a baking sheet lined with parchment paper. Make sure to leave a little space between each piece to allow for proper air circulation during drying. Do not overlap them.
- Dehydrator Method (Option 1): If you’re using a food dehydrator, set it to 135°F (57°C). Let those delicious slices dry for about 4-6 hours. Check them periodically. The drying time can vary depending on the thickness of your slices, the humidity in your environment, and your dehydrator model. Continue drying until they’re perfectly dried – chewy and pliable but free of any moisture when pressed.
- Oven Drying Method (Option 2): If using an oven, preheat it to its lowest setting (ideally around 140°F to 170°F, or as low as your oven goes). Place your baking sheet with the kiwi slices in the oven. It’s crucial to prop the oven door open a little (you can use a wooden spoon) to allow moisture to escape and air to circulate, preventing the kiwis from just baking.
- Dry in Oven: Dry for approximately 4-6 hours, flipping the slices halfway through (after 2-3 hours) to ensure they dry evenly on both sides. Continue drying until they are chewy and free of moisture when pressed. Again, drying times vary.
- Cool & Store: Once the dried kiwi slices feel perfectly chewy and are free of moisture, remove them from the dehydrator or oven. Allow them to cool completely at room temperature on the rack/sheet before storing. Once fully cooled, store your dried kiwi slices in an airtight container in a cool, dry place.
Enjoy your sweet and tangy homemade dried kiwi slices!
Tips for Success
- Even Slices are Key: Uniform thickness ensures that all slices dry at the same rate. A mandoline is great for this.
- Pat Dry (Initial): Even before adding lemon juice, ensure the kiwis are reasonably dry after peeling.
- Lemon Juice for Color (and Taste): Don’t skip the lemon juice if you want vibrant green dried kiwis that aren’t brown. It also adds a nice tangy note.
- Air Circulation: Whether using a dehydrator or oven, proper airflow is vital to prevent steaming and encourage even drying. Don’t overcrowd the trays/sheets.
- Check for Doneness: The slices should be leathery and pliable, not brittle or sticky, and shouldn’t feel damp in the middle.
- Cool Completely Before Storing: Storing warm dried fruit can lead to condensation and spoilage.
Serving Suggestions and Pairings
Homemade Dried Kiwi Slices are a fantastic versatile snack or addition to:
- On-the-Go Snacking: A perfect healthy alternative to candy.
- Trail Mix: Add to your homemade trail mix for a sweet-tangy chew.
- Oatmeal or Yogurt: Stir into breakfast bowls for extra flavor and texture.
- Granola: Mix into homemade granola.
- Baking: Chop and add to muffins, cookies, or bread (like our This Chocolate Chip Banana Bread Is My Favorite Way To Use Up Overripe Bananas).
- Garnish: Use as a vibrant garnish for desserts or drinks (like our This Blueberry Lemonade Is My Favorite Refreshing Drink For Sunny Days).
- Cheese Boards: A unique addition to a cheese and fruit platter.
- For other incredibly popular, healthy, and easy-to-make snacks, consider our These No-Bake Monster Cookie Energy Balls Are My Favorite Snack To Keep On Hand or our These 3-Ingredient Chocolate Chip Oatmeal Breakfast Cookies Are My Morning Time Saver.
Storage and Leftover Tips
Properly dried kiwi slices have a good shelf life when stored correctly.
- Airtight Container: Store cooled dried kiwi slices in an airtight container (like a glass jar or plastic container) in a cool, dry, dark place (pantry or cupboard).
- Shelf Life: When stored correctly, they can last for up to 6 months to 1 year.
- Check Periodically: If you see any signs of moisture or mold, discard the batch.
- Freezing (Optional): For very long-term storage, dried fruit can be frozen in a freezer-safe bag or container for up to 1-2 years.
More Recipes You Will Love
If you loved the sweet, tangy, and healthy nature of these dried kiwi slices, you’ll definitely want to explore some of our other fantastic, fuss-free sweet treats and refreshing beverages:
- For a refreshing and easy drink, try our This Blueberry Lemonade Is My Favorite Refreshing Drink For Sunny Days.
- For a fun, sweet, dessert-inspired sipper, check out The Slippery Drank Is My Favorite Sweet Sipper For Dessert-Inspired Vibes.
- And for an incredibly indulgent chocolate treat, try our These Chocolate Chip Cookie Dough Brownie Bombs Are My Favorite Sweet Obsession.
Final Thoughts
These Homemade Dried Kiwi Slices are a brilliant solution for bringing a truly healthy, flavorful, and incredibly satisfying snack to your table with ease. They’re perfect for on-the-go munching, adding to your favorite foods, or simply enjoying the concentrated goodness of kiwi!
Give this recipe a try and let these delightful dried kiwis become your new favorite healthy snack! What’s your go-to fruit to dehydrate at home? Share your ideas and feedback in the comments below!