The Best Homemade Cherry Pie Filling (Fresh & Easy Recipe)

Print it, save it, or add it to your recipe binder.
There are certain moments in the year when ingredients are so perfect, so vibrant, that they barely need any help from us in the kitchen. Here in mid-June, that ingredient is the cherry. Sweet, tart, juicy, and ruby-red, fresh cherries are bursting from farmers’ market stands and grocery stores, and there is no better way to celebrate them than by making a batch of homemade cherry pie filling.
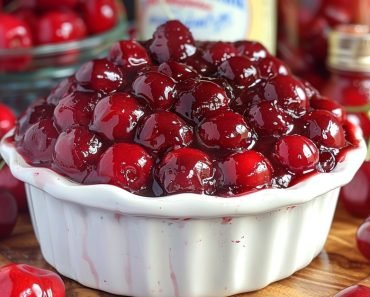
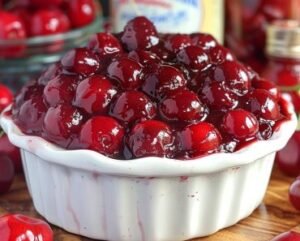
If you’ve only ever known the cloyingly sweet, one-note flavor from a can, you are in for a revelation. Making your own cherry pie filling from scratch is a simple process that yields a result that is worlds apart. It’s bright, bursting with authentic fruit flavor, and has a perfect, glossy thickness that’s never gummy. This recipe isn’t just a component; it’s a way to capture the absolute best of the season in a jar.
Why I Love This Recipe
First and foremost, the flavor is unbeatable. You control the sweetness and the tartness, allowing the true character of the cherries to shine. Second, it is incredibly easy. If you can stir ingredients in a pot, you can make this filling. The most time-consuming part is pitting the cherries, which is a small, worthy price to pay for the delicious outcome.
Finally, I adore its versatility. While it’s the heart and soul of a classic cherry pie, its usefulness doesn’t stop there. This glorious, ruby-red concoction is a superhero topping for cheesecakes, a decadent sauce for ice cream, a vibrant layer in trifles, and the perfect partner for your morning yogurt or waffles. Making a big batch during peak season means you can enjoy the taste of summer for weeks to come.
Ingredients
This recipe is simple, letting the fresh cherries be the star.
- 6 cups Fresh Cherries, pitted (about 2.5 – 3 lbs whole cherries)
- 3/4 to 1 cup Granulated Sugar (adjust based on cherry sweetness)
- 1/4 cup Cornstarch
- 1/4 cup Cold Water
- 2 tbsp Fresh Lemon Juice
- 1/2 tsp Almond Extract (optional, but highly recommended)
- Pinch of Salt
Swaps and Notes:
- Cherries: This is the perfect time of year for fresh sweet cherries like Bing or Rainier, or tart cherries like Morello or Montmorency. If using tart cherries, you’ll likely want to use the full cup of sugar, or even a bit more. If you can’t find fresh, 6 cups of frozen, pitted cherries work beautifully—no need to thaw them first.
- Sugar: The amount of sugar you need depends entirely on your cherries and your preference. Start with 3/4 cup, taste, and add more if needed.
- Thickener: Cornstarch creates a beautiful, clear, glossy filling. To use it properly, you must first dissolve it in cold water to make a “slurry,” which prevents lumps.
- Almond Extract: This is my secret weapon. A small amount doesn’t make the filling taste overwhelmingly of almond; instead, it enhances and deepens the natural cherry flavor in a magical way.
Step-by-Step Instructions
- Pit the Cherries: If using fresh cherries, remove the stems and pits. A cherry pitter is a fantastic tool that makes this job go much faster. This is the most labor-intensive step, so put on some music and get into the zone!
- Combine Ingredients: In a large saucepan or Dutch oven, combine the pitted cherries, sugar, and lemon juice. Stir to combine and place over medium heat.
- Cook the Cherries: Cook the mixture, stirring occasionally, for about 5-8 minutes. The cherries will start to release their juices, and the sugar will dissolve. The mixture should come to a gentle simmer.
- Make the Cornstarch Slurry: While the cherries are heating up, whisk together the cornstarch and the 1/4 cup of cold water in a small bowl until the cornstarch is completely dissolved and no lumps remain.
- Thicken the Filling: Once the cherry mixture is simmering and juicy, slowly pour the cornstarch slurry into the pot, stirring constantly. Continue to cook, stirring gently but constantly, for another 2-3 minutes. The filling will magically transform, becoming thick, bubbly, and glossy.
- Finish and Cool: Once the filling has thickened, remove it from the heat. Stir in the pinch of salt and the almond extract (if using). Transfer the filling to a heatproof bowl or jars and let it cool completely to room temperature. It will thicken even more as it cools.
Tips for Success
- Invest in a Cherry Pitter: I can’t recommend this enough. It will save you time and a very big mess. You can find simple, inexpensive models online or in kitchen supply stores.
- Don’t Skip the Slurry: Never dump cornstarch directly into a hot liquid, as it will clump up instantly. Dissolving it in cold water first is a non-negotiable step for a smooth filling.
- Taste Your Fruit: The single best tip for any fruit dessert is to taste your fruit first. If your cherries are exceptionally sweet, you can pull back on the sugar. If they’re very tart, you may need a bit more.
Serving Suggestions
The most obvious use is, of course, in a classic cherry pie. But don’t stop there!
- Spoon it over vanilla ice cream or pound cake.
- Use it as a topping for a New York-style cheesecake.
- Layer it in a parfait with yogurt and granola.
- Swirl it into brownie batter before baking.
- Serve it warm over pancakes, waffles, or French toast.
Storage and Leftover Tips
- Refrigerator: Once cooled, the cherry pie filling can be stored in an airtight container or jar in the refrigerator for up to 2 weeks.
- Freezer: This filling freezes beautifully! Let it cool completely, then transfer it to freezer-safe bags or containers. It will keep in the freezer for up to 6 months. Thaw it overnight in the refrigerator before using.
More Recipes You Will Love
If you’re in a baking mood, check out some of our other favorite from-scratch treats and easy desserts:
- For a fun, no-bake project, this Edible Cookie Dough is always a hit.
- For a perfect make-ahead holiday treat, try these Pecan Pie Bars.
- When you need to feed a crowd, nothing beats This Big Family Banana Pudding.
- For a quick and easy baked good, These Chocolate Chip Cookie Bites are perfect.
- And for a healthy, on-the-go snack, try These No-Bake Monster Cookie Energy Balls.
Final Thoughts
There is a deep satisfaction in taking a beautiful seasonal ingredient and turning it into something truly special. This Homemade Cherry Pie Filling is summer in a jar. It’s a simple recipe that will make all your desserts taste infinitely better. So please, take advantage of this beautiful season, grab a few pounds of fresh cherries, and make a batch. You’ll be so glad you did.
I’d love to hear all the delicious ways you use it! Let me know in the comments below.
The Best Homemade Cherry Pie Filling (Fresh & Easy Recipe)
This recipe is simple, letting the fresh cherries be the star.
Prep: min | Cook: min | Total: min
Servings:
Ingredients
Instructions
- Pit the : Cherries: If using fresh cherries, remove the stems and pits. A cherry pitter is a fantastic tool that makes this job go much faster. This is the most labor-intensive step, so put on some music and get into the zone!
- Combine : Ingredients: In a large saucepan or Dutch oven, combine the pitted cherries, sugar, and lemon juice. Stir to combine and place over medium heat.
- Cook the : Cherries: Cook the mixture, stirring occasionally, for about 5-8 minutes. The cherries will start to release their juices, and the sugar will dissolve. The mixture should come to a gentle simmer.
- Make the : Cornstarch Slurry: While the cherries are heating up, whisk together the cornstarch and the 1/4 cup of cold water in a small bowl until the cornstarch is completely dissolved and no lumps remain.
- Thicken the : Filling: Once the cherry mixture is simmering and juicy, slowly pour the cornstarch slurry into the pot, stirring constantly. Continue to cook, stirring gently but constantly, for another 2-3 minutes. The filling will magically transform, becoming thick, bubbly, and glossy.
- Finish and : Cool: Once the filling has thickened, remove it from the heat. Stir in the pinch of salt and the almond extract (if using). Transfer the filling to a heatproof bowl or jars and let it cool completely to room temperature. It will thicken even more as it cools.
- Tips for Success: Invest in a Cherry Pitter: I can't recommend this enough. It will save you time and a very big mess. You can find simple, inexpensive models online or in kitchen supply stores.
- Don't : Skip the Slurry: Never dump cornstarch directly into a hot liquid, as it will clump up instantly. Dissolving it in cold water first is a non-negotiable step for a smooth filling.
- Taste : Your Fruit: The single best tip for any fruit dessert is to taste your fruit first. If your cherries are exceptionally sweet, you can pull back on the sugar. If they're very tart, you may need a bit more.
- Serving Suggestions: The most obvious use is, of course, in a classic cherry pie. But don't stop there!
- Spoon it over vanilla ice cream or pound cake.
- Use it as a topping for a : New York-style cheesecake.
- Layer it in a parfait with yogurt and granola.
- Swirl it into brownie batter before baking.
- Serve it warm over pancakes, waffles, or : French toast.
- Storage and Leftover Tips: Refrigerator: Once cooled, the cherry pie filling can be stored in an airtight container or jar in the refrigerator for up to 2 weeks.
- Freezer: This filling freezes beautifully! Let it cool completely, then transfer it to freezer-safe bags or containers. It will keep in the freezer for up to 6 months. Thaw it overnight in the refrigerator before using.
- More Recipes You Will Love: If you're in a baking mood, check out some of our other favorite from-scratch treats and easy desserts:
- For a fun, no-bake project, this : Edible Cookie Dough is always a hit.
- For a perfect make-ahead holiday treat, try these Pecan Pie Bars.
- When you need to feed a crowd, nothing beats : This Big Family Banana Pudding.
- For a quick and easy baked good, : These Chocolate Chip Cookie Bites are perfect.
- And for a healthy, on-the-go snack, try : These No-Bake Monster Cookie Energy Balls.
- Final Thoughts: There is a deep satisfaction in taking a beautiful seasonal ingredient and turning it into something truly special. This Homemade Cherry Pie Filling is summer in a jar. It’s a simple recipe that will make all your desserts taste infinitely better. So please, take advantage of this beautiful season, grab a few pounds of fresh cherries, and make a batch. You’ll be so glad you did.
- I’d love to hear all the delicious ways you use it! Let me know in the comments below.
Nutrition
- Calories:
- Fat:
- Carbs:
- Protein:
Rate This Recipe
Average Rating: 0 (0 votes)