🥧 Chocolate Pie: The Creamy Classic That Never Goes Out of Style
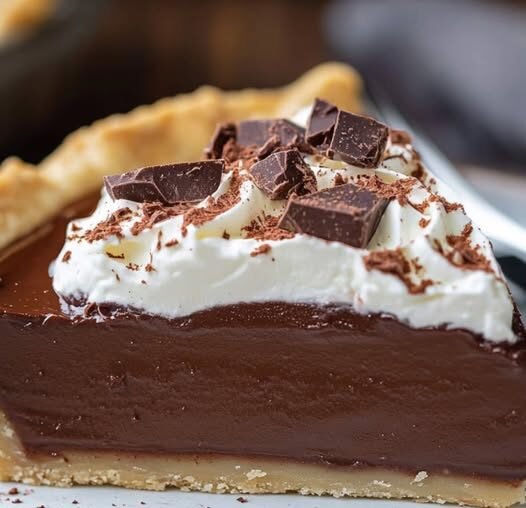
If you’re looking for a dessert that’s elegant, indulgent, and easy to make ahead, this Chocolate Pie delivers on all counts. With a smooth, velvety filling made from real chocolate and a fluffy whipped cream topping, it’s the kind of dessert that gets devoured at potlucks, birthdays, and holidays alike.
It’s made with pantry staples and can be served with a dusting of cocoa powder and chocolate shavings for a beautiful finish. Whether you use a homemade crust or a store-bought one, this pie will be the standout on your dessert table.
❤️ Why I Love This Recipe
- Rich and velvety filling made with real dark and semi-sweet chocolate
- Perfectly balanced sweetness with just a hint of salt and vanilla
- Can be made ahead – ideal for entertaining
- No special equipment required
- Always a crowd-pleaser, from family dinners to formal occasions
📝 Ingredients
For the Pie:
- 1 cup granulated sugar
- ¼ cup cornstarch
- ¼ tsp salt
- 3 cups whole milk
- 4 oz semi-sweet chocolate, chopped
- 4 oz dark chocolate, chopped
- 4 egg yolks, lightly beaten
- 2 tbsp unsalted butter
- 1 tsp vanilla extract
- 1 pre-made or homemade 9-inch pie crust, baked and cooled
For the Whipped Topping:
- 1 cup heavy whipping cream
- 2 tbsp powdered sugar
- 1 tsp cocoa powder, for dusting (optional)
- Chocolate shavings, for garnish (optional)
👨🍳 Step-by-Step Instructions
1️⃣ Pre-Bake the Crust
Bake your 9-inch pie crust according to the package or your favorite recipe. Let it cool completely before adding the filling.
2️⃣ Make the Chocolate Filling
In a medium saucepan over medium heat, whisk together:
- 1 cup sugar
- ¼ cup cornstarch
- ¼ tsp salt
- 3 cups milk
Stir continuously until the mixture thickens—about 5–7 minutes.
3️⃣ Add the Chocolate
Once thickened, remove from heat and stir in:
- 4 oz semi-sweet chocolate
- 4 oz dark chocolate
Stir until melted and smooth.
4️⃣ Temper the Eggs
In a small bowl, slowly whisk a few spoonfuls of the warm chocolate mixture into the 4 beaten egg yolks to temper.
Then pour the yolks back into the saucepan, stirring constantly.
Return to low heat and cook for 2 more minutes until thick and glossy.
5️⃣ Add Butter & Vanilla
Remove from heat and stir in:
- 2 tbsp butter
- 1 tsp vanilla extract
6️⃣ Assemble the Pie
Pour the chocolate filling into the cooled pie crust.
Smooth the top and refrigerate for at least 4 hours (or overnight) to set.
7️⃣ Make the Whipped Cream
In a cold mixing bowl, beat:
- 1 cup heavy cream
- 2 tbsp powdered sugar
Whip until stiff peaks form. Spread or pipe over the chilled pie.
8️⃣ Garnish & Serve
Sprinkle with cocoa powder and chocolate shavings if desired.
Slice, serve, and savor!
⏱ Quick Info
- Prep Time: 15 minutes
- Cook Time: 10 minutes
- Chilling Time: 4 hours
- Total Time: 4 hours 25 minutes
- Servings: 8
- Calories: ~420 per slice
💡 Tips for Success
- Tempering the egg yolks is key to avoid curdling—don’t rush this step.
- Use good quality chocolate for the richest flavor.
- Let it chill fully before slicing or it won’t hold its shape.
- Want a twist? Add a pinch of cinnamon or espresso powder to the filling.
🍽 Serving Suggestions & Pairings
Pair this creamy pie with bold or refreshing companions like:
- Brownie Batter Dip – for a chocolate overload
- No-Bake Oreo Cream Pie – another creamy pie to add to the dessert table
- Chocolate Chip Cookie Bites – for those who want finger foods
- Chocolate Oreo Hearts – perfect for holidays or parties
- Peanut Butter Brownies – rich, chewy, and perfect with a scoop of whipped cream
🧊 Storage Tips
- Refrigerate: Keep the pie in the fridge for up to 5 days, covered loosely with foil or plastic wrap.
- Freeze: You can freeze the pie without whipped cream for up to 2 months. Thaw in the fridge overnight and top fresh.
🍴 More Recipes You’ll Love
If this chocolate pie won your heart, try these sweet hits:
- No-Bake Oreo Cream Pie
- Brownie Batter Dip
- Peanut Butter Brownies
- Chocolate Chip Cookie Bites
- Chocolate Oreo Hearts
🥄 Final Thoughts
This Chocolate Pie is proof that sometimes the best desserts are the simplest. Rich, creamy, and deeply chocolatey, it’s a timeless favorite that’s easy to make and impossible to forget. Whether you’re hosting, gifting, or indulging solo, this pie is always a good idea.
Tried it? Tag us @ChefManiacKitchen and let us see your slice! For more dreamy desserts and crowd-pleasing classics, follow us for weekly sweet (and savory) inspiration.


Leave a Reply