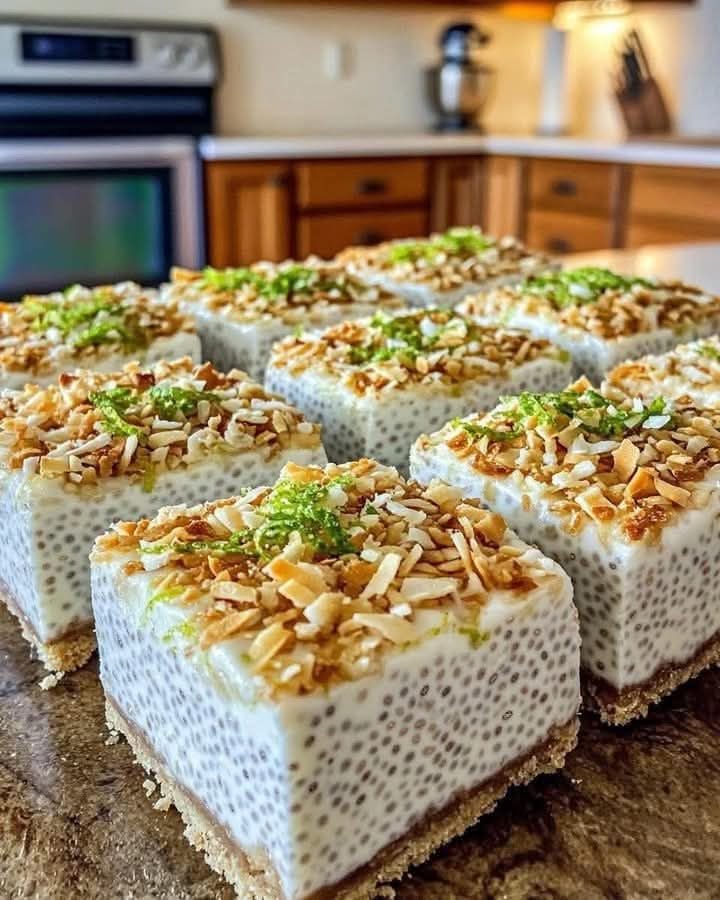
Refreshing No-Bake Chia Pudding Bars: Your Zesty Coconut Lime Delight for Summer!
Hey there, Jason Griffith here! As the summer of 2025 continues to bring its glorious warmth here in Marion, South Carolina, sometimes all you crave is a dessert that’s both incredibly refreshing and wonderfully healthy. And if you’re looking for a treat that’s bursting with bright, tropical flavors, creamy texture, and requires absolutely no baking, then these No-Bake Chia Pudding Bars with Zesty Coconut Lime Flavor are your new go-to! They’re light, satisfying, and perfect for summer gatherings or a sweet treat anytime.
Why I Love This Recipe
I’m a huge advocate for no-bake desserts that truly deliver on both flavor and convenience, and these Chia Pudding Bars perfectly embody that. What I particularly love about them is the incredible texture they achieve – creamy and smooth from the chia pudding, with a delightful pop from the chia seeds, and a satisfying crunch from the optional nut-and-coconut crust. The combination of rich coconut milk with zesty lime, brightened by a hint of vanilla and a touch of sweetness, is simply heavenly. They’re packed with healthy fats, fiber, and plant-based goodness, making them a guilt-free indulgence that feels totally decadent. Plus, they’re simple to make ahead, making party prep a breeze!
Ingredients
Here’s what you’ll need to create these refreshing and vibrant No-Bake Chia Pudding Bars:
For the Chia Pudding Base:
- 1 can (13.5 oz / 400ml) full-fat coconut milk (canned, not carton beverage)
- ½ cup / 80g chia seeds
- ¼ cup / 60ml maple syrup or agave nectar (adjust to taste)
- Zest of 1 large lime (freshly grated)
- Juice of ½ large lime (about 2 tbsp / 30ml, freshly squeezed)
- 1 teaspoon / 5ml vanilla extract
- Pinch of salt
Optional Crust (No-Bake):
- 1 cup / 140g almonds or cashews (raw, unsalted)
- ½ cup / 45g shredded unsweetened coconut
- ¼ cup / 45g Medjool dates, pitted (about 4-5 large dates)
- 1 tablespoon / 15ml melted coconut oil
- Pinch of salt
Topping:
- Toasted coconut flakes (for garnish)
- Extra lime zest (for garnish)
Swaps and Notes
- Full-Fat Coconut Milk: Essential for the creamy consistency of the chia pudding. Do not substitute with light coconut milk or coconut beverage from a carton, as it won’t set as well.
- Chia Seeds: These are the magic ingredient for thickening the pudding. They absorb liquid and create the gel-like texture.
- Sweetener: Maple syrup or agave nectar provides natural sweetness. Adjust quantity based on your preference.
- Lime Zest & Juice: Fresh lime zest and juice are crucial for the bright, zesty flavor. Don’t skip them!
- Vanilla Extract & Salt: Enhance the overall flavor.
- Crust Nuts: Almonds or cashews work well. You can use walnuts or pecans for a different flavor profile.
- Medjool Dates: Provide natural sweetness and bind the crust. If dry, soak them in warm water for 10 minutes, then drain before processing.
- Melted Coconut Oil (for crust): Helps bind the crust ingredients.
- Toppings: Toasted coconut flakes add a lovely crunch and visual appeal. Extra lime zest enhances the citrus aroma.
Directions
Making these Refreshing No-Bake Chia Pudding Bars is easy, with minimal effort and plenty of chilling time!
- Prepare the optional crust: If using, add the almonds/cashews, shredded unsweetened coconut, pitted Medjool dates, melted coconut oil, and pinch of salt to a food processor. Process until the mixture is finely ground and clumps together when pressed between your fingers. It should resemble wet sand. Press this mixture firmly and evenly into the bottom of an 8×8 inch (20×20 cm) pan that has been lined with parchment paper (leaving an overhang on the sides for easy lifting). Chill the pan in the refrigerator while you prepare the filling.
- Prepare the chia pudding filling: In a medium bowl, whisk together the full-fat coconut milk, chia seeds, maple syrup/agave, lime zest, lime juice, vanilla extract, and pinch of salt. Whisk well with a fork or whisk to prevent any clumps from forming.
- Set Chia Pudding: Let the chia pudding mixture sit at room temperature for 5-10 minutes. Then, whisk again thoroughly to break up any clumps that may have formed and to ensure the chia seeds are evenly distributed. This helps prevent a lumpy pudding.
- Pour & Spread: Pour the chia pudding mixture over the prepared crust (if using) or directly into the parchment-lined pan if you’re making crustless bars. Spread the mixture evenly with a spatula.
- Chill to Set: Cover the pan tightly with plastic wrap and refrigerate for at least 4 hours, or preferably overnight. The chia pudding needs to be very firm and set for easy slicing.
- Garnish & Cut: Once firm, lift the entire slab out of the pan using the parchment paper overhang. Sprinkle generously with toasted coconut flakes and extra lime zest.
- Cut into squares or bars using a sharp knife (running the knife under hot water and wiping it dry between cuts can help with clean slices).
- Store Leftovers: Store leftovers covered in the refrigerator for up to 4-5 days.
Recipe Information:
- Preparation Time: 20 mins
- Chilling Time: 4+ hours
- Total Time: 4 hrs 20 mins
- Calories per Serving: Approx. 250 (with crust)
- Number of Servings: 9 bars
Tips for Success
- Full-Fat Coconut Milk: This is crucial for creamy, well-set chia pudding bars.
- Whisk Chia Seeds Well: Whisking initially and again after 5-10 minutes helps prevent clumps and ensures an even set.
- Chill Thoroughly: The long chilling time is essential for the bars to firm up properly for clean slicing.
- Press Crust Firmly: If using the crust, press it down very firmly so it doesn’t crumble when cut.
- Adjust Sweetness: Taste the chia pudding mixture before chilling and adjust the maple syrup/agave to your preference.
- Fresh Lime: Fresh lime zest and juice make a huge difference in the brightness of this dessert.
Serving Suggestions and Pairings
These Refreshing No-Bake Chia Pudding Bars are perfect for a healthy and delicious snack, breakfast-on-the-go, or a light dessert. They’re fantastic for:
- Summer Gatherings: A refreshing, make-ahead treat for outdoor parties.
- Breakfast/Brunch: A wholesome and satisfying start to your day.
- Healthy Snack: A guilt-free way to curb sweet cravings.
- Post-Workout Treat: Packed with nutrients and energy.
Pair them with a refreshing cold drink like my Pina Colada Smoothie or a zesty This Blueberry Lemonade Is My Favorite Refreshing Drink for Sunny Days.
Storage and Leftover Tips
Store leftovers covered in an airtight container in the refrigerator for up to 4-5 days. These bars are also freezer-friendly! You can freeze them for up to 1 month. Wrap individual bars tightly in plastic wrap, then store in a freezer-safe bag. Thaw slightly in the refrigerator before enjoying.
More Recipes You Will Love
If you loved the refreshing, no-bake, and healthy nature of these bars, here are a few more delightful dessert recipes that I think you’ll absolutely love:
- For another incredibly easy and satisfying no-bake pie, check out my This No-Bake Oreo Cream Pie Is My Favorite Quick Dessert Hack.
- If you’re a fan of refreshing no-bake summer treats, my This Easy Ice Cream Sandwich Cake Is My Favorite No-Bake Summer Dessert is a must-try.
- For a fun, no-bake mint and chocolate dessert, my This Grasshopper Pie Is My Favorite No-Bake Dessert With a Mint Chocolate Twist is perfect.
- For a healthy-ish frozen fruit treat, my Frozen Chocolate-Covered Bananas are a great option for hot days.
- For another classic, fluffy, no-bake “salad” that’s a crowd-pleaser, don’t miss my Watergate Salad.
Final Thoughts
These Refreshing No-Bake Chia Pudding Bars with Zesty Coconut Lime Flavor are a true culinary gem – easy to make, incredibly healthy, and bursting with vibrant, tropical taste. They’re perfect for a guilt-free indulgence that feels totally decadent. Give them a chill, and enjoy this delightful summer treat!
What’s your favorite healthy ingredient to sneak into desserts? Share your ideas and feedback in the comments below, and don’t forget to follow Chef Maniac for more delightful and inspiring recipes!
Leave a Reply