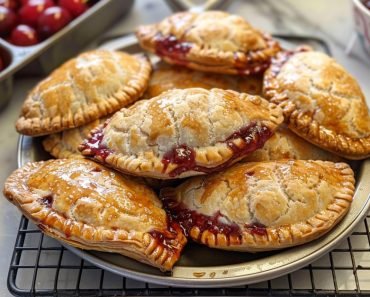
Hey there, Jason Griffith from Chef Maniac, and today we’re taking a beloved classic and making it perfectly portable: Cherry Hand Pies. Imagine all the joy of a traditional cherry pie, but in a convenient, individual serving, perfect for picnics, lunchboxes, or a simple sweet treat on the go. These little beauties feature a flaky, buttery crust generously filled with sweet and tart cherry goodness, making them an irresistible delight for any cherry lover.

Why I Love This Recipe
There’s something truly enchanting about a hand pie. It’s comforting, nostalgic, and just plain fun to eat! What makes these Cherry Hand Pies particularly special for me is the incredible contrast of textures and flavors. You get that tender, flaky crust that shatters just so, leading to a burst of sweet and tangy cherry filling. It’s less messy than a slice of pie and the perfect portion for satisfying a craving without overdoing it. Plus, the vibrant red cherry filling peeking through a golden-brown crust is simply beautiful. They’re surprisingly simple to make, and the effort truly pays off in every delicious bite!
Ingredients
Here’s what you’ll need to create these delightful Cherry Hand Pies:
For the Pie Dough (makes about 8-10 hand pies):
- 2 ½ cups all-purpose flour
- 1 tsp salt
- 1 cup (2 sticks) unsalted butter, very cold and cut into ½-inch cubes
- ½ cup ice water (plus more if needed)
For the Cherry Filling:
- 3 cups fresh or frozen pitted cherries (tart or sweet, or a mix)
- ½ cup granulated sugar (adjust based on cherry sweetness)
- 3 tbsp cornstarch
- 1 tbsp fresh lemon juice
- ½ tsp vanilla extract
- ¼ tsp almond extract (optional, but highly recommended)
For Assembly & Topping:
- 1 large egg, beaten (for egg wash)
- 1 tbsp water (for egg wash)
- 2 tbsp turbinado sugar or granulated sugar (for sprinkling)
Swaps and Notes
- Cherries: Fresh sour (tart) cherries are ideal for a classic hand pie, balancing the sweetness. If using sweet cherries, you might reduce the sugar in the filling slightly. Frozen pitted cherries work wonderfully – no need to thaw!
- Pie Dough: For the flakiest crust, use very cold butter and ice water. You can also use your favorite homemade pie crust recipe, or for a quicker option, store-bought refrigerated pie crusts (though homemade typically yields better flakiness).
- Shortening vs. Butter: This recipe calls for all butter for maximum flavor and flakiness. Some recipes use shortening for extra tenderness, but butter provides superior taste.
- Cornstarch: This is essential for thickening the cherry filling and preventing it from becoming too watery and making the crust soggy. You can use an equal amount of tapioca flour if preferred.
- Extracts: Vanilla and almond extracts truly enhance the cherry flavor. If you don’t like almond extract, you can omit it.
- Sugar for Sprinkling: Turbinado sugar adds a beautiful sparkle and crunch, but regular granulated sugar works fine too.
- Other Fruit Fillings: Once you master the technique, you can easily swap the cherries for other fruits like apples, blueberries, or peaches!
List of Steps for the Recipe
Let’s get these delicious hand pies baked!
- Make the Pie Dough (Start Here First!):
- In a large bowl, whisk together the flour and salt.
- Add the very cold, cubed butter to the flour mixture. Using a pastry blender, your fingertips, or two knives, cut the butter into the flour until the mixture resembles coarse crumbs with some pea-sized pieces of butter remaining.
- Gradually add the ice water, 1 tablespoon at a time, mixing with a fork until the dough just comes together. Be careful not to overmix.
- Divide the dough in half, flatten each half into a disk, wrap tightly in plastic wrap, and refrigerate for at least 1 hour (or up to 2 days). This chilling time is crucial for a flaky crust.
- Prepare the Cherry Filling:
- In a medium saucepan, combine the cherries, ½ cup granulated sugar, cornstarch, and lemon juice.
- Cook over medium heat, stirring frequently, until the mixture thickens and comes to a gentle boil (about 5-7 minutes). The cherries will release their juices and the cornstarch will thicken it into a glossy filling.
- Remove from heat and stir in the vanilla extract and almond extract (if using).
- Transfer the filling to a shallow bowl or plate and let it cool completely at room temperature. This is essential to prevent a soggy crust.
- Assemble the Hand Pies:
- On a lightly floured surface, unwrap one disk of chilled pie dough. Roll it out to about ⅛-inch thickness.
- Using a 4-inch round or square cookie cutter, cut out shapes from the dough. Reroll scraps as needed (stack them, don’t knead, to maintain flakiness) to cut more shapes. You should get 8-10 pieces of dough from each disk (so 16-20 total if making a full round pie). If making half-moon shapes, you’ll use half the circles for bases and half for tops.
- In a small bowl, whisk together the egg and 1 tbsp water for the egg wash.
- Place half of your dough shapes on a parchment-lined baking sheet. Spoon about 1 ½ to 2 tablespoons of the cooled cherry filling onto the center of each dough shape, leaving about a ½-inch border.
- Brush the edges of the dough with the egg wash.
- Place another dough shape on top of the filling (if making full pies) or fold the dough over the filling to create a half-moon shape.
- Gently press the edges to seal. Use the tines of a fork to crimp all around the edges to fully seal and create a decorative pattern.
- Finish and Bake:
- Cut 2-3 small slits into the top of each hand pie with a sharp knife (this allows steam to escape).
- Brush the tops of the hand pies with the remaining egg wash and sprinkle with turbinado sugar.
- Chill the assembled hand pies on the baking sheet for at least 15-20 minutes in the refrigerator (or 10 minutes in the freezer). This helps prevent shrinking and maintains flakiness.
- Preheat oven to 400°F (200°C).
- Bake for 18-25 minutes, or until the crust is golden brown and the filling is bubbly. Baking time may vary based on your oven and the size of your hand pies.
- Remove from oven and let cool on the baking sheet for a few minutes before transferring to a wire rack to cool completely.
Tips for Success
- Keep Everything Cold: For a truly flaky crust, it’s vital that your butter and water are very cold. Work quickly with the dough to prevent the butter from warming up.
- Don’t Overmix the Dough: Overmixing develops gluten, which leads to a tough crust. Mix just until the dough comes together.
- Chill Dough & Pies: Don’t skip the chilling steps! Chilling the dough makes it easier to roll and prevents shrinkage, while chilling the assembled pies helps the butter in the crust stay cold, resulting in more flakiness.
- Cool the Filling Completely: A warm filling will make your pie crust soggy and difficult to work with. Plan ahead and let it cool.
- Seal Well: Make sure to really crimp the edges with a fork to prevent the filling from leaking out during baking.
- Vent the Pies: The small slits on top are important for steam to escape, preventing blowouts and ensuring an even bake.
Serving Suggestions and Pairings
Cherry Hand Pies are incredibly versatile! They’re perfect as a portable dessert, a delightful addition to a brunch spread, or a sweet treat for an afternoon tea.
- Serve them warm with a scoop of vanilla ice cream for a classic à la mode experience.
- A dollop of freshly whipped cream adds a lovely richness.
- For a light breakfast or snack, enjoy them with a glass of cold milk or a hot cup of coffee.
- They also make wonderful gifts when tied with a ribbon!
Storage and Leftover Tips
Baked Cherry Hand Pies are best enjoyed on the day they are made, but they can be stored in an airtight container at room temperature for up to 2-3 days. If you want to refresh them, pop them in a toaster oven or a regular oven at 300°F (150°C) for 5-10 minutes to crisp up the crust.
Unbaked hand pies freeze beautifully! Assemble them up to the point of the egg wash and sugar, then freeze them flat on a baking sheet until solid. Once frozen, transfer them to a freezer-safe bag or container and store for up to 2-3 months. When ready to bake, you can bake them directly from frozen (no thawing needed), adding about 5-10 minutes to the baking time. Brush with egg wash and sprinkle with sugar just before baking.
More Recipes You Will Love
If you’re a fan of comforting baked goods, especially those with fruit and a delightful crust, you’ll love exploring these other Chef Maniac favorites:
- For another indulgent chocolatey treat, try my Chocolate Chip Cookie Dough Brownie Bombs.
- If you’re a peanut butter and chocolate fan, you have to try The Best Peanut Butter Brownies I’ve Ever Made.
- Looking for a quick and easy chocolate fix? My Brownie Batter Dip is a delightful no-bake option.
- And if you’re looking for more fun and easy cookies, don’t miss The Easter Cookies Everyone Will Be Talking About or These Old School No-Bake Cookies Never Fail Me.
Final Thoughts
Cherry Hand Pies are a sweet, satisfying, and utterly charming dessert that brings joy with every bite. The combination of a perfectly flaky crust and that bright, juicy cherry filling is simply irresistible. They’re a fantastic project for a lazy afternoon and a guaranteed crowd-pleaser. Give them a try – I know you’ll fall in love with these portable pockets of deliciousness!
What’s your favorite fruit filling for a hand pie? Share your ideas in the comments below! And don’t forget to visit Chef Maniac for more delightful recipes and kitchen inspiration. Happy baking!


Leave a Reply