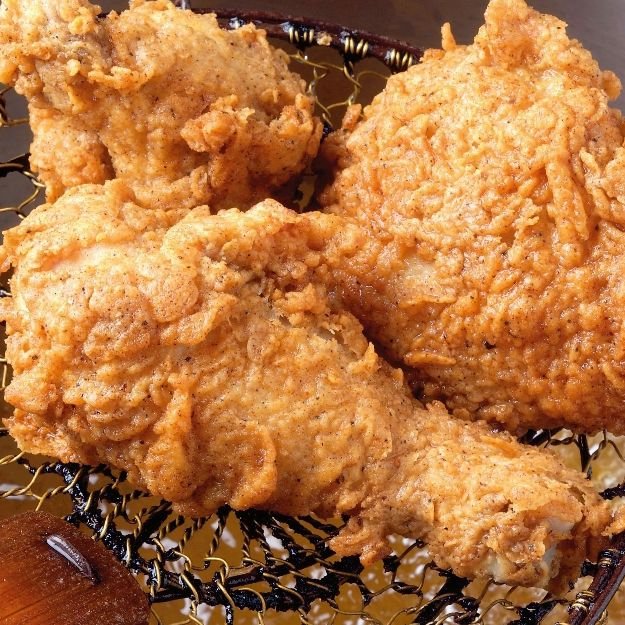
Extra-Crispy Easy Fried Chicken: The Only Recipe You Need
Print it, save it, or add it to your recipe binder.
By Jason Griffith Lead Writer, ChefManiac.com
Introduction
There is a specific kind of magic that happens when cold buttermilk meets seasoned flour and a hot skillet. Fried chicken is the undisputed heavyweight champion of comfort food, but for many home cooks, it can feel intimidating. Between the fear of raw centers and the mess of breading stations, it’s often a dish reserved for restaurants.
However, this Easy Fried Chicken recipe is designed to strip away the complexity. By focusing on a simple buttermilk soak and a high-impact spice blend, you can achieve that shatteringly crisp skin and juicy interior right in your own kitchen. Whether you are prepping for a summer picnic or a cozy Sunday dinner, this recipe delivers that classic, deep-fried satisfaction without the fuss.
Why I Love This Recipe
This is my “back-to-basics” recipe. Here’s why it has earned a permanent spot in my recipe tin:
- The Buttermilk Brine: It does all the heavy lifting, tenderizing the meat and ensuring the flour sticks perfectly.
- Minimal Ingredients: You don’t need a shelf full of exotic spices; the garlic and paprika provide a classic, savory profile.
- Skillet-Friendly: You don’t need a deep fryer. A heavy-bottomed skillet or cast-iron pan is all it takes to get that professional golden hue.
- Perfect for Beginners: The instructions are straightforward and focus on the techniques that actually matter for crunch and flavor.
If you love the crunch of fried chicken but want to try something a bit more bite-sized, you’ll obsess over these Easy Cheese Stuffed Chicken Wontons with Ranch Golden Crunchy Addictive.
Ingredients You’ll Need
For this recipe, quality and temperature are your best friends. Here is what you need:
- Chicken: 4-6 pieces (thighs and drumsticks are the most forgiving for frying).
- The Soak: 1 cup buttermilk (the acidity is key for tenderization).
- The Coating: 1 cup all-purpose flour.
- Spices: 1 tsp paprika (for color and mild earthiness) and 1 tsp garlic powder.
- Seasoning: Generous pinches of salt and pepper.
- Frying Medium: Oil for frying (choose one with a high smoke point, like vegetable, canola, or peanut oil).
Swaps and Notes
- Buttermilk Substitute: If you don’t have buttermilk, you can make a quick version by adding 1 tablespoon of lemon juice or white vinegar to 1 cup of whole milk and letting it sit for 5 minutes.
- Spicing it Up: Want a kick? Add ½ teaspoon of cayenne pepper or a teaspoon of dried oregano to the flour mixture.
- The Flour: For an even lighter, crispier crust, you can swap ¼ cup of the flour for cornstarch.
- Oil Temperature: Using a thermometer is a game-changer. Aim for an oil temperature between 350°F and 375°Ffor the perfect fry.
Step-by-Step Instructions
1. The Buttermilk Soak
Place your chicken pieces in a large bowl or a gallon-sized zip-top bag and pour in the buttermilk. Ensure every piece is well-coated. Let this sit in the refrigerator for at least 1 hour. This isn’t just about flavor; the lactic acid in the buttermilk breaks down the proteins, making the chicken incredibly tender.
2. Prepare the Dredge
In a shallow bowl or another bag, combine the flour, paprika, garlic powder, salt, and pepper. Give it a good whisk or shake to make sure the spices are evenly distributed. You don’t want a “salty spot” in your crust!
3. The Dredging Process
Remove the chicken from the buttermilk, letting the excess drip off. One by one, place the pieces into the flour mixture. Press the flour onto the chicken firmly to ensure a thick, even coating. For extra crunch, some people like to “double-dredge,” but for this easy version, one solid coat does the trick.
4. Heat the Oil
Fill a large, heavy skillet (cast iron is best for heat retention) with about 1 inch of oil. Heat it over medium-high heat. To test if it’s ready, drop a pinch of flour into the oil; if it sizzles immediately, you’re ready to go.
5. Fry to Perfection
Carefully place the chicken pieces into the hot oil. Do not overcrowd the pan, as this will drop the oil temperature and lead to greasy chicken. Fry for 7-10 minutes per side. Use tongs to flip them once they are deep golden brown. The internal temperature should reach 165°F.
6. Drain and Rest
Once cooked through, move the chicken to a plate lined with paper towels or a wire cooling rack. Letting it rest for about 5 minutes allows the juices to redistribute and the crust to “set” so it stays crunchy.
Tips for Success
- Room Temp is Better: Take the chicken out of the fridge about 15-20 minutes before frying. Cold chicken can drop the oil temperature too quickly.
- Don’t Move It: Once you put the chicken in the oil, leave it alone for the first few minutes. Moving it too soon can tear the breading off before it has a chance to crisp up.
- Keep it Warm: If you are frying in batches, keep the finished pieces on a wire rack in a 200°F oven to stay warm and crispy while you finish the rest.
Serving Suggestions and Pairings
Fried chicken is versatile! Serve it with mashed potatoes, coleslaw, or a buttery biscuit. If you’re looking for a crowd-pleasing appetizer to start the meal, I highly recommend This Beer Cheese Dip is My Favorite Party Starter that Disappears in Minutes.
For a complete party spread, you could even pair this with These Totchos are My Favorite Party Food Hack Tater Tot Nachos for the Win for an ultimate “cheat day” menu.
Nutritional Information (Per Serving)
Estimate based on 1 drumstick and 1 thigh:
- Calories: 410 kcal
- Protein: 28g
- Carbohydrates: 14g
- Fat: 26g
- Sodium: 550mg
Storage and Leftover Tips
- Fridge: Leftover fried chicken can be kept in an airtight container for up to 3 days.
- The “Re-Crisp” Trick: Never microwave fried chicken if you want to keep the crunch. Instead, place it in an air fryer at 375°F for 3-4 minutes or in a toaster oven until heated through.
- Cold Chicken: Honestly, cold fried chicken straight from the fridge the next morning is a chef’s secret pleasure!
More Recipes You Will Love
If you love savory, hand-held delights, check out these other hits from the kitchen:
- Easy Cheesy Chicken Sliders with Marinara Garlic Butter
- This Crockpot Nacho Dip is the Reason I Never Have Leftovers
Final Thoughts
There is no feeling quite like the first crunch of a piece of chicken you fried yourself. It’s a skill every home cook should have in their back pocket. This recipe proves that you don’t need a complicated setup to get professional-grade results.
Did this recipe help you conquer your fear of frying? Let me know in the comments! Don’t forget to follow ChefManiacfor more kitchen tips and foolproof recipes. Happy frying!

Extra-Crispy Easy Fried Chicken: The Only Recipe You Need
This is my "back-to-basics" recipe. Here’s why it has earned a permanent spot in my recipe tin:
Prep: min | Cook: min | Total: min
Servings:
Ingredients
- Chicken: 4-6 pieces (thighs and drumsticks are the most forgiving for frying).
- The Soak: 1 cup buttermilk (the acidity is key for tenderization).
- The Coating: 1 cup all-purpose flour.
- Spices: 1 tsp paprika (for color and mild earthiness) and 1 tsp garlic powder.
- Seasoning: Generous pinches of salt and pepper.
- Frying Medium: Oil for frying (choose one with a high smoke point, like vegetable, canola, or peanut oil).
Instructions
Nutrition
- Calories: 410 kcal
- Fat: 26g
- Carbs: 14g
- Protein: 28g
Rate This Recipe
Average Rating: 0 (0 votes)