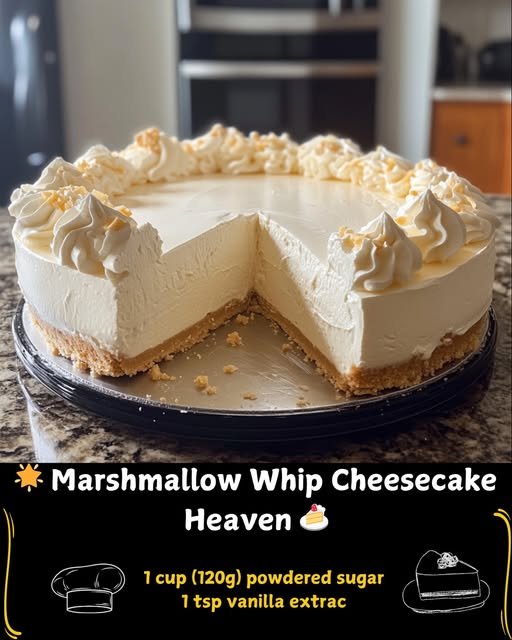
Marshmallow Whip Cheesecake Heaven: A Slice of Sweet, Airy Perfection
If there is one thing I’ve learned in my years of writing for ChefManiac.com, it’s that you don’t always need an oven to create a masterpiece. Sometimes, the best desserts come from a little bit of mixing, a lot of whipping, and the patience to let things chill. Today, I’m sharing a recipe that is near and dear to my heart: Marshmallow Whip Cheesecake Heaven.
This isn’t your dense, New York-style cheesecake that sits heavy in your stomach. Instead, this is like eating a sweet, creamy cloud. It combines the tangy richness of cream cheese with the nostalgic, sugary pull of melted marshmallows and fluff. Whether you’re a seasoned baker or someone who avoids the oven at all costs, this recipe is designed for success.
Why I Love This Recipe
There is something inherently joyful about marshmallows. They remind me of summer campfires and mugs of cocoa, but when you fold them into a cheesecake base, they transform into a sophisticated stabilizer that gives the filling a unique, velvety texture.
I love this recipe because it is 100% no-bake. On a hot summer day, or even during a busy holiday season when the oven is occupied by a turkey or a tray of Easy Cheesy Chicken Sliders, having a dessert that lives entirely in the fridge is a lifesaver. It’s also incredibly versatile—you can dress it up with chocolate or keep it simple and snowy white.
The Ingredients
To make this Marshmallow Whip Cheesecake Heaven, you’ll need to gather a few pantry staples and some dairy favorites.
For the Base:
- Graham Cracker Crumbs (2 cups / 200g): You can buy these pre-crushed or pulse full crackers in a food processor.
- Unsalted Butter (½ cup / 115g): Melted to bind the crust.
- Granulated Sugar (2 tbsp / 25g): Just enough to give the crust a little extra crunch.
For the Cheesecake Layer:
- Cream Cheese (16 oz / 450g): Ensure this is softened to room temperature to avoid lumps.
- Powdered Sugar (1 cup / 120g): Provides sweetness and helps with the structure.
- Vanilla Extract (1 tsp): A high-quality extract makes a world of difference.
- Mini Marshmallows (2 cups / 100g): These will be melted down to provide that “whip” factor.
- Heavy Whipping Cream (1 cup / 240ml): Whipped to stiff peaks to fold in for aeration.
For the Topping:
- Marshmallow Fluff (1 cup / 240g): For that extra glossy, gooey finish.
- Whipped Cream (½ cup / 120ml): To lighten the fluff for spreading.
- Optional Garnishes: Chocolate shavings, sprinkles, or even crushed pieces of these rainbow sprinkle cookies.
Swaps and Notes
- The Crust: If you want a deeper flavor, swap the standard graham crackers for chocolate ones or even crushed Oreos. If you’re a fan of Oreo-based treats, you’ll see why I love this no-bake Oreo cream pie.
- The Marshmallows: If you only have large marshmallows, you can use them, but keep a close eye on them in the microwave as they expand much faster than the mini ones.
- Dairy-Free: While I haven’t tested it personally, several readers have had luck using plant-based cream cheese and a coconut-based whipping cream.
Step-by-Step Instructions
1. Prepare the Base
In a medium bowl, mix your graham cracker crumbs, melted butter, and sugar. You want the texture to feel like wet sand. Press the mixture firmly into the bottom of a 9×9-inch dish. I like to use the bottom of a flat measuring cup to really pack it in tight—this prevents the crust from crumbling when you slice it. Pop it in the fridge for 10 minutes while you work on the filling.
2. Make the Cheesecake Filling
In a large mixing bowl, beat the softened cream cheese, powdered sugar, and vanilla until the mixture is silky smooth.
Now, for the magic: Place your mini marshmallows in a microwave-safe bowl. Heat them in 20-30 second intervals. Watch them closely! They will puff up like balloons. Stir them until they are a smooth, liquid ribbons. Quickly fold the melted marshmallows into your cream cheese mixture. Finally, gently fold in your stiff-peaked whipped cream. You want to be gentle here to keep as much air in the batter as possible.
3. Assemble and Top
Spread the cheesecake filling evenly over your chilled crust. In a separate small bowl, whisk together the marshmallow fluff and the extra whipped cream. Spread this over the top of the cheesecake. It will create a beautiful, glossy finish that looks like a professional pastry chef made it.
4. Chill
The hardest part of this recipe is waiting. Refrigerate the dessert for at least 4 hours. This gives the marshmallows time to “set” the cream cheese, resulting in a clean slice.
Tips for Success
- Temperature Matters: If your cream cheese is cold, you will end up with tiny white lumps. If you’re in a hurry, you can place the foil-wrapped blocks of cream cheese in a bowl of warm water for 15 minutes.
- Clean Slices: For those perfect, Instagram-worthy squares, dip your knife in hot water and wipe it clean between every single cut.
- The “Torch” Trick: If you want to impress your guests, use a kitchen torch to lightly brown the marshmallow topping right before serving. It adds a toasted marshmallow aroma that is irresistible.
Serving Suggestions and Pairings
This cheesecake is quite sweet, so I love pairing it with something slightly tart or salty.
- Fruit: Fresh raspberries or a drizzle of lemon curd cut through the sugar beautifully.
- Savory Balance: If you’re serving this at a party, balance the sugar with a savory snack like this beer cheese dip.
- Drinks: A cup of strong black coffee is the traditional choice, but for a fun party vibe, serve it alongside a classic margarita.
Nutritional Information (Per Serving)
- Calories: 385 kcal
- Total Fat: 22g
- Carbohydrates: 44g
- Protein: 4g
- Sugar: 32g
Storage and Leftover Tips
This cheesecake keeps remarkably well. Cover the dish tightly with plastic wrap or foil and store it in the refrigerator for up to 5 days.
Can you freeze it? Yes! This is a great make-ahead dessert. Freeze the entire dish (without garnishes) for up to 3 months. Thaw it in the fridge overnight before serving. The texture remains surprisingly creamy even after freezing.
More Recipes You Will Love
If you enjoyed this airy, no-bake treat, you have to check out these other favorites from the ChefManiac archives:
- How This Unicorn Poke Cake Became My Favorite Party Trick
- This Edible Cookie Dough for Late Night Cravings
- No-Bake Monster Cookie Energy Balls
Final Thoughts
Marshmallow Whip Cheesecake Heaven is more than just a dessert; it’s a guaranteed crowd-pleaser that takes the stress out of entertaining. I’ve served this at birthdays, potlucks, and simple Sunday dinners, and there are never any leftovers!
Did you try this recipe? I’d love to hear how it turned out for you! Leave a comment below, and don’t forget to follow us on social media for more kitchen inspiration. Happy “baking” (without the bake)!
— Jason Griffith


Leave a Reply