
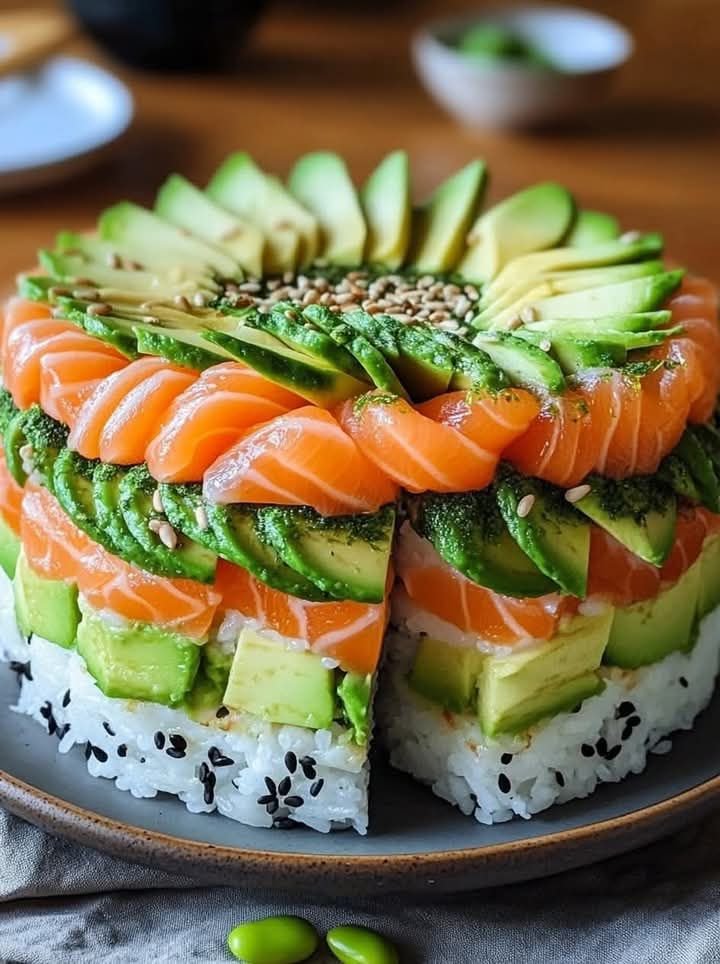
Avocado Sushi Cake: Fun, Layered & Easy Sushi Delight

Print it, save it, or add it to your recipe binder.
Avocado Sushi Cake: A Fun, Layered Celebration for Your Taste Buds!
Hey there, Jason Griffith here! Sushi is always a favorite, but sometimes you want to present those fresh, vibrant flavors in a way that truly wows. And if you’re looking for a dish that looks like a celebration and tastes like one too, this Avocado Sushi Cake is an absolute must-try! It’s a fun, layered twist on traditional sushi, featuring seasoned sushi rice, creamy avocado, crisp cucumber, and fresh sushi-grade fish, all pressed into a beautiful cake form.
Why I Love This Recipe
I’m a huge advocate for creative presentations that elevate a meal, and this Avocado Sushi Cake perfectly embodies that. What I particularly love about it is how it takes all the familiar, delicious components of sushi and presents them in a stunning, shareable “cake” format. The layers of seasoned rice, rich avocado, and crisp cucumber provide a fantastic textural base for the delicate, fresh fish. It’s incredibly visually appealing, easy to customize with your favorite sushi ingredients, and surprisingly simple to assemble. Perfect for a special occasion, a light lunch, or a unique appetizer, it’s a dish that’s sure to impress everyone here in Marion, South Carolina!
Ingredients
Here’s what you’ll need to create this fun and vibrant Avocado Sushi Cake:
- 2 cups cooked sushi rice (seasoned with rice vinegar, sugar, and salt – follow package directions for seasoning sushi rice)
- 2 ripe avocados, sliced
- 1 cucumber, cut into thin strips (English or Persian cucumber recommended)
- ½ lb sushi-grade salmon or tuna, thinly sliced
- 1 sheet nori (seaweed), cut into strips (for garnish)
- 1 tbsp sesame seeds (toasted, for garnish)
- Soy sauce, for dipping
- Pickled ginger, for serving
- Wasabi, to serve
Swaps and Notes
- Sushi Rice: Cooking sushi rice correctly and seasoning it properly (with rice vinegar, a pinch of sugar, and salt) is crucial for the authentic flavor and sticky texture. Ensure it’s cooled to room temperature before layering.
- Sushi-Grade Fish: This means the fish is safe to eat raw. Purchase from a reputable fishmonger. If raw fish isn’t preferred, you can use cooked shrimp, smoked salmon, or even thinly sliced cooked chicken for a different take.
- Avocados: Choose ripe but firm avocados that will hold their shape when sliced.
- Cucumber: Thin strips are ideal for layering. English or Persian cucumbers work well due to their thin skin and few seeds.
- Nori: The sheet of nori at the bottom helps with removal and adds a subtle seaweed flavor. Strips for garnish add visual appeal and crunch.
- Springform Pan: A 6-inch or 8-inch springform cake tin is ideal for shaping, but a regular cake pan lined thoroughly with plastic wrap could also work.
- Garnishes: Sesame seeds, nori strips, pickled ginger, and wasabi complete the sushi experience.
- Additional Layers (Optional): You can add a thin layer of cream cheese, masago (fish roe), or a drizzle of spicy mayo (mayo + sriracha) between layers for extra flavor.
Instructions
Making an Avocado Sushi Cake is all about careful layering and chilling for a beautiful presentation!
- Prep the Pan: Line a springform cake tin (a 6-inch or 8-inch round pan works well) thoroughly with plastic wrap, ensuring plenty of overhang on all sides. This will help you easily remove the cake once chilled. Place a nori sheeton the bottom of the lined pan.
- Layer 1 (Rice, Avocado, Cucumber, Fish): Add half of the cooled, seasoned sushi rice to the pan. Press it down firmly and evenly to form the base layer. Next, arrange half of the sliced avocado neatly over the rice. Follow with half of the thin cucumber strips and then half of the thinly sliced sushi-grade fish (salmon or tuna).
- Layer 2 (Repeat): Carefully repeat the layers: add the remaining half of the sushi rice and press it down gently. Then, layer on the remaining half of the sliced avocado, cucumber strips, and fish.
- Top Layer (Rice): Finish with the last layer of rice on top. Press down gently but firmly to ensure all layers are compacted. Pull the plastic wrap overhang over the top to cover the cake.
- Chill to Set: Cover the entire tin with plastic wrap and refrigerate for at least 2 hours to allow the sushi cake to set firmly. This makes it easier to remove from the pan and slice.
- Garnish & Serve: When ready to serve, remove the sushi cake from the refrigerator. Gently unclip the springform pan and remove the ring. Carefully invert the cake onto a serving platter, remove the plastic wrap and the base of the springform pan. Sprinkle sesame seeds generously over the top. Arrange the nori strips decoratively on top. Serve immediately with soy sauce for dipping, wasabi, and pickled ginger on the side.
Tips for Success
- Cool Sushi Rice: Ensure your seasoned sushi rice is completely cooled to room temperature before layering. Hot rice will cook the other ingredients and make the avocado brown.
- Pack Firmly: Press each rice layer down firmly but gently to ensure a cohesive cake that holds its shape.
- Fresh Fish: Always use sushi-grade fish from a reputable source if consuming raw.
- Add Avocado Last: Add the avocado just before assembling or chilling to minimize browning.
- Chill Thoroughly: The chilling time is crucial for the cake to set, making it easier to slice and serve cleanly.
- Sharp Knife for Slicing: Use a very sharp, slightly moistened knife to slice the sushi cake cleanly.
Serving Suggestions and Pairings
This Avocado Sushi Cake is a show-stopping dish perfect for:
- Parties & Gatherings: It makes an elegant and unique centerpiece.
- Light Lunch or Dinner: A satisfying and healthy meal.
- Appetizer: Serve smaller slices as an impressive starter.
- Picnics (Chilled): A lovely option for an outdoor meal.
Pair it with a refreshing beverage like green tea, or a light white wine. For other light and fresh Asian-inspired dishes, you might also enjoy my Easy Quinoa Salad (if you added some edamame!) or my vibrant Vegan Sweet Chili Edamame.
Storage and Leftover Tips
Avocado Sushi Cake is best enjoyed immediately after assembly and chilling for optimal freshness and texture. Due to the raw fish and avocado, it does not store well. If you have any leftovers, cover tightly and consume within 12-24 hours at most, keeping it well-chilled. The avocado may brown over time.
More Recipes You Will Love
If you loved the fresh flavors and unique presentation of this sushi cake, here are a few more fantastic savory recipes that I think you’ll absolutely love:
- For another exciting dish featuring fresh ingredients, check out my Blistered Shishito Peppers with Zesty Spicy Sauce.
- If you’re a fan of flavorful Asian-inspired main courses, my Chinese Pepper Steak is a must-try.
- And for a comforting and rich Asian-inspired soup, don’t miss my Beef Miso Ramen.
- For other healthy and easy baked vegetable sides, check out my Baked Butternut Squash Fries.
Final Thoughts
This Avocado Sushi Cake is a true celebration of fresh, vibrant flavors and creative presentation. It’s a fun, surprisingly simple way to enjoy sushi in a whole new light, perfect for impressing guests or just treating yourself to something special. Give it a try, and enjoy this delicious, layered sushi delight!
What’s your favorite creative way to serve a classic dish? Share your ideas and feedback in the comments below, and don’t forget to follow Chef Maniac for more delightful and inspiring recipes!

Avocado Sushi Cake: Fun, Layered & Easy Sushi Delight
Avocado Sushi Cake: A Fun, Layered Celebration for Your Taste Buds!
Prep: min | Cook: min | Total: min
Servings:
Ingredients
- 2 cups cooked sushi rice (seasoned with rice vinegar, sugar, and salt – follow package directions for seasoning sushi rice)
- 2 ripe avocados, sliced
- 1 cucumber, cut into thin strips (English or Persian cucumber recommended)
- ½ lb sushi-grade salmon or tuna, thinly sliced
- 1 sheet nori (seaweed), cut into strips (for garnish)
- 1 tbsp sesame seeds (toasted, for garnish)
- Soy sauce, for dipping
- Pickled ginger, for serving
- Wasabi, to serve
- Swaps and Notes:
- Sushi Rice: Cooking sushi rice correctly and seasoning it properly (with rice vinegar, a pinch of sugar, and salt) is crucial for the authentic flavor and sticky texture. Ensure it's cooled to room temperature before layering.
- Sushi-Grade Fish: This means the fish is safe to eat raw. Purchase from a reputable fishmonger. If raw fish isn't preferred, you can use cooked shrimp, smoked salmon, or even thinly sliced cooked chicken for a different take.
- Avocados: Choose ripe but firm avocados that will hold their shape when sliced.
- Cucumber: Thin strips are ideal for layering. English or Persian cucumbers work well due to their thin skin and few seeds.
- Nori: The sheet of nori at the bottom helps with removal and adds a subtle seaweed flavor. Strips for garnish add visual appeal and crunch.
- Springform Pan: A 6-inch or 8-inch springform cake tin is ideal for shaping, but a regular cake pan lined thoroughly with plastic wrap could also work.
- Garnishes: Sesame seeds, nori strips, pickled ginger, and wasabi complete the sushi experience.
- Additional Layers (Optional): You can add a thin layer of cream cheese, masago (fish roe), or a drizzle of spicy mayo (mayo + sriracha) between layers for extra flavor.
- Instructions:
- Prep the Pan: Line a springform cake tin (a 6-inch or 8-inch round pan works well) thoroughly with plastic wrap, ensuring plenty of overhang on all sides. This will help you easily remove the cake once chilled. Place a nori sheeton the bottom of the lined pan.
- Layer 1 (Rice, Avocado, Cucumber, Fish): Add half of the cooled, seasoned sushi rice to the pan. Press it down firmly and evenly to form the base layer. Next, arrange half of the sliced avocado neatly over the rice. Follow with half of the thin cucumber strips and then half of the thinly sliced sushi-grade fish (salmon or tuna).
- Layer 2 (Repeat): Carefully repeat the layers: add the remaining half of the sushi rice and press it down gently. Then, layer on the remaining half of the sliced avocado, cucumber strips, and fish.
- Top Layer (Rice): Finish with the last layer of rice on top. Press down gently but firmly to ensure all layers are compacted. Pull the plastic wrap overhang over the top to cover the cake.
- Chill to Set: Cover the entire tin with plastic wrap and refrigerate for at least 2 hours to allow the sushi cake to set firmly. This makes it easier to remove from the pan and slice.
- Garnish & Serve: When ready to serve, remove the sushi cake from the refrigerator. Gently unclip the springform pan and remove the ring. Carefully invert the cake onto a serving platter, remove the plastic wrap and the base of the springform pan. Sprinkle sesame seeds generously over the top. Arrange the nori strips decoratively on top. Serve immediately with soy sauce for dipping, wasabi, and pickled ginger on the side.
- Tips for Success:
- Cool Sushi Rice: Ensure your seasoned sushi rice is completely cooled to room temperature before layering. Hot rice will cook the other ingredients and make the avocado brown.
- Pack Firmly: Press each rice layer down firmly but gently to ensure a cohesive cake that holds its shape.
- Fresh Fish: Always use sushi-grade fish from a reputable source if consuming raw.
- Add Avocado Last: Add the avocado just before assembling or chilling to minimize browning.
- Chill Thoroughly: The chilling time is crucial for the cake to set, making it easier to slice and serve cleanly.
- Sharp Knife for Slicing: Use a very sharp, slightly moistened knife to slice the sushi cake cleanly.
- Serving Suggestions and Pairings:
- Parties & Gatherings: It makes an elegant and unique centerpiece.
- Light Lunch or Dinner: A satisfying and healthy meal.
- Appetizer: Serve smaller slices as an impressive starter.
- Picnics (Chilled): A lovely option for an outdoor meal.
- Storage and Leftover Tips:
- More Recipes You Will Love:
- For another exciting dish featuring fresh ingredients, check out my Blistered Shishito Peppers with Zesty Spicy Sauce.
Instructions
- Making an : Avocado Sushi Cake is all about careful layering and chilling for a beautiful presentation!
- Prep the : Pan: Line a springform cake tin (a 6-inch or 8-inch round pan works well) thoroughly with plastic wrap, ensuring plenty of overhang on all sides. This will help you easily remove the cake once chilled. Place a nori sheeton the bottom of the lined pan.
- Layer 1 (Rice, Avocado, Cucumber, Fish): Add half of the cooled, seasoned sushi rice to the pan. Press it down firmly and evenly to form the base layer. Next, arrange half of the sliced avocado neatly over the rice. Follow with half of the thin cucumber strips and then half of the thinly sliced sushi-grade fish (salmon or tuna).
- Layer 2 (Repeat): Carefully repeat the layers: add the remaining half of the sushi rice and press it down gently. Then, layer on the remaining half of the sliced avocado, cucumber strips, and fish.
- Top : Layer (Rice): Finish with the last layer of rice on top. Press down gently but firmly to ensure all layers are compacted. Pull the plastic wrap overhang over the top to cover the cake.
- Chill to : Set: Cover the entire tin with plastic wrap and refrigerate for at least 2 hours to allow the sushi cake to set firmly. This makes it easier to remove from the pan and slice.
- Garnish & : Serve: When ready to serve, remove the sushi cake from the refrigerator. Gently unclip the springform pan and remove the ring. Carefully invert the cake onto a serving platter, remove the plastic wrap and the base of the springform pan. Sprinkle sesame seeds generously over the top. Arrange the nori strips decoratively on top. Serve immediately with soy sauce for dipping, wasabi, and pickled ginger on the side.
- Tips for Success: Cool Sushi Rice: Ensure your seasoned sushi rice is completely cooled to room temperature before layering. Hot rice will cook the other ingredients and make the avocado brown.
- Pack : Firmly: Press each rice layer down firmly but gently to ensure a cohesive cake that holds its shape.
- Fresh : Fish: Always use sushi-grade fish from a reputable source if consuming raw.
- Add : Avocado Last: Add the avocado just before assembling or chilling to minimize browning.
- Chill : Thoroughly: The chilling time is crucial for the cake to set, making it easier to slice and serve cleanly.
- Sharp : Knife for Slicing: Use a very sharp, slightly moistened knife to slice the sushi cake cleanly.
- Serving Suggestions and Pairings: This Avocado Sushi Cake is a show-stopping dish perfect for:
- Parties & : Gatherings: It makes an elegant and unique centerpiece.
- Light : Lunch or Dinner: A satisfying and healthy meal.
- Appetizer: Serve smaller slices as an impressive starter.
- Picnics (Chilled): A lovely option for an outdoor meal.
- Pair it with a refreshing beverage like green tea, or a light white wine. For other light and fresh Asian-inspired dishes, you might also enjoy my Easy Quinoa Salad (if you added some edamame!) or my vibrant Vegan Sweet Chili Edamame.
- Storage and Leftover Tips: Avocado Sushi Cake is best enjoyed immediately after assembly and chilling for optimal freshness and texture. Due to the raw fish and avocado, it does not store well. If you have any leftovers, cover tightly and consume within 12-24 hours at most, keeping it well-chilled. The avocado may brown over time.
- More Recipes You Will Love: If you loved the fresh flavors and unique presentation of this sushi cake, here are a few more fantastic savory recipes that I think you'll absolutely love:
- For another exciting dish featuring fresh ingredients, check out my Blistered Shishito Peppers with Zesty Spicy Sauce.
- If you're a fan of flavorful : Asian-inspired main courses, my Chinese Pepper Steak is a must-try.
- And for a comforting and rich : Asian-inspired soup, don't miss my Beef Miso Ramen.
- For other healthy and easy baked vegetable sides, check out my Baked Butternut Squash Fries.
- Final Thoughts: This Avocado Sushi Cake is a true celebration of fresh, vibrant flavors and creative presentation. It’s a fun, surprisingly simple way to enjoy sushi in a whole new light, perfect for impressing guests or just treating yourself to something special. Give it a try, and enjoy this delicious, layered sushi delight!
- What's your favorite creative way to serve a classic dish? Share your ideas and feedback in the comments below, and don't forget to follow Chef Maniac for more delightful and inspiring recipes!
Nutrition
- Calories:
- Fat:
- Carbs:
- Protein:
Rate This Recipe
Average Rating: 0 (0 votes)
Related posts:
 Ambrosia with Coconut and Toasted Almonds: A Classic Dessert with a Nutty Twist
 Nettle & Ginger Ice Cream – A Cool Herbal Twist on a Summer Favorite
 Easy Seafood Pot Pie with Garlic Butter Biscuit Crust – Better Than a Restaurant!
 The Best Low-Carb Salmon Breakfast Plate with Sautéed Mushrooms and Spinach


