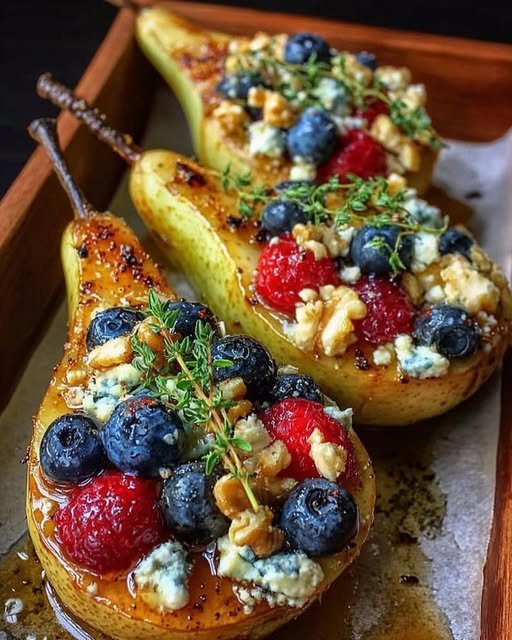
Baked Pears with Berries, Honey, Walnuts and Blue Cheese for an Easy Elegant Dessert
Print it, save it, or add it to your recipe binder.
Baked Pears with Berries, Honey, Walnuts & Blue Cheese
By Jason Griffith
Recipe Summary
Prep Time: 10 minutes
Cook Time: 20 to 25 minutes
Total Time: 30 to 35 minutes
Yield: 6 pear halves
Category: Dessert, Appetizer, Brunch
Method: Baked
Cuisine: American, European-Inspired
Introduction
Some recipes feel instantly special the moment they come out of the oven, and these Baked Pears with Berries, Honey, Walnuts, and Blue Cheese absolutely fit that description. They are warm, elegant, and layered with flavor in a way that feels a little sophisticated without being the least bit difficult. Sweet ripe pears soften and caramelize in the oven, the berries become jammy and vibrant, the walnuts add crunch, and the blue cheese melts just enough to create that irresistible sweet-savory contrast.
This is one of those dishes I love pulling out when I want something beautiful but low effort. It works as a light dessert, a brunch addition, or even a dinner-party starter if you are leaning into a cheese-board style menu. The ingredients sound fancy together, but the prep could not be simpler. Slice the pears, add the toppings, bake, and finish with cheese while everything is still warm.
What I especially love here is the balance. The honey and fruit bring natural sweetness, the blue cheese adds creamy tang, and the walnuts keep every bite interesting. It is the kind of recipe that feels memorable, even though it comes together in under 40 minutes.
Why I Love This Recipe
I come back to recipes like this because they deliver big flavor without relying on complicated techniques. You get something that looks gorgeous on the table, tastes layered and thoughtful, and still feels easy enough to make on a weeknight.
Here is why this recipe stands out:
- It is simple but feels elegant and restaurant-worthy
- The sweet and savory flavors balance beautifully
- It works as a dessert, brunch dish, or appetizer
- It uses fresh ingredients that look naturally beautiful
- It is easy to customize with different berries, nuts, or cheeses
I also love that it fits right in with other entertaining-friendly favorites like This Baked Brie Appetizer Is My Favorite Effortless Way to Impress Guests. If you enjoy recipes that feel a little elevated without much stress, this one will absolutely hit the mark.
Ingredients
Here is everything you need to make these baked pears:
- 3 ripe pears, preferably Bosc or Bartlett, halved and cored
- 2 tablespoons butter, melted
- 2 tablespoons honey, plus more for drizzling if desired
- 1/2 cup mixed berries, such as blueberries, raspberries, or strawberries
- 1/3 cup walnuts, chopped
- 1/3 cup blue cheese, crumbled
- 1/2 teaspoon ground cinnamon
- Pinch of salt
- Fresh thyme leaves, optional
Swaps and Notes
This is a wonderfully flexible recipe, so you can easily adjust it based on what you have available.
- Pears: Bosc pears hold their shape especially well when baked, while Bartlett pears become softer and juicier.
- Berries: Blueberries, raspberries, and chopped strawberries all work beautifully. Use one or mix them together.
- Walnuts: Pecans are a great substitute if that is what you have on hand.
- Blue cheese: If blue cheese is too bold for your taste, goat cheese or brie can give a milder creamy finish.
- Honey: Maple syrup works too, though honey pairs especially well with pears and blue cheese.
- Herbs: Fresh thyme adds a lovely savory note, but it is optional.
If you enjoy fruit-forward desserts with a cozy feel, These Pecan Pie Bars Are My Favorite Make-Ahead Holiday Dessert are another delicious option with that same warm, crowd-pleasing energy.

Baked Pears with Berries, Honey, Walnuts and Blue Cheese for an Easy Elegant Dessert
Baked Pears with Berries, Honey, Walnuts & Blue Cheese
Prep: 10 min | Cook: 20 min | Total: 30 min
Servings: 6 pear halves
Ingredients
- 3 ripe pears, preferably Bosc or Bartlett, halved and cored
- 2 tablespoons butter, melted
- 2 tablespoons honey, plus more for drizzling if desired
- 1/2 cup mixed berries, such as blueberries, raspberries, or strawberries
- 1/3 cup walnuts, chopped
- 1/3 cup blue cheese, crumbled
- 1/2 teaspoon ground cinnamon
- Pinch of salt
- Fresh thyme leaves, optional
Instructions
- Step 1: Preheat the oven: Preheat your oven to 375°F (190°C). Lightly grease a baking dish large enough to hold the pear halves in a single layer.
- Step 2: Prepare the pears: Arrange the pear halves cut-side up in the prepared baking dish. Make sure they sit fairly level so the toppings stay in place.
- Step 3: Add butter and honey: Brush the pears with melted butter, then drizzle the honey evenly over each half.
- Step 4: Season: Sprinkle the pears with cinnamon and a small pinch of salt. This helps bring out both the sweetness of the fruit and the savory edge of the cheese.
- Step 5: Add berries and walnuts: Top each pear half with a small spoonful of mixed berries and a sprinkle of chopped walnuts.
- Step 6: Bake: Bake for 20 to 25 minutes, or until the pears are tender and lightly caramelized around the edges.
- Step 7: Finish with blue cheese: Remove the baking dish from the oven and immediately sprinkle the warm pears with crumbled blue cheese so it softens slightly from the heat.
- Step 8: Garnish and serve: Finish with fresh thyme leaves if using, and drizzle with a little extra honey if you want a sweeter finish. Serve warm.
Nutrition
- Calories: 180
- Fat: 10g
- Carbs: 22g
- Protein: 3g
Rate This Recipe
Average Rating: 0 (0 votes)
How to Make Baked Pears with Berries, Honey, Walnuts & Blue Cheese
Step 1: Preheat the oven
Preheat your oven to 375°F (190°C). Lightly grease a baking dish large enough to hold the pear halves in a single layer.
Step 2: Prepare the pears
Arrange the pear halves cut-side up in the prepared baking dish. Make sure they sit fairly level so the toppings stay in place.
Step 3: Add butter and honey
Brush the pears with melted butter, then drizzle the honey evenly over each half.
Step 4: Season
Sprinkle the pears with cinnamon and a small pinch of salt. This helps bring out both the sweetness of the fruit and the savory edge of the cheese.
Step 5: Add berries and walnuts
Top each pear half with a small spoonful of mixed berries and a sprinkle of chopped walnuts.
Step 6: Bake
Bake for 20 to 25 minutes, or until the pears are tender and lightly caramelized around the edges.
Step 7: Finish with blue cheese
Remove the baking dish from the oven and immediately sprinkle the warm pears with crumbled blue cheese so it softens slightly from the heat.
Step 8: Garnish and serve
Finish with fresh thyme leaves if using, and drizzle with a little extra honey if you want a sweeter finish. Serve warm.
Tips for Success
A few simple tricks will help this recipe turn out beautifully every time:
- Choose ripe pears that still feel slightly firm so they do not collapse while baking
- Core the pears deeply enough to hold the berries and walnuts
- Do not overload the tops or the fruit may slide off during baking
- Add the blue cheese after baking so it softens without fully melting away
- Serve warm for the best contrast of textures and flavors
For entertaining, this dish also pairs nicely with simple, impressive starters and desserts. This Big Family Banana Pudding Is My Favorite Classic Dessert to Feed a Crowd is a great follow-up when you want a menu with both elegant and nostalgic elements.
Serving Suggestions and Pairings
These baked pears are incredibly versatile and can be served in a few different ways depending on the occasion.
Serve them as:
- A warm dinner-party dessert
- A brunch centerpiece alongside coffee and pastries
- An appetizer on a holiday table
- A sweet-savory addition to a cheese board spread
They pair especially well with:
- Sparkling water or iced tea
- A crisp white wine
- Greek yogurt or mascarpone
- Extra fresh berries on the side
For a bright and refreshing pairing, I love serving them with This Blueberry Lemonade Is My Favorite Refreshing Drink for Sunny Days. The fruity citrus notes work really well with the baked pears and berries.
Nutritional Information Per Serving
Estimated per pear half:
- Calories: 180
- Fat: 10g
- Carbohydrates: 22g
- Sugar: 16g
- Protein: 3g
- Fiber: 3g
- Sodium: 140mg
These values are approximate and can vary depending on the size of the pears and the exact cheese used.
Storage and Leftover Tips
These pears are best served warm the day they are made, but leftovers can still be enjoyed.
- Refrigerator: Store in an airtight container for up to 2 days
- Reheating: Warm gently in the oven or microwave before serving
- Make-ahead tip: Bake the pears and add the blue cheese just before serving for the freshest texture
- Leftover idea: Chop leftover pears and spoon them over yogurt or oatmeal
Because the texture of pears softens further after storage, they are best when freshly baked, but the flavors remain delicious.
More Recipes You’ll Love
If you enjoyed these Baked Pears with Berries, Honey, Walnuts, and Blue Cheese, here are a few more Chef Maniac favorites to try next:
- This Baked Brie Appetizer Is My Favorite Effortless Way to Impress Guests
- This Blueberry Lemonade Is My Favorite Refreshing Drink for Sunny Days
- This Grasshopper Pie Is My Favorite No-Bake Dessert with a Mint Chocolate Twist
- These Pecan Pie Bars Are My Favorite Make-Ahead Holiday Dessert
- This Big Family Banana Pudding Is My Favorite Classic Dessert to Feed a Crowd
Final Thoughts
Baked Pears with Berries, Honey, Walnuts, and Blue Cheese are the kind of dish that makes simple ingredients feel truly special. They are sweet, tangy, warm, crunchy, creamy, and just a little unexpected in the best possible way. Whether you serve them as an elegant dessert, a brunch feature, or part of a holiday spread, they bring a beautiful balance of flavor and texture to the table.
This is the sort of recipe I love sharing because it looks impressive, tastes memorable, and is surprisingly easy to pull off. If you make it, I would love to hear whether you kept the blue cheese classic or swapped in another cheese. Keep following along at Chef Maniac for more approachable recipes that feel a little elevated without ever getting complicated.