Homemade Pineapple Jam: A Sweet & Tangy Spread for Your Morning Toast
Print it, save it, or add it to your recipe binder.
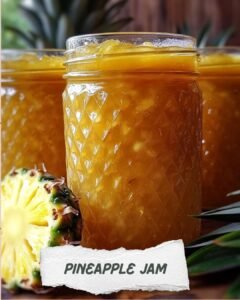
Homemade Pineapple Jam: Brighten Your Mornings with a Tropical Twist
Looking to shake up your breakfast routine? This homemade pineapple jam brings a sunny burst of tropical flavor to your kitchen. It’s sweet, slightly tangy, and absolutely perfect slathered on buttered toast, dolloped over yogurt, or paired with soft cheeses on a brunch board.
Best of all? You don’t need any commercial pectin—just simple ingredients, a little patience, and a good stirring arm.
Why I Love This Recipe
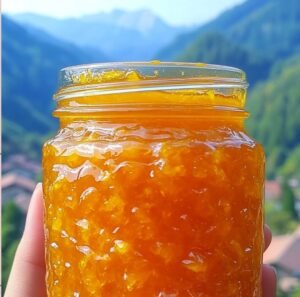
There’s something nostalgic about homemade jam. It’s comforting, it’s flavorful, and it fills your kitchen with the most incredible aroma. Pineapple jam, in particular, has a golden glow and a tropical tang that instantly transports you to warm beaches and sunny days—even in the dead of winter.
This small-batch jam is ideal for canning or gifting, and the process is just as satisfying as the final taste.
Ingredients
- 1 Quart Crushed Pineapple (fresh or canned)
- 2 1/2 Cups White Granulated Sugar
- 1/2 Large Lemon, Pulped and Juiced (thinly sliced, seeds removed)
- 1 Cup Water
Ingredient Notes & Swaps
- Pineapple: If using fresh pineapple, pulse it briefly in a food processor until crushed. Canned works too—just drain excess juice.
- Lemon: The pulp and juice act as natural pectin. For added zing, include some finely chopped lemon peel.
- Sugar: Feel free to reduce slightly if your pineapple is ultra-sweet, but be cautious—sugar helps with preservation.
Step-by-Step Instructions
- Prep Everything: Get your jars, lids, and rings ready. Sterilize them by boiling or running through a dishwasher cycle.
- Combine Ingredients: In a large saucepot, mix the crushed pineapple, sugar, lemon pulp and juice, and water.
- Bring to Boil: Heat the mixture over medium-high heat, stirring frequently to help the sugar dissolve and prevent sticking.
- Cook Until Set: Once boiling, cook it vigorously until the jam reaches the gelling point. Stir often—this could take 20–30 minutes depending on water content.
- Check for Doneness: Test the jam by placing a small spoonful on a chilled plate. If it wrinkles when you push it, it’s ready.
- Skim Foam: Remove from heat and skim off any foam that may have formed.
- Fill Jars: Ladle hot jam into warm, prepared jars. Leave 1/4-inch headspace.
- Seal & Process: Wipe rims, apply lids and rings finger-tight. Process jars in a boiling water bath for 15 minutes.
- Cool & Store: Let jars rest undisturbed for 12–24 hours. Check seals before storing. Label and date them.
Tips for Success
- Consistency Check: Don’t rely only on time—use the cold plate test or a thermometer (220°F/104°C).
- Don’t Skip the Lemon: It boosts flavor and helps the jam gel naturally.
- Small Batch is Key: This isn’t a mass-production jam—it’s best in small, fresh batches for peak flavor.
Serving Suggestions & Pairings
- Spread on warm toast, English muffins, or biscuits
- Swirl into Greek yogurt or cottage cheese
- Layer into trifles or cakes
- Serve alongside easy pumpkin spice muffins or scones
- Pair with soft cheeses like brie or cream cheese for a brunch board
- Try as a glaze for grilled chicken or pork
Storage & Shelf Life
- Sealed jars: Store in a cool, dark place for up to 12 months.
- Opened jars: Keep in the fridge and use within 2–3 weeks.
- Extra tip: Label your jars with the date—they make adorable edible gifts!
More Recipes You’ll Love
- This Blueberry Lemonade is My Favorite Refreshing Drink for Sunny Days
- This Edible Cookie Dough Is My Favorite No-Bake Treat for Late Night Cravings
- This No-Bake Oreo Cream Pie Is My Favorite Quick Dessert Hack
- These Caramel Apple Nachos Are My Favorite Quick Fall Dessert Trick
- These Easy Pumpkin Spice Muffins Are My Favorite Fall Treat to Bake on Repeat
Final Thoughts
This pineapple jam is sunshine in a jar. It’s cheerful, it’s flavorful, and it’s easy enough to make on a weekend morning. Whether you’re gifting it or savoring it yourself, it’s a joyful addition to your pantry.
Tried this recipe? I’d love to see your creations—tag me @chefmaniac and share your jam journey. And don’t forget to subscribe for more recipes that blend simplicity with crave-worthy flavor. 🍍✨
Homemade Pineapple Jam: A Sweet & Tangy Spread for Your Morning Toast
Homemade Pineapple Jam: Brighten Your Mornings with a Tropical Twist
Prep: min | Cook: min | Total: min
Servings:
Ingredients
- 1 Quart Crushed Pineapple (fresh or canned)
- 2 1/2 Cups White Granulated Sugar
- 1/2 Large Lemon, Pulped and Juiced (thinly sliced, seeds removed)
- 1 Cup Water
- Ingredient Notes & Swaps:
- Pineapple: If using fresh pineapple, pulse it briefly in a food processor until crushed. Canned works too—just drain excess juice.
- Lemon: The pulp and juice act as natural pectin. For added zing, include some finely chopped lemon peel.
- Sugar: Feel free to reduce slightly if your pineapple is ultra-sweet, but be cautious—sugar helps with preservation.
- Step-by-Step Instructions:
- Prep Everything: Get your jars, lids, and rings ready. Sterilize them by boiling or running through a dishwasher cycle.
- Combine Ingredients: In a large saucepot, mix the crushed pineapple, sugar, lemon pulp and juice, and water.
- Bring to Boil: Heat the mixture over medium-high heat, stirring frequently to help the sugar dissolve and prevent sticking.
- Cook Until Set: Once boiling, cook it vigorously until the jam reaches the gelling point. Stir often—this could take 20–30 minutes depending on water content.
- Check for Doneness: Test the jam by placing a small spoonful on a chilled plate. If it wrinkles when you push it, it’s ready.
- Skim Foam: Remove from heat and skim off any foam that may have formed.
- Fill Jars: Ladle hot jam into warm, prepared jars. Leave 1/4-inch headspace.
- Seal & Process: Wipe rims, apply lids and rings finger-tight. Process jars in a boiling water bath for 15 minutes.
- Cool & Store: Let jars rest undisturbed for 12–24 hours. Check seals before storing. Label and date them.
- Tips for Success:
- Consistency Check: Don’t rely only on time—use the cold plate test or a thermometer (220°F/104°C).
- Don’t Skip the Lemon: It boosts flavor and helps the jam gel naturally.
- Small Batch is Key: This isn’t a mass-production jam—it’s best in small, fresh batches for peak flavor.
- Serving Suggestions & Pairings:
- Spread on warm toast, English muffins, or biscuits
- Swirl into Greek yogurt or cottage cheese
- Layer into trifles or cakes
- Serve alongside easy pumpkin spice muffins or scones
- Pair with soft cheeses like brie or cream cheese for a brunch board
- Try as a glaze for grilled chicken or pork
- Storage & Shelf Life:
- Sealed jars: Store in a cool, dark place for up to 12 months.
- Opened jars: Keep in the fridge and use within 2–3 weeks.
- Extra tip: Label your jars with the date—they make adorable edible gifts!
- More Recipes You’ll Love:
- This Blueberry Lemonade is My Favorite Refreshing Drink for Sunny Days
- This Edible Cookie Dough Is My Favorite No-Bake Treat for Late Night Cravings
- This No-Bake Oreo Cream Pie Is My Favorite Quick Dessert Hack
- These Caramel Apple Nachos Are My Favorite Quick Fall Dessert Trick
- These Easy Pumpkin Spice Muffins Are My Favorite Fall Treat to Bake on Repeat
- Final Thoughts:
Instructions
- Prep : Everything: Get your jars, lids, and rings ready. Sterilize them by boiling or running through a dishwasher cycle.
- Combine : Ingredients: In a large saucepot, mix the crushed pineapple, sugar, lemon pulp and juice, and water.
- Bring to : Boil: Heat the mixture over medium-high heat, stirring frequently to help the sugar dissolve and prevent sticking.
- Cook : Until Set: Once boiling, cook it vigorously until the jam reaches the gelling point. Stir often—this could take 20–30 minutes depending on water content.
- Check for : Doneness: Test the jam by placing a small spoonful on a chilled plate. If it wrinkles when you push it, it’s ready.
- Skim : Foam: Remove from heat and skim off any foam that may have formed.
- Fill : Jars: Ladle hot jam into warm, prepared jars. Leave 1/4-inch headspace.
- Seal & : Process: Wipe rims, apply lids and rings finger-tight. Process jars in a boiling water bath for 15 minutes.
- Cool & : Store: Let jars rest undisturbed for 12–24 hours. Check seals before storing. Label and date them.
- Tips for Success: Consistency Check: Don’t rely only on time—use the cold plate test or a thermometer (220°F/104°C).
- Don’t Skip the Lemon: It boosts flavor and helps the jam gel naturally.
- Small : Batch is Key: This isn’t a mass-production jam—it’s best in small, fresh batches for peak flavor.
- Serving Suggestions & Pairings: Spread on warm toast, English muffins, or biscuits
- Swirl into : Greek yogurt or cottage cheese
- Layer into trifles or cakes
- Serve alongside easy pumpkin spice muffins or scones
- Pair with soft cheeses like brie or cream cheese for a brunch board
- Try as a glaze for grilled chicken or pork
- Storage & Shelf Life: Sealed jars: Store in a cool, dark place for up to 12 months.
- Opened jars: Keep in the fridge and use within 2–3 weeks.
- Extra tip: Label your jars with the date—they make adorable edible gifts!
- More Recipes You’ll Love: This Blueberry Lemonade is My Favorite Refreshing Drink for Sunny Days
- This : Edible Cookie Dough Is My Favorite No-Bake Treat for Late Night Cravings
- This : No-Bake Oreo Cream Pie Is My Favorite Quick Dessert Hack
- These : Caramel Apple Nachos Are My Favorite Quick Fall Dessert Trick
- These : Easy Pumpkin Spice Muffins Are My Favorite Fall Treat to Bake on Repeat
- Final Thoughts: This pineapple jam is sunshine in a jar. It’s cheerful, it’s flavorful, and it’s easy enough to make on a weekend morning. Whether you're gifting it or savoring it yourself, it’s a joyful addition to your pantry.
- Tried this recipe? I’d love to see your creations—tag me @chefmaniac and share your jam journey. And don’t forget to subscribe for more recipes that blend simplicity with crave-worthy flavor. 🍍✨
Nutrition
- Calories:
- Fat:
- Carbs:
- Protein:
Rate This Recipe
Average Rating: 0 (0 votes)