Classic Rock Buns: The Nostalgic British Treat You Can Make in Minutes
By: Jason Griffith
Introduction
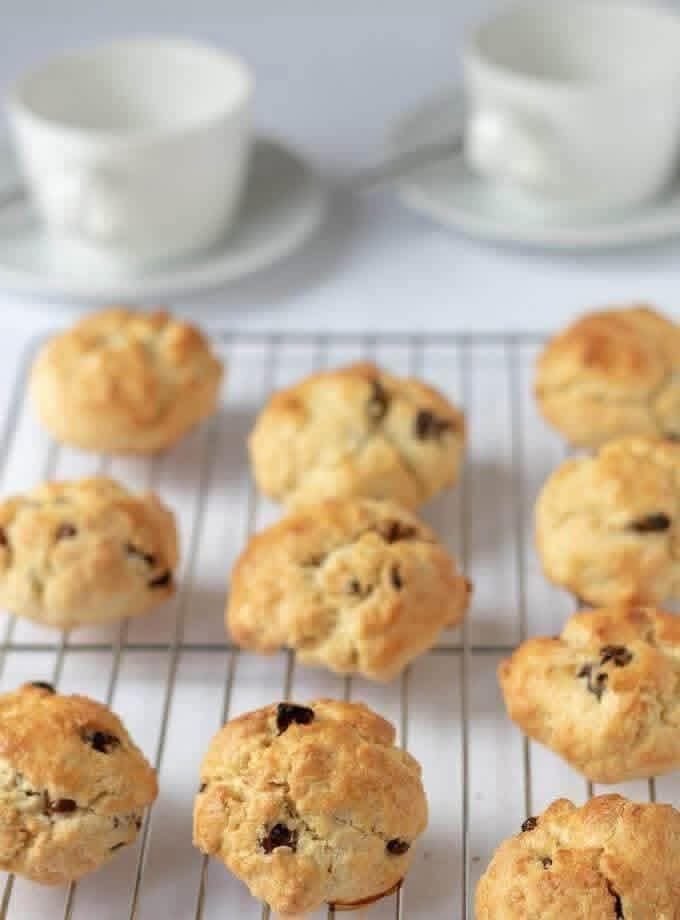
If you grew up in a household that appreciated a proper afternoon tea, or if you’ve ever found yourself wandering through a charming English bakery, you’ve likely encountered the Rock Bun. Often called “Rock Cakes,” these craggy, rustic treats are a staple of British baking for a very good reason: they are incredibly simple, fast, and satisfying.
Despite their name and their rugged, rocky appearance, a well-made rock bun is anything but hard. They are essentially a cross between a scone and a cookie—tender on the inside with a delightful crunch on the exterior. They became especially famous during WWII rationing because they required fewer eggs and less sugar than traditional cakes, but today, they remain a favorite for busy parents and beginner bakers alike.
Why I Love This Recipe
I am a huge fan of “low-effort, high-reward” baking. Much like my easy cake mix cookies, these rock buns come together in one bowl without the need for a stand mixer.
What I love most is their texture. The “rubbing-in” method used for the butter creates a crumbly, shortbread-like base that holds onto the dried fruit beautifully. Plus, you don’t have to worry about making them look perfect. In fact, the uglier and more “rock-like” they look before they hit the oven, the better they look when they come out! If you enjoy the warm, spiced notes of this recipe, you might also find yourself reaching for these easy pumpkin spice muffins during the autumn months.
Ingredients You’ll Need
To get that classic flavor, you only need a few pantry staples:
- All-purpose flour: 2 cups (250g)
- Baking powder: 2 tsp (This provides the lift since we aren’t using self-rising flour)
- Ground nutmeg or mixed spice: ½ tsp (Optional, but adds that signature warmth)
- Salt: A pinch to balance the sweetness
- Cold unsalted butter: ½ cup (115g), cubed (Keep it cold for the best texture!)
- Granulated sugar: ½ cup (1000g)
- Mixed dried fruits: ¾ cup (100g) — Raisins, currants, or sultanas work best.
- Egg: 1 large
- Milk: 2–3 tbsp (Just enough to bind the dough)
- Vanilla extract: 1 tsp
Swaps and Notes
- The Fruit: While currants are traditional, you can use dried cranberries, chopped dried apricots, or even chocolate chip cookie bites if you want a modern, kid-friendly twist.
- The Fat: If you don’t have butter, margarine can be used, but the flavor won’t be as rich.
- The Spice: If you don’t have nutmeg, cinnamon is a fantastic substitute.
- Gluten-Free: A 1:1 gluten-free flour blend works surprisingly well here because the dough is meant to be stiff.
Step-by-Step Instructions
- Prep the Oven: Preheat your oven to 375°F (190°C). Line a large baking tray with parchment paper or a silicone mat.
- Combine Dry Ingredients: In a large mixing bowl, sift together the flour, baking powder, nutmeg (or mixed spice), and salt.
- The Rubbing-In Method: Add the cold, cubed butter to the flour. Using your fingertips, rub the butter into the flour until the mixture resembles coarse breadcrumbs. You don’t want large chunks of butter left, but you also don’t want it to turn into a paste.
- Add Sugar and Fruit: Stir in the granulated sugar and your choice of dried fruits until evenly distributed.
- Wet Ingredients: In a small separate bowl, lightly beat the egg with 2 tablespoons of milk and the vanilla extract.
- Form the Dough: Pour the egg mixture into the dry ingredients. Use a fork or a wooden spoon to bring it together. If it’s too dry to hold, add the third tablespoon of milk. You are looking for a stiff, sticky dough—not a runny batter.
- Shape and Bake: Using two spoons, drop rough, craggy heaps of dough onto the tray. Do not smooth them out! They should look like little rocks.
- Bake: Bake for 15–20 minutes until the edges are golden brown and the tops feel firm.
- Cool: Let them sit on the tray for 5 minutes before moving them to a wire rack.
Tips for Success
- Don’t Over-Mix: Once you add the liquid, mix just until the flour is hydrated. Over-mixing leads to tough rock buns.
- Keep it Cold: Using cold butter is the secret to that slightly flaky, scone-like interior.
- The Craggy Look: Resist the urge to roll these into balls. The “peaks” on the dough catch the heat and become deliciously crisp.
- Top with Sugar: For an extra crunch, sprinkle a little Demerara sugar or coarse sparkling sugar on top before baking.
Serving Suggestions and Pairings
Rock buns are best served slightly warm with a bit of butter or even a dollop of clotted cream and jam.
- For Tea Time: Pair these with a strong black tea (like Earl Grey or English Breakfast).
- For a Summer Refreshment: If you’re serving these on a hot day, they go wonderfully with a glass of cold blueberry lemonade.
- For Breakfast: They make a great “on-the-go” breakfast, much like a slice of chocolate chip banana bread.
Nutritional Information (Per Serving)
Estimate based on 12 buns per batch:
- Calories: 185 kcal
- Fat: 8g
- Carbohydrates: 26g
- Sugar: 12g
- Protein: 3g
- Fiber: 1g
Storage and Leftover Tips
Rock buns are at their peak the day they are baked. However, if you have leftovers:
- Room Temperature: Store in an airtight container for up to 3 days.
- Reheating: To bring back that “fresh-baked” feel, pop them in a 300°F oven for 5 minutes or microwave for 10 seconds.
- Freezing: These freeze beautifully! Wrap them individually in plastic wrap and store in a freezer bag for up to 3 months. Thaw at room temperature.
Final Thoughts
Rock buns are a testament to the fact that you don’t need fancy equipment or expensive ingredients to create something comforting and delicious. They are the perfect project for kids or a quick fix when unexpected guests drop by for coffee.
I’d love to hear how yours turned out! Did you stick with raisins or try something new? Leave a comment below and don’t forget to follow Chefmaniac for more classic recipes.


Leave a Reply