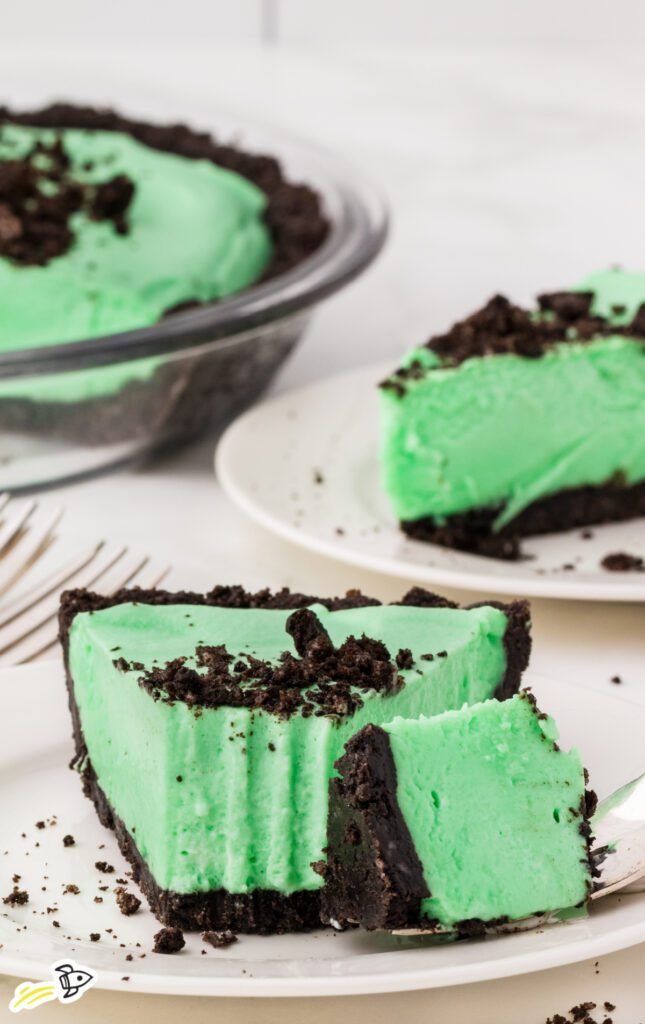
If you’re a fan of cool, creamy desserts and anything mint chocolate, this Grasshopper Pie is going to steal your heart. It’s light, fluffy, and rich all at once—thanks to a smooth mint filling, crushed Oreo crust, and a hint of chocolate that ties everything together. The best part? It’s no-bake, which makes it an easy win for holidays, potlucks, or any time you want a make-ahead treat that’s both nostalgic and impressive.
The first time I made it was for a spring brunch where I wanted something green (St. Patrick’s Day, anyone?) and a little retro. I remembered Grasshopper Pie from my grandma’s recipe box—yes, the one with the faded ink and chocolate smudges—and figured it was time to bring it back. One slice in, I knew it wasn’t just a throwback. It’s fresh, fun, and still totally worthy of a spot at any dessert table.
Let me walk you through exactly how I make it and why you’ll want to keep this recipe in your back pocket all year long.
Why This Grasshopper Pie Works
This dessert has stood the test of time for a reason. Here’s why it’s still a crowd-pleaser:
- No baking needed: Perfect for warm-weather entertaining
- Minty, creamy filling: Light but rich, with a hint of cool sweetness
- Oreo cookie crust: Adds texture and chocolate depth
- Kid-friendly, but grown-up approved: Sweet, smooth, and not too boozy
- Make-ahead convenience: Chill it overnight and it’s ready to go
Ingredients You’ll Need
(Serves 8 | Prep Time: 15 minutes | Chill Time: 4 hours or overnight)
For the Crust:
- 24 Oreo cookies, crushed
- 5 tablespoons butter, melted
For the Filling:
- 1 package (8 oz) cream cheese, softened
- 1 can (14 oz) sweetened condensed milk
- 1/2 teaspoon peppermint extract (or crème de menthe if you prefer a boozy version)
- Green food coloring (optional, just a few drops)
- 1 container (8 oz) whipped topping (like Cool Whip), thawed
- Optional: mini chocolate chips or chocolate shavings for garnish
How I Make Grasshopper Pie
1. Make the Crust
I start by crushing the Oreos—filling and all—in a food processor until they’re fine crumbs. Then I stir in the melted butter until the mixture resembles wet sand.
I press the crumbs into a 9-inch pie dish, making sure to go up the sides. Once it’s evenly packed, I pop it in the fridge to set while I prep the filling.
2. Whip Up the Mint Filling
In a large bowl, I beat the softened cream cheese until it’s smooth and lump-free. Then I add the sweetened condensed milk and mix until fully combined.
Next, I stir in the peppermint extract (or crème de menthe for a more traditional touch), along with a few drops of green food coloring if I want that signature pastel mint hue. Once the color is evenly blended, I gently fold in the whipped topping until everything is light, fluffy, and airy.
3. Fill and Chill
I spoon the mint filling into the chilled crust and smooth it out with a spatula. Then it goes into the fridge for at least 4 hours—but ideally overnight. This helps it firm up into sliceable, mousse-like perfection.
4. Garnish and Serve
Before serving, I like to sprinkle chocolate shavings or mini chocolate chips on top for a little extra texture. A drizzle of chocolate syrup or a dollop of whipped cream wouldn’t hurt either.
My Tips for the Best Grasshopper Pie
- Use peppermint extract carefully: A little goes a long way. Start with 1/2 teaspoon and taste—add more if needed.
- Want it boozy? Replace peppermint extract with 2 tablespoons crème de menthe liqueur.
- Chill fully before slicing: This pie sets best when given several hours in the fridge.
- Use a springform pan if you want to remove it for a clean edge presentation.
- Make it ahead: It holds beautifully in the fridge for 2–3 days, so it’s a great prep-ahead dessert.
How I Serve and Store It
I serve this pie chilled, straight from the fridge. It’s soft but sliceable, with a texture that’s somewhere between cheesecake and mousse. I use a warm knife to cut clean slices, especially if I’ve just pulled it from the fridge.
To store, I cover the pie loosely with foil or plastic wrap and keep it in the refrigerator. It’ll stay fresh for up to 3 days, but honestly—it rarely lasts that long around here. You can also freeze it and serve it semi-frozen for a cool summer treat.
FAQs From My Dessert Table
Q: Can I make this with homemade whipped cream instead of Cool Whip?
A: Absolutely. Whip 1 cup of heavy cream with 2 tablespoons of powdered sugar until stiff peaks form, then fold it in gently just like you would with Cool Whip.
Q: Is this the same as a traditional Grasshopper Pie with crème de menthe and crème de cacao?
A: Not exactly. This version is alcohol-free (unless you add it), making it more family-friendly. But the flavor is still totally on point.
Q: Can I use a store-bought chocolate crust?
A: You can! It makes the process even easier. Just make sure it’s deep enough to hold all the filling.
Q: Does this taste like toothpaste?
A: Not at all. It’s minty, but in a sweet, refreshing way—think mint chocolate chip ice cream, not mouthwash.
Why This Grasshopper Pie Has a Permanent Spot in My Recipe Binder
This Grasshopper Pie is the kind of recipe that feels playful and nostalgic while still delivering serious flavor. It’s creamy, minty, and just rich enough to feel indulgent without being heavy. And because it’s no-bake and make-ahead, it’s a dream for entertaining—or just satisfying that late-night dessert craving.
Whether you’re making it for St. Patrick’s Day, a spring celebration, or just because, this pie is guaranteed to please a crowd (and maybe leave you sneaking a slice from the fridge the next day).

Grasshopper Pie
Ingredients
- 2 teaspoons peppermint extract (or crème de menthe if you prefer a boozy version)
- 1 cup heavy cream
- 2 tablespoons powdered sugar
- 1 package Oreo cookies, crushed
- 4 tablespoons unsalted butter, melted
- 1 cup cream cheese, softened
- 1/2 cup granulated sugar
- 1/4 cup milk
- Green food coloring (optional)
- Chocolate shavings (for garnish)
Instructions
- In a bowl, combine the crushed Oreo cookies and melted butter until well mixed.
- Press the Oreo mixture into the bottom of a 9-inch pie pan to form the crust. Refrigerate while preparing the filling.
- In a separate bowl, beat the cream cheese and granulated sugar until smooth.
- Add the heavy cream, powdered sugar, peppermint extract, and milk to the cream cheese mixture. Beat until fluffy and stiff peaks form.
- If desired, add a few drops of green food coloring and mix until evenly colored.
- Pour the filling into the prepared crust and spread evenly.
- Refrigerate the pie for at least 4 hours or until set.
- Before serving, garnish with chocolate shavings.


Leave a Reply