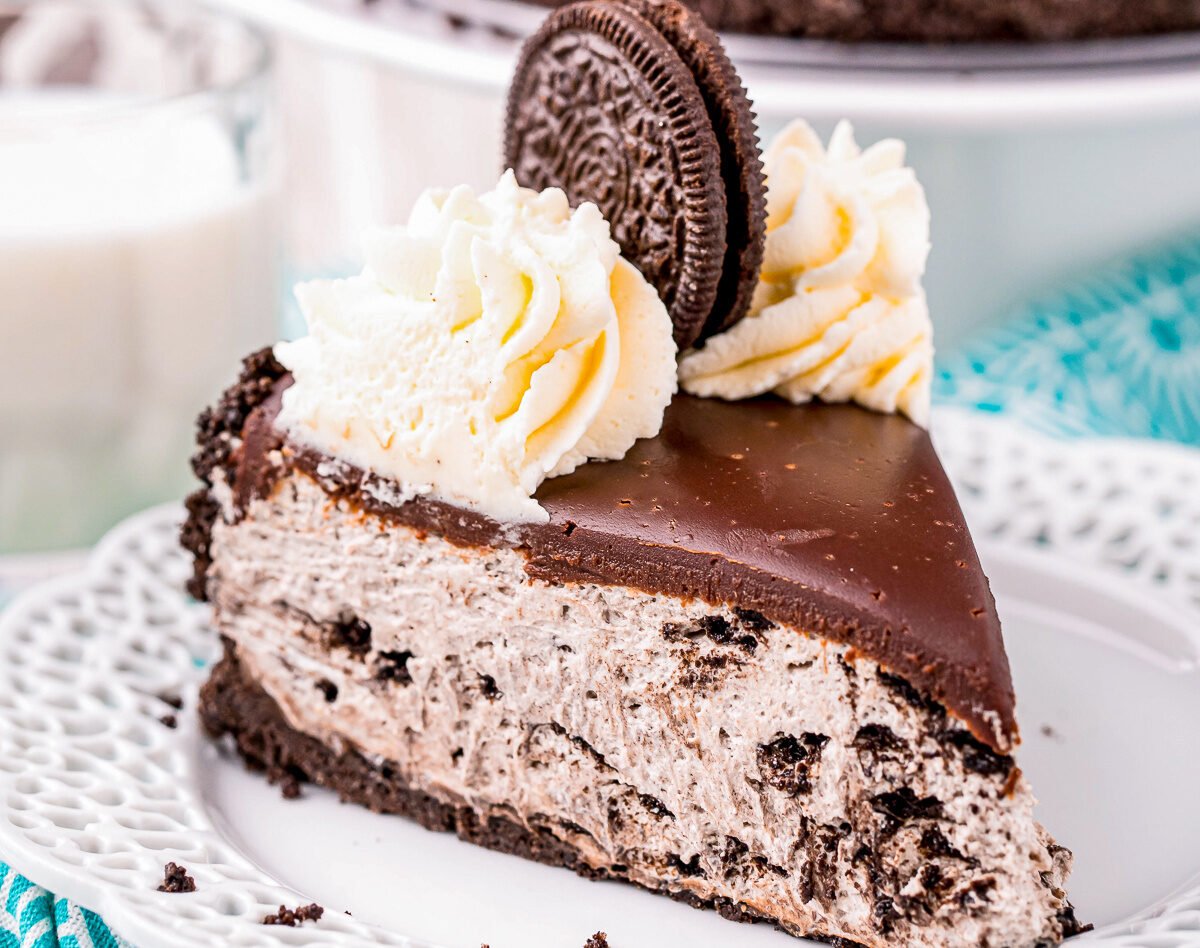
When it comes to desserts that deliver maximum satisfaction with minimal fuss, a truly exceptional no-bake cheesecake reigns supreme. And when that cheesecake is loaded with the iconic flavor and crunch of Oreos, you’ve got a recipe for pure dessert magic. Our BEST No-Bake Oreo Cheesecake is a rich, luscious, and utterly irresistible creation, featuring a classic Oreo crust and a velvety smooth, cookies-and-cream-packed filling, all without ever needing to turn on your oven. It’s the ultimate crowd-pleaser, perfect for summer gatherings, potlucks, birthdays, or any time you crave a cool, decadent, and delightfully fun dessert. Get ready for a cheesecake that’s as easy to make as it is impossible to stop eating!
Why I Love This Recipe
There are countless reasons why this No-Bake Oreo Cheesecake has earned its place as a perennial favorite. For me, it’s the sheer simplicity combined with the phenomenal outcome. The crust, made simply from crushed whole Oreos and melted butter, creates an intensely chocolatey and perfectly sturdy foundation that’s far superior to any plain graham cracker. Then there’s the filling: a dream of creamy, tangy perfection from the full-fat cream cheese, lightened and enriched with real whipped cream, and studded generously with delightful chunks of more Oreos. Every spoonful offers that perfect textural contrast – the satisfying crunch of the crust, the smooth, cool creaminess of the filling, and the tender chew of the cookie bits. It’s remarkably foolproof, requires no baking expertise, and yet presents beautifully, making it an ideal choice when you want to impress without the stress.
List of Ingredients
To whip up this absolutely irresistible No-Bake Oreo Cheesecake, here’s what you’ll need:
For the Oreo Crust:
- 36 Oreo cookies (regular, not double-stuffed), finely crushed (about 3 cups crumbs)
- 1/2 cup (1 stick) unsalted butter, melted
For the Cheesecake Filling:
- 2 (8-ounce) packages full-fat cream cheese, softened to room temperature
- 1/2 cup granulated sugar
- 1 teaspoon vanilla extract
- 1 1/2 cups cold heavy whipping cream
- 1/2 cup powdered sugar, sifted
- 15-20 Oreo cookies, coarsely chopped (about 1 1/2 cups)
For Garnish (Optional):
- Extra Oreo cookies, halved or crushed
- Whipped cream (homemade or store-bought)
- Chocolate syrup for drizzling
Swaps and Notes
- Oreo Cookies: Stick to regular Oreo cookies for both the crust and the filling. The cream filling in regular Oreos helps bind the crust and adds to the richness of the cheesecake filling. Using “Double Stuf” or other specialty flavors might alter the balance or texture.
- Butter: Use unsalted butter for the crust. Ensure it’s fully melted for easy mixing with the crumbs.
- Cream Cheese: Full-fat, brick-style cream cheese, softened to room temperature, is non-negotiable for a smooth, firm, and creamy cheesecake filling. Whipped or low-fat cream cheese varieties will not set properly and will result in a runny filling.
- Sugars: Granulated sugar sweetens the cream cheese base, while sifted powdered sugar sweetens and helps stabilize the whipped cream component of the filling. Sifting the powdered sugar is highly recommended to prevent lumps.
- Heavy Whipping Cream: The heavy whipping cream must be very cold to whip up properly into stiff peaks. For best results, consider chilling your mixing bowl and whisk attachment in the freezer for 10−15 minutes before whipping. Do not substitute with frozen whipped topping (like Cool Whip) for the filling itself, as real whipped cream provides superior texture and stability (though Cool Whip can be used as an optional topping).
- Vanilla Extract: Pure vanilla extract enhances the overall flavor profile significantly.
- Chopped Oreos: The amount of coarsely chopped Oreos for the filling can be adjusted to your preference – some like it loaded, others prefer fewer chunks.
- Pan Size: A 9-inch springform pan is ideal for easy removal and an elegant presentation. You can also use a 9×13-inch baking dish, though slicing and serving will be different.
List of Steps for the Recipe
Creating this No-Bake Oreo Cheesecake is all about precise preparation, careful mixing, and plenty of patience for chilling!
- Prepare the Oreo Crust:
- Crush Oreos: In a food processor, pulse 36 Oreo cookies until they are finely crushed into crumbs. If you don’t have a food processor, place the cookies in a large Ziploc bag and crush them thoroughly with a rolling pin.
- Combine with Butter: Transfer the Oreo crumbs to a medium bowl. Pour the 1/2 cup of melted butter over the crumbs and stir with a fork until all crumbs are evenly moistened.
- Press into Pan: Press the mixture firmly and evenly into the bottom of a 9-inch springform pan. Use the bottom of a flat glass or a measuring cup to compact the crust firmly. You can optionally press it slightly up the sides (about 1 inch) for a more defined crust edge.
- Chill Crust: Place the prepared crust in the refrigerator to chill and firm up while you prepare the filling (at least 15−30 minutes).
- Make the Cheesecake Filling (Two Parts):
- Whip Cream Cheese Mixture: In a large mixing bowl, using an electric mixer, beat the softened cream cheese, 1/2 cup granulated sugar, and 1 teaspoon vanilla extract on medium speed until the mixture is completely smooth, creamy, and lump-free (about 2−3 minutes). Scrape down the sides of the bowl as needed. Set this mixture aside.
- Whip Heavy Cream: In a separate, chilled large mixing bowl (or the bowl of your stand mixer), beat the 1 1/2 cups of very cold heavy whipping cream and 1/2 cup sifted powdered sugar on medium-high speed until stiff peaks form. The cream should be thick enough to hold its shape when the whisk is lifted. Be careful not to over-whip into butter.
- Combine Filling & Add Oreos:
- Using a rubber spatula, gently fold about half of the whipped cream into the cream cheese mixture until just combined. Then, fold in the remaining whipped cream until no streaks remain and the mixture is light and airy.
- Gently fold in the 15-20 coarsely chopped Oreo cookies until they are evenly distributed throughout the filling.
- Assemble the Cheesecake:
- Spoon the entire cheesecake filling evenly over the chilled Oreo crust in the springform pan. Use an offset spatula or the back of a spoon to spread the filling smoothly and evenly across the top.
- Gently tap the pan on the counter a few times to help release any trapped air bubbles and ensure the filling settles.
- Chill (Crucial Step!):
- Cover the springform pan tightly with plastic wrap.
- Place the cheesecake in the refrigerator for a minimum of 6 hours, but preferably overnight, to allow the cheesecake to firm up and set completely. This extended chilling is absolutely essential for a clean slice and stable texture.
- Decorate & Serve:
- Once the cheesecake is fully set, carefully run a thin knife around the edge of the pan before releasing and removing the springform ring.
- Transfer the cheesecake to a serving platter.
- Decorate with extra halved or crushed Oreos, a dollop of whipped cream, or a drizzle of chocolate syrup if desired.
- Slice with a sharp, warm knife (run under hot water and wipe dry between slices for clean cuts) and serve cold.
Tips for Success
- Room Temperature Cream Cheese: This is the most critical tip! If your cream cheese isn’t soft, you’ll end up with lumps in your filling. Plan ahead and take it out of the fridge at least an hour before you start.
- Cold Heavy Cream & Chilled Bowl: To get perfect, stiff peaks from your heavy cream, ensure both the cream and your mixing bowl (and whisk attachment) are thoroughly chilled.
- Don’t Over-Whip Whipped Cream: Keep an eye on the heavy cream as you whip it. Stop as soon as stiff peaks form; over-whipping can result in a grainy texture or even turn it into butter.
- Gentle Folding: When combining the whipped cream with the cream cheese mixture, use a gentle folding motion with a rubber spatula. This preserves the air incorporated into the whipped cream, contributing to the cheesecake’s light and airy texture.
- Patience with Chilling: The long chill time is non-negotiable for a no-bake cheesecake. It needs ample time to set properly, resulting in a firm, sliceable dessert.
- Springform Pan Advantage: While you can make this in a regular 9×13-inch dish, a springform pan makes for a beautiful presentation and much easier slicing and serving.
- Warm Knife for Slicing: For impeccably clean slices, run your knife under hot water and wipe it dry between each cut. This helps glide through the creamy filling and crust.
Serving Suggestions and Pairings
This No-Bake Oreo Cheesecake is a showstopper on its own, but here are some delightful ways to serve and pair it:
- Simple Elegance: A classic slice with just a few extra Oreo crumbs on top is always a winning choice.
- Extra Whipped Cream: A dollop of fresh, unsweetened whipped cream provides a lovely, light contrast to the rich cheesecake.
- Chocolate Sauce: A drizzle of hot fudge, chocolate syrup, or even a homemade chocolate ganache takes the chocolate factor over the top.
- Ice Cream: Serve a slice alongside a scoop of vanilla bean, chocolate, or even mint chocolate chip ice cream for an extra decadent treat.
- Coffee or Milk: A natural and comforting companion for this rich and creamy dessert.
- Celebration Cake: Its impressive appearance and crowd-pleasing flavor make it ideal for birthdays, graduations, or any festive gathering.
Nutritional Information
A single serving of The BEST No-Bake Oreo Cheesecake (approximately 1/12th of the recipe, without optional garnishes) contains:
- Calories: Approximately 450−550 calories
- Fat: Approximately 30−40g
- Carbohydrates: Approximately 35−45g
- Protein: Approximately 5−8g
- Fiber: Approximately 1−2g
- Sodium: Approximately 250−350mg
Please note that these are approximate values and can vary based on the specific brands of ingredients (especially Oreos and cream cheese), precise measurements, and the size of your slices.
Storage and Leftover Tips
This No-Bake Oreo Cheesecake stores beautifully, making it an excellent make-ahead dessert!
- Refrigeration: Store any leftover cheesecake, covered tightly with plastic wrap or in an airtight container, in the refrigerator for up to 4−5 days. The crust may soften slightly over time, but the flavor will remain excellent.
- Freezing: This cheesecake freezes wonderfully. Once completely set, remove it from the springform pan. Wrap the entire cheesecake (or individual slices) tightly in plastic wrap, then in aluminum foil. Freeze for up to 1−2 months.
- To Thaw: Thaw overnight in the refrigerator. The texture will be slightly softer after thawing, but still delicious and creamy.
Final Thoughts
The BEST No-Bake Oreo Cheesecake is more than just a recipe; it’s a testament to how simple ingredients, combined with careful attention to detail, can create an extraordinary dessert. It’s rich, creamy, packed with iconic Oreo flavor, and best of all, requires no oven time, making it perfect for any time of year. This recipe is destined to become your go-to for a fun, impressive, and utterly delicious treat that will have everyone asking for more.
Have you tried making a no-bake Oreo cheesecake before? What are your favorite no-bake desserts? Share your thoughts, tips, and photos in the comments below – we love hearing from you! And don’t forget to follow Chefmaniac.com for more irresistible dessert recipes and culinary inspiration!


Leave a Reply