Introduction
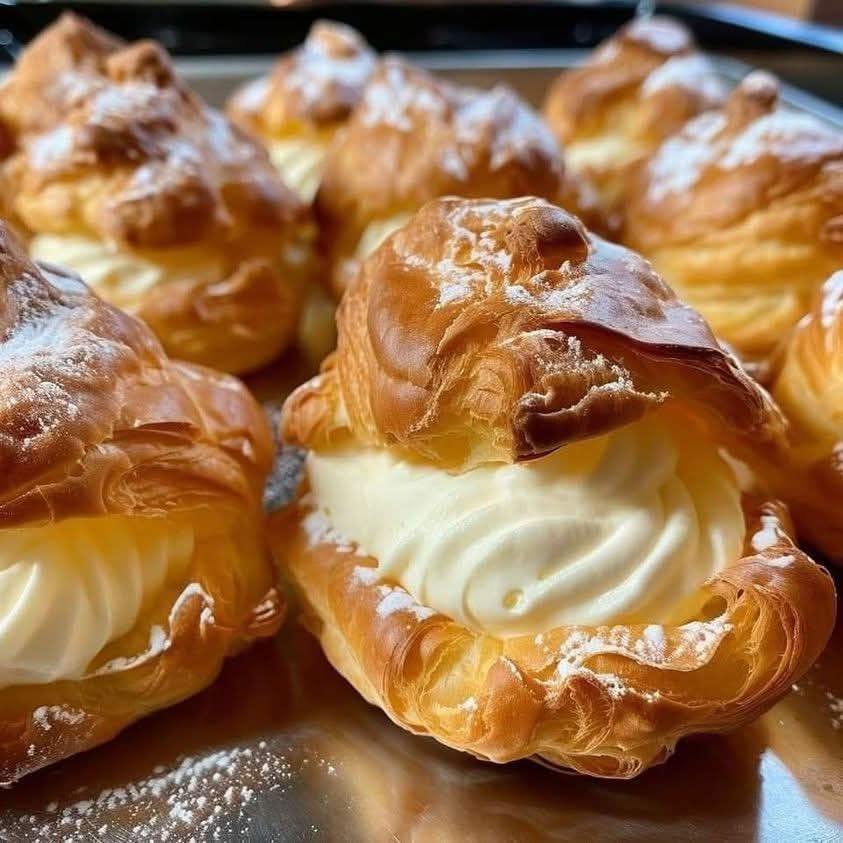
There is something inherently magical about a cream puff. It’s a dessert that looks like it belongs in a high-end French patisserie, yet it’s born from the simplest of pantry staples: flour, water, butter, and eggs. Growing up, Mom’s Famous Cream Puffs were the highlight of every birthday, holiday, and “just because” Sunday afternoon.
I’m Jason Griffith, and I’ve spent years in the kitchen trying to replicate that specific childhood nostalgia. While many are intimidated by pâte à choux (the technical name for the dough), my mom’s method simplifies the process so anyone can achieve that perfect, hollow, golden-brown shell. Whether you are a seasoned baker or someone who usually sticks to these chocolate chip cookie bites, this recipe is well within your reach.
Why I Love This Recipe
What sets this recipe apart from your standard bakery fare is the texture. The shells are crisp and sturdy, but the moment you bite into them, they give way to a light, airy center filled with a rich, velvety vanilla cream.
Unlike other complicated desserts, these cream puffs don’t require fancy equipment—just a sturdy wooden spoon and a bit of arm muscle. Plus, the filling is a “cheat code” that tastes like it took hours but actually comes together in minutes. It’s the kind of reliable comfort food that reminds me of why I love sharing recipes here at Chef Maniac.
The Ingredients
The Pastry Shells
- 1 stick Butter: Unsalted is preferred so you can control the salt content.
- 1 cup Water: The base for the steam that makes the puffs rise.
- 1 tsp Vanilla: To add depth to the dough itself.
- 1 cup All-Purpose Flour: Provides the structure.
- 4 large Eggs: These are crucial for the lift and the rich, golden color.
Mom’s Famous Filling
- 1 pint Heavy Cream: High fat content is a must for a thick, stable filling.
- 1 package (3.4 ounces) Instant Vanilla Pudding: This acts as a flavor agent and stabilizer.
- 1/3 cup Milk: To help the pudding mix incorporate smoothly.
Swaps and Notes
- The Flour: Stick to all-purpose flour. Bread flour makes them too tough, and cake flour doesn’t have enough protein to hold the “puff.”
- The Filling: If you aren’t a fan of vanilla, you can use chocolate or butterscotch instant pudding for a different flavor profile.
- Dairy-Free: While difficult with cream puffs, you can use a high-quality plant-based butter, but the heavy cream in the filling is harder to substitute while maintaining that signature “Mom’s” thickness.
- Sugar: The dough itself isn’t sweet, which is why the filling and the dusting of powdered sugar are so important!
Step-by-Step Instructions
1. The Dough Base
In a medium saucepan, combine the water, butter, and vanilla. Bring the mixture to a rolling boil over medium-high heat. Ensure the butter is completely melted before moving to the next step.
2. Adding the Flour
Turn the heat down to low and add the flour all at once. Stir constantly with a wooden spoon. The mixture will look like a mess for a second, then suddenly transform into a smooth ball that pulls away from the sides of the pot. Continue to cook and stir for about 1 minute to “cook out” the raw flour taste.
3. The Cooling Phase
Remove the pot from the heat. It is vital to let the dough cool for about 5-10 minutes. If you add the eggs while the dough is boiling hot, you’ll end up with scrambled eggs!
4. Incorporating the Eggs
Beat in the 4 eggs, one at a time. Do not add the next egg until the previous one is fully incorporated. The dough will look like it’s breaking, but keep stirring! By the fourth egg, the dough should be silky, shiny, and hang in a “V” shape from your spoon.
5. Baking to Perfection
Drop the dough by the tablespoon onto parchment-lined cookie sheets. For nice large puffs, aim for 8 mounds. Bake at 400°F for about 40 minutes.
Pro Tip: Once you take them out, poke a small hole in the side of each puff with a toothpick. Return them to the oven with the heat OFF and the door cracked open. This allows the internal steam to escape so they don’t get soggy or deflate.
6. The Filling
While the shells cool completely, make the filling. Combine the heavy cream, instant pudding, and milk in a mixer. Beat on high until the mixture is thick and holds its shape.
7. Assembly
Slice the cooled shells in half horizontally. Pipe or scoop a generous amount of Mom’s filling into the bottom half, then replace the top.
Tips for Success
- Don’t Peek: Do not open the oven door during the first 25 minutes of baking. The rush of cool air can cause the puffs to collapse before their structure has set.
- The Egg Size: Use large eggs at room temperature. If your eggs are extra-large, you might only need three and a half—watch for that “V” shape in the dough.
- Cool Completely: Never fill a warm cream puff, or the filling will melt and turn into a puddle.
Serving Suggestions and Pairings
These cream puffs are a showstopper on their own, dusted with powdered sugar or drizzled with melted chocolate. If you are hosting a brunch, they pair beautifully with a 3-ingredient egg wrap for a savory-sweet balance.
For a holiday dessert spread, I love serving these alongside hot chocolate cookie cups. The contrast between the cold cream filling and a warm drink is perfection.
Nutritional Information (Per Serving)
Note: Based on 8 large cream puffs.
- Calories: 310 kcal
- Fat: 22g
- Carbohydrates: 24g
- Protein: 5g
- Sugar: 12g
Storage and Leftover Tips
- Fridge: Store assembled cream puffs in an airtight container in the refrigerator for up to 2 days. Note that the shells will soften over time.
- Freezer: You can freeze the unfilled shells for up to a month. Just pop them in a 350°F oven for 5 minutes to crisp them back up before filling.
- Pro Hack: If you have leftover filling, it makes an incredible dip for easy coconut macaroons.
More Recipes You Will Love
If you enjoyed this classic dessert, you have to try these other fan favorites from the Chef Maniac kitchen:
- No-Bake Oreo Cream Pie – For when you want that creamy texture without turning on the oven.
- Chocolate Chip Cookie Bites – The perfect bite-sized snack for kids.
- Hot Chocolate Cookie Cups – A cozy winter staple.
Final Thoughts
Mom’s Famous Cream Puffs are more than just a recipe; they are a tradition. There’s a certain pride that comes with pulling a tray of perfectly puffed pastry out of the oven. I can’t wait to hear how yours turned out!
Did you go with the powdered sugar or the melted chocolate? Let me know in the comments below, and be sure to follow Chef Maniac on social media for more family-tested recipes.


Leave a Reply