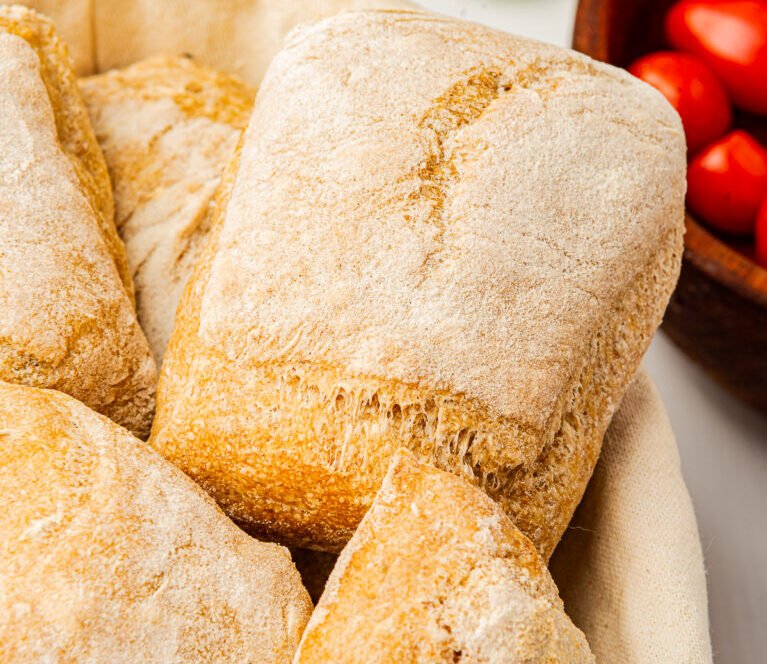
Hey everyone, Jason Griffith here! There’s nothing quite like the smell of fresh bread baking at home. And when it comes to bread, ciabatta holds a special place in my heart. It’s the perfect combination of a crackling, rustic crust and a light, airy, and chewy interior. Making it at home might sound intimidating, but I’m here to tell you it’s incredibly simple. This Homemade Ciabatta Bread Rolls recipe is my go-to for achieving that bakery-quality texture and flavor right in my own kitchen. It’s an overnight process, but the hands-on time is minimal and the reward is absolutely worth it.
Why I Love This Recipe
I’m obsessed with the texture of ciabatta. The signature open crumb, the crisp crust, and that wonderfully chewy bite—it’s everything I want in a good bread. This recipe embraces a high-hydration dough and a long fermentation period, which is the secret to developing that incredible flavor and beautiful internal structure. While it does take some planning (you’ll need to start it the night before), the actual effort is so minimal that it feels like a kitchen hack. You’ll wake up to a beautifully risen dough that’s just begging to be baked. It’s perfect for sandwiches, sopping up soup, or just slathering with some good butter and enjoying on its own.
Ingredients
For the Biga (Starter)
- 1/4 teaspoon instant yeast
- 1/2 cup warm water (105-110°F)
- 1 cup all-purpose flour
For the Final Dough
- 1/2 teaspoon instant yeast
- 1 1/4 cups warm water (105-110°F)
- All of the biga (starter)
- 2 cups all-purpose flour
- 2 teaspoons salt
Swaps and Notes
- Flour: While all-purpose flour works great, a high-quality bread flour will give you an even chewier, more structured crumb.
- Yeast: This recipe calls for instant yeast, which can be mixed directly into the flour. If you only have active dry yeast, proof it in the warm water for about 5 minutes before adding it to the rest of the ingredients.
- Biga: The biga, or pre-ferment, is essential for the flavor and structure of ciabatta. Don’t skip this step! It’s what gives the bread its distinct, slightly tangy flavor.
- Water: Ciabatta is a high-hydration dough, meaning it’s very wet and sticky. This is normal and exactly what you want for that airy texture. Embrace the stickiness!
Step-by-Step Instructions
- Make the Biga (The Night Before): In a large bowl, whisk together the 1/4 teaspoon instant yeast and 1/2 cup warm water. Add 1 cup of all-purpose flour and mix until a sticky dough forms. Cover the bowl with plastic wrap and let it sit on your kitchen counter overnight, or for at least 8-12 hours. It should look bubbly and slightly puffed up in the morning.
- Combine the Final Dough: The next day, add the remaining 1/2 teaspoon of instant yeast and 1 1/4 cups of warm water to the biga. Mix until the biga is mostly dissolved. Then, add the 2 cups of all-purpose flour and 2 teaspoons of salt.
- Mix the Dough: Using a wooden spoon or spatula, mix the dough until all the flour is hydrated and you have a very shaggy, sticky mass. Do not knead it! This is a no-knead dough.
- First Rise (Bulk Fermentation): Cover the bowl with plastic wrap and let it rise in a warm place for 1.5-2 hours. The dough should double in size and be filled with bubbles.
- Shape the Rolls: Heavily flour your countertop. Gently scrape the dough out onto the floured surface, being careful not to deflate it. Use a bench scraper or knife to divide the dough into 6-8 equal portions. Dust the tops with more flour.
- Second Rise: Place the rolls on a baking sheet lined with parchment paper. Cover loosely with a tea towel and let them rise for another 30-45 minutes.
- Preheat Oven: While the rolls are rising, preheat your oven to 450°F (230°C). Place a baking stone or a heavy-duty baking sheet on the middle rack to get hot.
- Bake: Carefully transfer the rolls (on the parchment paper) onto the preheated stone or baking sheet. Bake for 18-22 minutes, or until the rolls are a beautiful golden brown and sound hollow when tapped on the bottom.
- Cool: Let the rolls cool on a wire rack for at least 15-20 minutes before slicing into them. This is crucial for the internal crumb to set properly.
Tips for Success
- Use a Scale: Baking bread is much more accurate with a kitchen scale. The weights of flour can vary, and a scale ensures you get the right high-hydration consistency.
- Don’t Be Afraid of a Wet Dough: Ciabatta dough is supposed to be very wet. The key is to use plenty of flour on your hands and work surface when you’re shaping the rolls.
- Long Rise is Key: The long, slow fermentation of the biga is where all the deep flavor develops. Patience is a virtue here.
- Listen for the Hollow Sound: Tapping the bottom of the roll to hear a hollow sound is a great way to test for doneness.
Serving Suggestions and Pairings
These ciabatta rolls are perfect for so many things! Use them to make an incredible sandwich with fresh mozzarella, tomato, and basil. Serve them alongside a hearty soup or stew, or just toast them up for breakfast with a little jam. They also make a fantastic appetizer when served with a simple olive oil and balsamic vinegar for dipping.
Nutritional Information (per serving, approximate)
- Calories: 220 kcal
- Carbohydrates: 45g
- Protein: 8g
- Fat: 1g
- Saturated Fat: 0g
- Cholesterol: 0mg
- Sodium: 400mg
- Fiber: 2g
- Sugar: 1g
Disclaimer: Nutritional values are estimates and can vary based on specific ingredients and portion sizes.
Storage and Leftover Tips
Homemade ciabatta is best eaten on the day it’s baked. However, you can store it in a paper bag at room temperature for 1-2 days. To refresh it, just mist it with a little water and pop it in a hot oven for a few minutes. For longer storage, you can freeze the rolls in an airtight bag for up to a month. Thaw at room temperature and refresh in the oven.
More Recipes You’ll Love
If you enjoy baking and creating delicious treats from scratch, you might also like these other recipes:
- This Chocolate Chip Banana Bread is my favorite way to use up overripe bananas
- These Easy Pumpkin Spice Muffins are my favorite fall treat to bake on repeat
- These Hot Chocolate Cookie Cups are my favorite winter treat to share and savor
- These Easy Coconut Macaroons are my favorite 3-ingredient treat
- These Pecan Pie Bars are my favorite make-ahead holiday dessert
Final Thoughts
Making your own ciabatta bread rolls is one of the most rewarding things you can do in the kitchen. The pride you’ll feel when you pull that perfectly baked, golden-brown bread from the oven is unmatched. It’s a simple process that yields spectacular results. Give it a try, and you might never buy ciabatta again.
What’s your favorite thing to do with homemade ciabatta? I’d love to hear your ideas in the comments below! Be sure to follow me for more baking adventures and kitchen tips.
How to Make Perfect Homemade Ciabatta Bread Rolls
Ingredients
- 4 teaspoons instant yeast
- 2 cups warm water (105-110°F)
- 1 cup all-purpose flour
- 2 teaspoons salt
- 4 cups all-purpose flour (for dough)
- 1 tablespoon olive oil
- Additional flour for dusting
Instructions
- In a large bowl, combine 1 cup of warm water and 2 teaspoons of instant yeast. Stir gently and let it sit for about 5 minutes until frothy.
- Add 1 cup of flour and 2 teaspoons of salt to the yeast mixture. Mix until a sticky dough forms.
- In a separate bowl, prepare the biga by combining 4 teaspoons of instant yeast with 1/2 cup of warm water and 1 cup of all-purpose flour. Mix well and let it rise overnight.
- The next day, combine the biga with 4 cups of all-purpose flour, 1 tablespoon of olive oil, and the remaining 1 1/2 cups of warm water. Mix until a sticky dough forms.
- Cover the bowl with plastic wrap and let it rise for about 1 hour, or until doubled in size.
- Preheat your oven to 425°F (220°C).
- Dust a clean surface with flour and gently turn out the risen dough. Divide the dough into 8 equal pieces and shape into rolls.
- Place the rolls on a baking sheet lined with parchment paper. Let them rest for about 30 minutes.
- Bake the rolls in the preheated oven for 25-30 minutes, or until golden brown and hollow sounding when tapped on the bottom.
- Remove from the oven and let cool on a wire rack before serving.


Leave a Reply