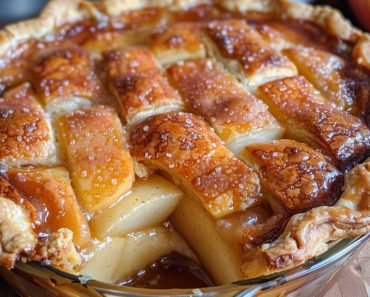
Hey there, dessert enthusiasts! Jason Griffith here, and if you’ve ever shied away from making homemade pie because of the crust, then today’s recipe is your new best friend: Crazy Crust Apple Pie. This ingenious dessert lives up to its name – it makes its own crust as it bakes! No rolling, no chilling, no fuss. It’s pure magic, delivering all the comforting flavors of apple pie with incredible ease.

Why I Love This Recipe
I’m a big believer that delicious food shouldn’t always be complicated, and this Crazy Crust Apple Pie is the perfect embodiment of that philosophy. What truly makes me love this recipe is its sheer simplicity. You pour a thin, cake-like batter into a pie dish, then add your apple filling right into the center. As it bakes, the batter around the edges puffs up and turns into a beautiful, golden “crust” that is somewhere between a tender cake and a rich cobbler. It’s an absolute revelation for anyone who loves pie but dreads pie dough. The warm, spiced apple filling nestled in that unique, self-forming crust is incredibly satisfying and always impresses, even though it’s deceptively easy to make!
The “Crazy” History of Crazy Crust Pie
The concept of a “crazy crust” pie has been circulating in American kitchens for decades, particularly popular in the mid-20th century. It often appeared on the back of flour bags or in community cookbooks, marketed as a no-fail, no-fuss solution to traditional pie making. The “crazy” part comes from the seemingly magical way the batter transforms, with the thin liquid crust rising around the fruit filling to create its own golden border. It’s a testament to the era’s ingenuity in creating convenient and comforting desserts, making homemade pie accessible to even the most novice bakers without the challenge of traditional pastry. This particular version, with its sweet apple filling, is a timeless favorite that continues to bring smiles.
Ingredients
Here’s what you’ll need to create this magically easy Crazy Crust Apple Pie:
For the Crust (the “Crazy” part!):
- 1 cup all-purpose flour
- 1/2 cup granulated sugar
- 1 teaspoon baking powder
- 1/2 teaspoon salt
- 1/2 cup (1 stick) unsalted butter, softened
- 3/4 cup milk (whole or 2%)
- 1 large egg
For the Apple Filling:
- 4 cups apples, peeled, cored, and sliced (about 3-4 medium apples, tart-sweet varieties like Granny Smith, Fuji, or Honeycrisp work best)
- 1/2 cup packed light brown sugar
- 1 teaspoon ground cinnamon
- 1/4 teaspoon ground nutmeg
- 1 tablespoon all-purpose flour (to help thicken)
- 1 tablespoon lemon juice
Swaps and Notes
- Apples: A mix of tart and sweet apples creates the most balanced flavor. Make sure your slices are fairly uniform for even cooking. If you’re short on time, you can absolutely use a 21-ounce can of apple pie filling (omit the brown sugar, cinnamon, nutmeg, flour, and lemon juice for the filling if using canned).
- Milk: Any kind of dairy milk will work. For a richer flavor, use whole milk.
- Butter: Ensure the butter for the crust is softened to room temperature for smooth mixing.
- Spices: Feel free to adjust the cinnamon and nutmeg to your taste. A pinch of allspice or a dash of apple pie spice would also be lovely.
- Sweetness: If your apples are very tart, you might want to increase the brown sugar in the filling by a tablespoon or two. If using a very sweet apple, you might slightly reduce it.
- Thickening: The tablespoon of flour in the apple filling helps it thicken as it bakes, preventing a watery pie.
Steps for the Recipe
Let’s get this “crazy” pie started!
- Prepare Oven and Pan: Preheat your oven to 375°F (190°C). Grease a 9-inch pie plate well.
- Make the Crust Batter: In a medium mixing bowl, combine the flour, granulated sugar, baking powder, salt, softened butter, milk, and egg. Beat with an electric mixer on low speed until just combined, then increase to medium speed and beat for about 1-2 minutes until the batter is smooth and well blended. The batter will be thin, similar to pancake batter.
- Prepare the Apple Filling: In a large bowl, combine the peeled, sliced apples with the brown sugar, cinnamon, nutmeg, flour, and lemon juice. Toss gently until the apples are evenly coated.
- Assemble the Pie: Pour the thin crust batter evenly into the bottom of the prepared pie plate. Carefully spoon the apple filling into the center of the batter. Do not stir or mix the apples into the batter. The magic happens as they bake! Spread the apples out gently towards the edges, but make sure there’s at least a 1-inch border of batter around the fruit.
- Bake: Place the pie plate on a baking sheet (to catch any potential drips). Bake for 40-50 minutes, or until the “crust” around the edges is golden brown and puffed, and the apple filling is tender and bubbly. A toothpick inserted into the crust part (not the apples) should come out clean.
- Cool & Serve: Let the pie cool on a wire rack for at least 15-20 minutes before slicing and serving. This allows the filling to set slightly.
Tips for Success
- Don’t Stir! This is the most crucial rule for Crazy Crust Pie. Trust the process! Pour the batter, then add the filling, and let the oven do the work of separating them into crust and filling.
- Grease Your Pan Well: Since the crust forms directly in the pan, a well-greased dish ensures easy serving.
- Even Apple Slices: Aim for uniform apple slices so they cook evenly. About 1/4-inch thick is ideal.
- Check for Doneness: The edges of the crust should be nicely browned and puffed. The center, where the apples are, will be softer and bubbly.
- Serve Warm: This pie is absolutely at its best when served warm, allowing the flavors and textures to shine.
Serving Suggestions and Pairings
Crazy Crust Apple Pie is a comforting dessert that pairs beautifully with simple additions:
- Vanilla Ice Cream: The ultimate classic pairing! A scoop of vanilla bean ice cream melting over a warm slice is pure heaven.
- Whipped Cream: A dollop of freshly whipped cream adds a lovely richness.
- Caramel Sauce: A drizzle of homemade or store-bought caramel sauce takes it up another notch.
- Powdered Sugar: A light dusting of powdered sugar on top can add a pretty finishing touch.
- Beverage Pairings: A warm cup of coffee, a glass of cold milk, or for a refreshing contrast, a glass of This Blueberry Lemonade Is My Favorite Refreshing Drink for Sunny Days would be delightful.
Storage and Leftover Tips
Store any leftover Crazy Crust Apple Pie covered loosely with plastic wrap or in an airtight container at room temperature for up to 2 days, or in the refrigerator for up to 4 days.
To reheat, you can warm individual slices gently in the microwave or in a preheated oven at 300°F (150°C) for about 10-15 minutes, until warmed through. Freezing is possible, but the crust texture might become slightly softer upon thawing. If freezing, wrap cooled slices tightly in plastic wrap and foil for up to 1-2 months. Thaw in the refrigerator before reheating.
More Recipes You Will Love
If you enjoyed the ease and deliciousness of this Crazy Crust Apple Pie, you might also like these other comforting and crowd-pleasing desserts:
- For another fun and whimsical treat that’s surprisingly easy, check out How This Unicorn Poke Cake Became My Favorite Party Trick.
- If you’re a fan of rich chocolate and a delightful textural twist, you absolutely must try These Chocolate Chip Cookie Dough Brownie Bombs Are My Favorite Sweet Obsession.
- And for a classic and utterly delicious baked good, my recipe for The Best Peanut Butter Brownies I’ve Ever Made (and I’ve Made a Lot) is a definite winner.
- Looking for a refreshing no-bake option? Don’t miss This Grasshopper Pie Is My Favorite No-Bake Dessert with a Mint Chocolate Twist.
Final Thoughts
Crazy Crust Apple Pie truly is a game-changer for anyone who loves homemade pie but wants a simpler approach. It’s a delightful combination of flavors and textures, with that magical crust making it almost effortless. This pie is a celebration of comfort, simplicity, and the timeless appeal of a classic apple dessert.
I hope you give this “crazy” good pie a try and enjoy every last bite! Let me know in the comments below how it turns out for you, or what your favorite easy apple desserts are. I always love hearing from you! Happy baking!


Leave a Reply