Bloody Red Velvet Cake Pops: The Ultimate Spooky-Sweet Halloween Treat
By Jason Griffith
Introduction
Halloween is my absolute favorite time of year, not just for the costumes, but for the chance to get truly creative in the kitchen. When it comes to party food, I want something that’s equal parts spooky, sweet, and simple to make ahead. That’s where these Bloody Red Velvet Cake Pops come in.
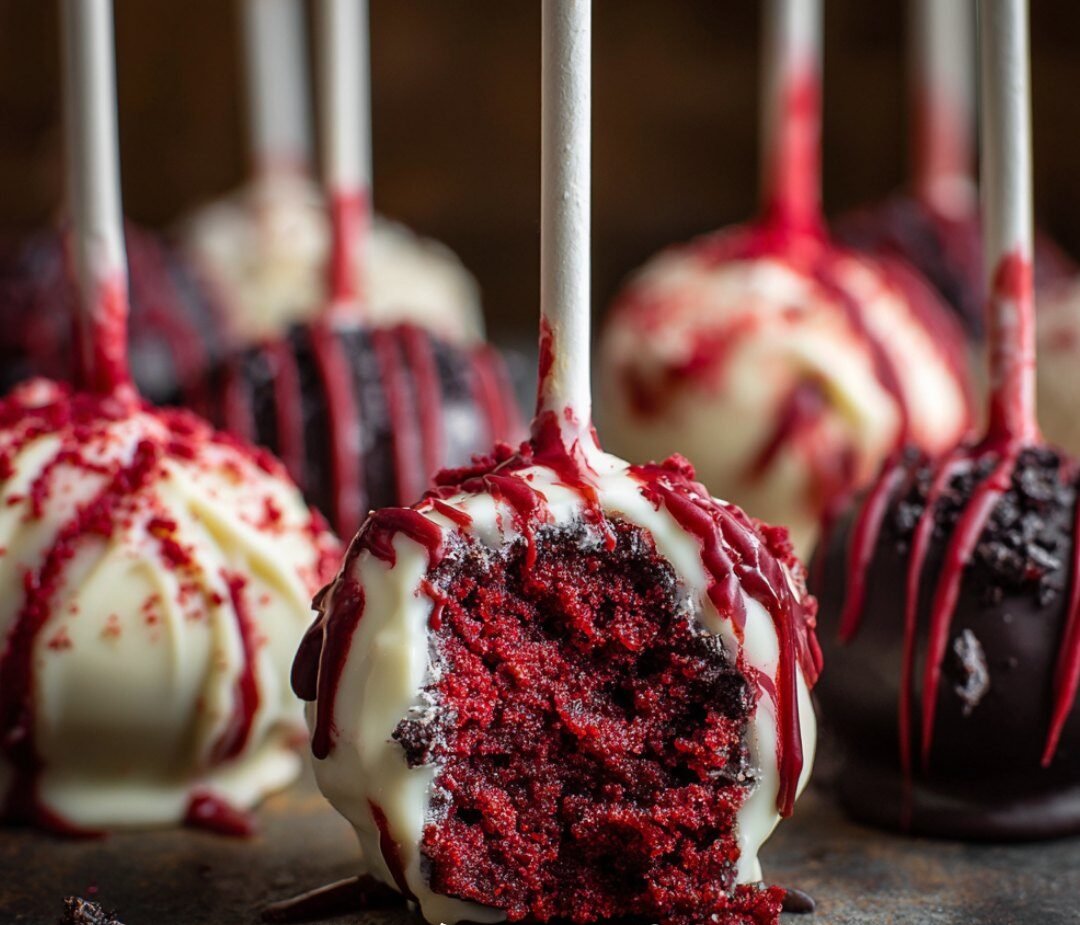
These aren’t your typical, cutesy cake pops. They start with the irresistible flavor of moist red velvet cake mixed with tangy cream cheese frosting. Dipped in a clean coat of white chocolate, they look innocent enough—until you add the final, essential touch: a chilling, creepy red “blood” drizzle.
They are the perfect bite-sized horror movie for your dessert table. They’re easy to make, a massive crowd-pleaser, and their deep crimson color makes them an instant centerpiece. Get ready to impress (and maybe slightly gross out) your guests with this fantastic holiday treat.
Why I Love This Recipe
I’ve been making these bloody cake pops every Halloween for years, and they are always the first thing to disappear. Here’s why I swear by this recipe:
- Make-Ahead Mastery: Cake pops need to chill anyway, which makes them the perfect dessert to prepare a few days before your party. That means less stress on the big day!
- The Perfect Bite: They deliver the amazing flavor of red velvet cake and cream cheese frosting in a single, perfectly portioned bite—no plates or forks required.
- Maximum Visual Impact: The red drizzle on the stark white chocolate coating creates a striking, spooky contrast that immediately catches the eye. It’s an easy hack for a high-impact dessert.
- Simple Ingredients, Big Flavor: We’re using a shortcut with a cake mix to keep things simple, proving you don’t need a complicated recipe to create a showstopping dessert.
Bloody Red Velvet Cake Pops Recipe
This recipe makes 20–24 beautifully “bloody” cake pops.
Ingredients
| Component | Ingredient | Quantity | Notes |
| For the Cake Pops | Red velvet cake mix | 1 box | Follow package directions for the cake. |
| Cream cheese frosting | ½ cup | Use store-bought or your favorite homemade recipe. | |
| For the Coating | White chocolate or candy melts | 12 oz | Quality candy melts provide the smoothest finish. |
| Red candy melts or red gel icing | As needed | For the “bloody” drizzle effect. | |
| Supplies | Lollipop sticks | 20–24 |
Export to Sheets
Swaps and Notes
- Cake Flavor: While red velvet provides the perfect “bloody” color, you can easily swap it for chocolate or vanillacake mix.
- The “Blood” Drizzle: For the most realistic and dramatic blood effect, use red candy melts thinned slightly with a teaspoon of coconut oil, or a vibrant red gel icing (the kind used for writing on cakes). A little goes a long way!
- Gluten-Free Option: Use a certified gluten-free red velvet cake mix to easily adapt this recipe.
Instructions
1. Bake and Crumble the Cake
- Preheat your oven and bake the red velvet cake according to the directions on the box.
- Allow the cake to cool completely. This is essential—warm cake will melt the frosting.
- Once cool, crumble the cake into very fine crumbs in a large bowl. You should be left with a fluffy texture.
2. Mix and Roll the Dough
- Add the ½ cup of cream cheese frosting to the cake crumbs.
- Mix it all together using a spoon or your hands until a dough-like texture forms. It should be easy to roll without being sticky or too dry.
- Roll the mixture into 1-inch balls (about the size of a ping-pong ball) and place them on a parchment-lined baking sheet.
- Chill for 30 minutes in the refrigerator. This step ensures they hold their shape during dipping.
3. Dip and Chill
- Melt the white chocolate or candy melts according to the package directions. Use a deep, narrow mug for easy dipping.
- Dip the tip of a lollipop stick into the melted white chocolate, then insert the stick halfway into a cake ball. The chocolate acts as glue.
- Dip the entire cake ball into the melted white chocolate, letting the excess drip off completely. Gently twist the cake pop as you pull it out to get a smooth coat.
- Place the dipped cake pops upright into a Styrofoam block or a tall glass to set. Let the coating dry completely, which takes about 10–15 minutes.
4. The Bloody Finish
- Melt a small amount of red candy melts (or prepare your red gel icing).
- Using a fork or a small spoon, carefully drizzle the red over the white chocolate coating to create the “bloody” effect. Let some drip down the sides for maximum impact.
- Allow the red drizzle to set completely before serving.
Tips for Success
- Don’t Over-Frost: The biggest mistake people make is adding too much frosting. Start with the recommended amount and only add more if the dough is too crumbly to hold together when rolled. Too much frosting makes them dense and greasy.
- Use Quality Candy Melts: While white chocolate is delicious, white candy melts often provide a smoother finish that sets faster and doesn’t crack as easily as traditional white chocolate.
- Deep Dipping: Use a deep, narrow container for your melted chocolate. This ensures you can fully submerge the cake pop without tilting the container, keeping the coating even and mess-free.
Serving Suggestions and Pairings
These Bloody Red Velvet Cake Pops are the perfect dessert for any Halloween bash or spooky movie night.
- Beverage Pairings: Balance the sweetness with a tart and refreshing drink. I recommend my favorite homemade Blueberry Lemonade or a simple, sparkling white grape juice.
- Display Ideas: Stick the pops into a Styrofoam block covered with chocolate cookie crumbs to mimic a graveyard or a patch of dirt. You can also place them stick-down into a tall, clear vase filled with candy corn.
- Main Course Menu: If you’re planning a full party menu, serve these after an easy, cheesy main like Easy Cheesy Chicken Sliders with Marinara Garlic Butter.
Nutritional Information (Per Serving)
Disclaimer: This is an estimated nutritional breakdown based on a standard cake mix and a 24-pop yield. Actual values will vary based on brands and exact measurements.
- Calories: 180–220 kcal
- Total Fat: 9g
- Saturated Fat: 5g
- Carbohydrates: 25g
- Sugar: 20g
- Protein: 2g
Storage and Leftover Tips
Cake pops are a dream for make-ahead entertaining!
- Short-Term Storage (Coated): Store finished cake pops in an airtight container in the refrigerator for up to 4 days. The chilling actually improves the texture.
- Long-Term Storage (Coated): For longer storage, freeze the finished pops in a single layer in a freezer-safe container for up to 1 month. Thaw overnight in the refrigerator before serving.
- Uncoated Cake Balls: The un-dipped cake balls can be made and frozen for up to 2 months. Thaw for 30 minutes before inserting sticks and dipping.
More Recipes You Will Love
If you loved the sweet simplicity of these spooky treats, be sure to check out some of my other favorite recipes for easy desserts and holiday baking:
- For another crowd-pleasing dessert that requires no baking at all, try This Pumpkin Delight Dessert is My Favorite No-Bake Fall Treat.
- If you’re craving more bite-sized chocolate goodness, you’ll love These Chocolate Chip Cookie Bites Are My Favorite Little Treat to Bake Anytime.
- And for a richer, classic treat, you absolutely must make The Best Peanut Butter Brownies I’ve Ever Made (And I’ve Made a Lot).
Final Thoughts
These Bloody Red Velvet Cake Pops prove that the best holiday food is fun, a little theatrical, and seriously delicious. They strike that perfect balance between gourmet flavor and playful holiday spirit. Give them a shot this season, and they’re guaranteed to become a yearly tradition!
If you try this recipe, I’d love to know what you thought! Leave a comment below or tag me on social media with your spooky creations. Happy baking!


Leave a Reply