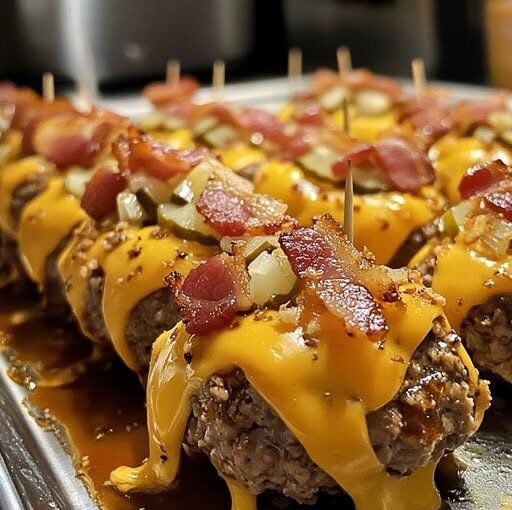
Get ready to score big with these incredible Tailgate Bacon Burger Bombs! As a food writer, I’ve seen my fair share of party appetizers, but these little bundles of joy are in a league of their own. Imagine perfectly seasoned ground beef, stuffed with a gooey cube of cheddar, wrapped in crispy bacon, and brushed with tangy BBQ sauce. Sounds like a dream, right? Well, it’s a dream you can easily make a reality for your next game day or casual get-together.

Why I Love This Recipe
What’s not to love about something that combines the best parts of a burger and bacon into a bite-sized package? These bacon burger bombs are incredibly flavorful, easy to eat, and always a huge hit with everyone. They’re the kind of recipe that disappears almost as fast as you can make them, leaving guests raving and asking for the recipe. Plus, they’re surprisingly simple to put together, making them perfect for those busy days when you still want to impress without all the fuss. They’re a fantastic alternative to traditional sliders or mini burgers, offering that same satisfying flavor in a fun, grab-and-go format.
Ingredients
Here’s what you’ll need to whip up a batch of these irresistible Tailgate Bacon Burger Bombs:
- 1 lb ground beef (80/20 lean is ideal for flavor)
- 1/2 cup breadcrumbs (plain or panko work great)
- 1/2 cup shredded cheddar cheese
- 1/4 cup diced onions (finely diced is best)
- 1/4 cup diced pickles (dill pickles recommended)
- 1 tsp garlic powder
- 1/2 tsp salt
- 1/2 tsp pepper
- 8 slices bacon (thin or regular cut)
- 8 small cubes of cheddar cheese (about 1/2 inch cubes)
- 1/4 cup BBQ sauce (your favorite kind!)
- Toothpicks (essential for securing the bacon)
Swaps and Notes
- Ground Beef: You can experiment with ground turkey or a mix of beef and pork for a different flavor profile.
- Cheese: While cheddar is classic, feel free to use Monterey Jack, pepper jack, or even a smoked gouda cube for an extra kick.
- Pickles: If you’re not a fan of pickles, you can omit them or swap them for a finely diced bell pepper for a touch of sweetness and crunch.
- BBQ Sauce: Don’t limit yourself! Try a spicy BBQ sauce, a honey BBQ, or even a smoky chipotle sauce to change things up.
- Add-ins: A pinch of smoked paprika or a dash of Worcestershire sauce in the meat mixture can elevate the flavor even further.
Steps for the Recipes
Making these bacon burger bombs is straightforward. Follow these steps for perfect results every time:
- Preheat Your Oven: Preheat your oven to 400°F (200°C). Line a baking sheet with parchment paper for easy cleanup.
- Combine Ingredients: In a large bowl, combine the ground beef, breadcrumbs, shredded cheddar cheese, diced onions, diced pickles, garlic powder, salt, and pepper. Use your hands to mix everything until it’s just combined. Be careful not to overmix, as this can make the meat tough.
- Form the Balls: Divide the meat mixture into 8 equal-sized portions. Flatten each portion into a patty, about 3-4 inches in diameter.
- Stuff with Cheese: Place one small cube of cheddar cheese in the center of each flattened patty.
- Form the Bombs: Carefully wrap the meat around the cheese cube, sealing it completely to form a tight ball. Make sure there are no cracks where the cheese could escape during baking.
- Wrap with Bacon: Take one slice of bacon and wrap it tightly around each beef ball. Secure the end of the bacon with a toothpick, pushing it all the way through the bomb to hold everything together.
- Bake: Place the bacon-wrapped balls seam-side down on your prepared baking sheet. Bake for 25-30 minutes, or until the bacon is crispy and the beef is cooked through to your desired doneness. The internal temperature should reach 160°F (71°C) for ground beef.
- Brush with BBQ Sauce: Once out of the oven, brush each hot burger bomb generously with your favorite BBQ sauce.
- Serve and Enjoy! Carefully remove the toothpicks before serving, especially if serving to children.
Tips for Success
- Don’t Overmix: Overmixing the ground beef mixture can lead to tough, dry burger bombs. Mix just until combined.
- Seal the Cheese: Ensure the cheese cube is fully enclosed in the meat. This prevents it from melting out during baking.
- Crispy Bacon: For extra crispy bacon, you can par-cook it for a few minutes in a skillet before wrapping, but this isn’t strictly necessary.
- Uniform Size: Try to make your bombs roughly the same size so they cook evenly.
- Rest Before Serving: Let the bombs rest for a few minutes after baking. This helps the juices redistribute, keeping them moist.
Serving Suggestions and Pairings
These Tailgate Bacon Burger Bombs are a complete party food on their own, but they also pair wonderfully with a variety of sides and dips. Serve them with extra BBQ sauce for dipping, or try a side of ranch or a spicy aioli.
For a full game day spread, consider serving them alongside:
- Crispy Oven Fries or Sweet Potato Fries: A classic pairing that always satisfies.
- Coleslaw or Potato Salad: Cool, creamy sides that offer a nice contrast.
- Simple Green Salad: To add a touch of freshness.
- Other Party Favorites: Pair them with some delicious dips like this Crockpot Nacho Dip or Beer Cheese Dip.
Storage and Leftover Tips
If you happen to have any Tailgate Bacon Burger Bombs leftover (which is unlikely!), store them in an airtight container in the refrigerator for up to 3-4 days.
To reheat, you can use a microwave, but for best results and to re-crisp the bacon, reheat them in a preheated oven at 350°F (175°C) for about 10-15 minutes, or until heated through. You can also use an air fryer for quick reheating and crisping.
More Recipes You Will Love
If you enjoyed these bacon burger bombs, I highly recommend checking out some of my other crowd-pleasing recipes:
- For another cheesy, meaty delight, try my Easy Cheesy Chicken Sliders with Marinara Garlic Butter.
- If you’re a fan of comfort food that’s perfect for a party, you’ll love How I Turned a Classic Sandwich into the Ultimate Cheesy Hot Dip.
- And for another fun, easy-to-eat appetizer, these Totchos are always a hit!
Final Thoughts
These Tailgate Bacon Burger Bombs are more than just an appetizer; they’re an experience! They bring together classic flavors in a fun, innovative way that’s perfect for sharing. Whether you’re hosting a game day, a backyard BBQ, or just looking for a delicious snack, these bombs are sure to be a showstopper. Give them a try, and let me know how they turn out!
What are your favorite game day snacks? Share your ideas in the comments below, and don’t forget to follow me on social media for more delicious recipes and cooking tips!


Leave a Reply