Classic Homemade Chocolate Pie: Rich, Creamy & Easy Recipe
Print it, save it, or add it to your recipe binder.
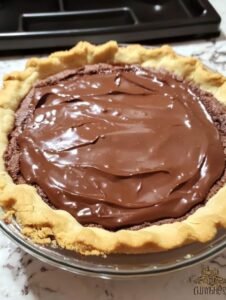
Prepare to indulge in a slice of pure chocolatey heaven with this incredible Chocolate Pie! This isn’t just any chocolate pie; it features a rich, velvety smooth, and intensely chocolatey filling that sets perfectly, all nestled in a crispy pie crust. Topped with a generous dollop of whipped cream, it’s a truly decadent and classic dessert that’s surprisingly easy to make and guaranteed to be a crowd-pleaser for any occasion.
Why I Love This Recipe
This Chocolate Pie recipe is a dream come true for any chocolate lover, and it’s a dessert I truly adore! What I love most is the luxurious texture and deep chocolate flavor of the filling. The combination of whole milk, egg yolks, and cornstarch creates an incredibly rich and smooth custard base, while the bittersweet chocolate melts in, transforming it into a velvety, intensely chocolatey delight. The best part? It’s mostly a no-bake wonder (assuming you use a pre-baked crust), making it elegant and simple. It sets beautifully, slices perfectly, and that final touch of whipped cream is the ideal light counterpoint to the rich filling. It truly tastes like a slice of heaven!
Ingredients
Here’s what you’ll need to create this delicious Chocolate Pie:
- 1 ½ cups granulated sugar
- ¼ cup cornstarch
- ¼ tsp salt
- 3 cups whole milk
- 4 egg yolks, large
- 6 ½ oz bittersweet chocolate, finely chopped
- 2 tsp vanilla extract
- 2 Tbsp butter (unsalted recommended)
- 1 pie crust, baked and cooled (store-bought or homemade, or an Oreo/graham cracker crust)
- Whipped cream, for serving (store-bought or homemade)
Swaps and Notes
- Bittersweet Chocolate: Bittersweet chocolate provides a deep, rich chocolate flavor. You can use semi-sweet chocolate for a slightly sweeter pie, but avoid milk chocolate as it can be too sweet. Finely chopping the chocolate helps it melt smoothly.
- Whole Milk: Whole milk is recommended for the creamiest, richest filling.
- Egg Yolks: These contribute to the custard’s richness and help it set beautifully. Don’t omit them!
- Cornstarch: This is the primary thickener for the pudding-like filling. Ensure it’s whisked thoroughly to prevent lumps.
- Vanilla Extract: Pure vanilla extract enhances the chocolate flavor.
- Butter: A touch of butter at the end adds glossiness and richness to the filling. Unsalted butter is preferred.
- Pie Crust: A pre-baked regular pie crust is ideal. An Oreo cookie crust or graham cracker crust also works wonderfully for a no-bake crust option. Ensure it’s completely cooled.
- Whipped Cream: Homemade whipped cream is always best, but good quality store-bought whipped cream is convenient for serving.
Classic Homemade Chocolate Pie: Rich, Creamy & Easy Recipe
Prepare to indulge in a slice of pure chocolatey heaven with this incredible
Prep: min | Cook: min | Total: min
Servings:
Ingredients
- 1 ½ cups granulated sugar
- ¼ cup cornstarch
- ¼ tsp salt
- 3 cups whole milk
- 4 egg yolks, large
- 6 ½ oz bittersweet chocolate, finely chopped
- 2 tsp vanilla extract
- 2 Tbsp butter (unsalted recommended)
- 1 pie crust, baked and cooled (store-bought or homemade, or an Oreo/graham cracker crust)
- Whipped cream, for serving (store-bought or homemade)
Instructions
- Let's get this delicious : Chocolate Pie chilling!
- Prepare : Pudding Base: In a medium-sized heavy-bottomed saucepan, whisk together the 1 ½ cups granulated sugar, ¼ cup cornstarch, and ¼ teaspoon salt until well combined and no lumps of cornstarch remain. Pour in the 3 cups whole milk and 4 large egg yolks, whisking continuously to combine thoroughly.
- Cook : Pudding: Place the saucepan over medium heat. Stir constantly with a whisk or wooden spoon. Cook until the mixture just barely comes to a boil and becomes very thick, like pudding. This usually takes about 6 to 8 minutes, but watch it carefully as cooking times can vary.
- Remove & : Add Chocolate/Flavor: The second the mixture starts to bubble and visibly thickens (it should be very thick, coating the back of a spoon), immediately remove it from the heat. Add the 6 ½ oz finely chopped bittersweet chocolate, 2 teaspoons vanilla extract, and 2 tablespoons butter. Stir vigorously until everything is beautifully combined, and the chocolate and butter have completely melted into a smooth, glossy, rich chocolate pudding.
- Pour into : Crust & Chill: Pour the hot chocolate pudding filling into your prepared baked and cooled pie crust. If there is any extra pudding, spoon it into small dishes or ramekins for individual servings. Do not cover the pie immediately. Place the pie in the refrigerator, uncovered, to chill for at least 4 hours, or preferably overnight, until it is completely set. Covering it too soon can cause condensation.
- Serve: Once thoroughly chilled and set, cut the chocolate pie into slices. Serve each slice with a generous dollop of whipped cream on top.
Nutrition
- Calories:
- Fat:
- Carbs:
- Protein:
Rate This Recipe
Average Rating: 0 (0 votes)
Directions
Let’s get this delicious Chocolate Pie chilling!
- Prepare Pudding Base: In a medium-sized heavy-bottomed saucepan, whisk together the 1 ½ cups granulated sugar, ¼ cup cornstarch, and ¼ teaspoon salt until well combined and no lumps of cornstarch remain. Pour in the 3 cups whole milk and 4 large egg yolks, whisking continuously to combine thoroughly.
- Cook Pudding: Place the saucepan over medium heat. Stir constantly with a whisk or wooden spoon. Cook until the mixture just barely comes to a boil and becomes very thick, like pudding. This usually takes about 6 to 8 minutes, but watch it carefully as cooking times can vary.
- Remove & Add Chocolate/Flavor: The second the mixture starts to bubble and visibly thickens (it should be very thick, coating the back of a spoon), immediately remove it from the heat. Add the 6 ½ oz finely chopped bittersweet chocolate, 2 teaspoons vanilla extract, and 2 tablespoons butter. Stir vigorously until everything is beautifully combined, and the chocolate and butter have completely melted into a smooth, glossy, rich chocolate pudding.
- Pour into Crust & Chill: Pour the hot chocolate pudding filling into your prepared baked and cooled pie crust. If there is any extra pudding, spoon it into small dishes or ramekins for individual servings. Do not cover the pie immediately. Place the pie in the refrigerator, uncovered, to chill for at least 4 hours, or preferably overnight, until it is completely set. Covering it too soon can cause condensation.
- Serve: Once thoroughly chilled and set, cut the chocolate pie into slices. Serve each slice with a generous dollop of whipped cream on top.
Tips for Success
- Whisk Constantly: When cooking the pudding, whisking non-stop is crucial to prevent lumps and ensure even thickening, especially as it approaches a boil.
- Don’t Boil Vigorously: The mixture should just barely come to a boil and thicken. Boiling rapidly can scorch the bottom.
- Finely Chop Chocolate: Smaller pieces of chocolate will melt more easily and smoothly into the hot pudding.
- Cool Pie Uncovered: Chilling the pie uncovered initially helps prevent condensation from forming on the surface, which can make the top watery.
- Chill Time is Key: Allow the full chilling time for the pie to set properly. Rushing this step will result in a runny pie.
- Quality Ingredients: With a simple pie like this, the quality of your chocolate, milk, and vanilla will really shine through.
Serving Suggestions and Pairings
This Chocolate Pie is a complete and decadent dessert on its own, but it pairs wonderfully with:
- Fresh Berries: A side of fresh raspberries or sliced strawberries can add a lovely tart counterpoint.
- Coffee or Espresso: The bitterness of coffee complements the richness of the chocolate perfectly.
- A dusting of cocoa powder: For an extra touch of elegance on top of the whipped cream.
- For other incredible chocolate desserts, consider our These Chocolate Chip Cookie Dough Brownie Bombs Are My Favorite Sweet Obsession or our The Best Peanut Butter Brownies I’ve Ever Made (And I’ve Made A Lot).
Storage and Leftover Tips
This Chocolate Pie stores beautifully, making it a great make-ahead dessert!
- Refrigeration: Store any cooled and set leftover chocolate pie, covered loosely with plastic wrap or a pie cover, in the refrigerator for up to 3-4 days.
- Serving: It’s best served cold from the refrigerator. Add whipped cream just before serving.
- Freezing: This pie can be frozen (without the whipped cream). Once completely set, wrap the pie (or individual slices) tightly in plastic wrap, then foil. Freeze for up to 1-2 months. Thaw in the refrigerator overnight before serving.
More Recipes You Will Love
If you loved the rich, creamy, and irresistible nature of this chocolate pie, you’ll definitely want to explore some of our other fantastic, fuss-free chocolate and dessert recipes:
- For another incredibly indulgent chocolate treat, try our These Chocolate Chip Cookie Dough Brownie Bombs Are My Favorite Sweet Obsession.
- If you’re a brownie aficionado, you can’t go wrong with The Best Peanut Butter Brownies I’ve Ever Made (And I’ve Made A Lot).
- For a sweet treat you can enjoy without baking, our This Edible Cookie Dough Is My Favorite No-Bake Treat For Late Night Cravings is perfect.
- And for a fun, easy, and sweet no-bake treat, check out This Smores Bark Is My Favorite No-Campfire Treat For Anytime Cravings.
- Finally, for an instant chocolate fix in dip form, try This Brownie Batter Dip Is My Favorite No-Bake Dessert For Instant Chocolate Cravings.
Final Thoughts
This Chocolate Pie recipe is a brilliant guide to creating a truly classic, rich, and incredibly satisfying dessert. It’s perfect for any occasion that calls for a touch of chocolatey decadence and homemade charm.
Give this recipe a try and let this delightful pie become a new family favorite! What’s your go-to no-bake dessert for a sweet craving? Share your ideas and feedback in the comments below! And for more amazing, easy-to-follow recipes that bring joy to your kitchen, be sure to visit Chefmaniac.com. Happy baking!