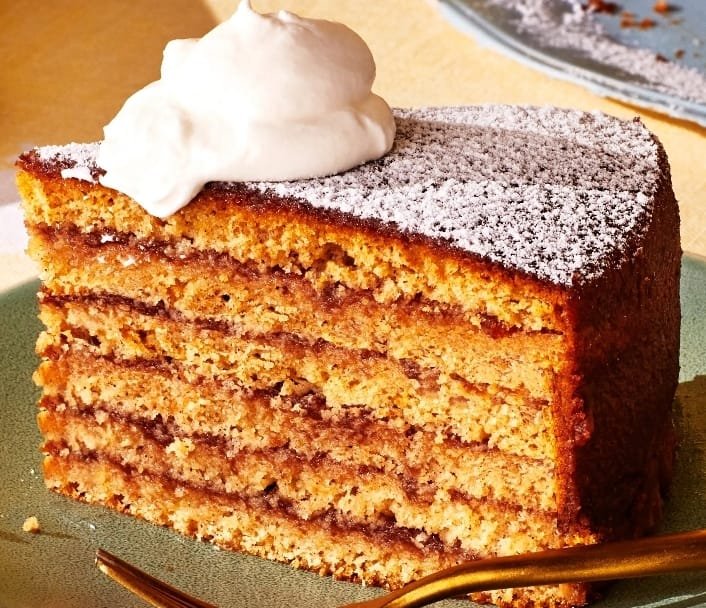
Step into the comforting world of Southern baking with this magnificent Apple Stack Cake. This impressive dessert, often called a “building cake” due to its numerous thin layers, is a true labor of love that delivers incredible depth of flavor and a wonderfully moist texture. Featuring tender, spiced dried apple filling nestled between delicate, cake-like layers, it’s a dessert that’s rich in history and rich in taste. While it might look complex, this recipe breaks down the process, making it accessible for anyone eager to create a show-stopping, old-fashioned treat.
Why I Love This Recipe
This Apple Stack Cake holds a special place in my heart, evoking images of cozy kitchens and gatherings. What I truly love about it is the rustic charm and the rewarding process of creating something so unique and delicious. Each thin, golden layer of cake provides a delicate contrast to the rich, chunky, spiced dried apple filling. The magic truly happens during the chilling process, when the moisture from the apple filling infuses into the cake layers, transforming them from firm disks into incredibly moist, tender cake. It’s a dessert that isn’t overly sweet, allowing the natural apple and spice flavors to shine, and it’s a wonderful project for a weekend, promising a truly memorable treat.
Ingredients
Here’s what you’ll need to create this impressive Apple Stack Cake:
For the Apple Filling:
- 16 ounces dried apples, chopped
- 5 cups water
- 1 cup packed brown sugar
- 2 teaspoons apple pie spice
For the Cake Layers:
- 1 cup butter, softened
- 2 cups sugar
- 2 large eggs, room temperature
- 2 teaspoons vanilla extract
- 6 cups all-purpose flour
- 3 teaspoons baking powder
- 1 teaspoon baking soda
- 1/2 cup buttermilk
For Garnish (Optional):
- Confectioners’ sugar
Swaps and Notes
- Dried Apples: Using dried apples is traditional and yields a more intense apple flavor and a jam-like consistency for the filling. You can find these in the dried fruit section of most grocery stores.
- Apple Pie Spice: This blend typically includes cinnamon, nutmeg, and allspice. If you don’t have it, you can make your own by combining 1 1/2 tsp cinnamon, 1/4 tsp nutmeg, and 1/4 tsp allspice.
- Butter (Cake): Ensure your butter is softened to room temperature for proper creaming with the sugar. Unsalted butter is recommended to control the overall saltiness.
- Eggs: Room temperature eggs emulsify better with the creamed butter and sugar, leading to a smoother batter.
- Buttermilk: Buttermilk reacts with the baking soda to create a tender crumb. If you don’t have buttermilk, you can make a substitute by adding 1/2 tablespoon of lemon juice or white vinegar to a measuring cup, then filling the rest of the way to 1/2 cup with regular milk. Let it sit for 5 minutes before using.
- Parchment Paper: Essential for easily transferring the thin cake layers and preventing sticking.
- Confectioners’ Sugar: This is an optional garnish for a beautiful, delicate finish.
Directions
Let’s get this impressive Apple Stack Cake assembled!
- Prepare Apple Filling:
- Place the chopped dried apples and 5 cups of water in a 6-quart stockpot. Bring to a boil over medium-high heat.
- Reduce the heat to low and simmer, uncovered, for 40-45 minutes or until the apples are very soft and most of the liquid has been absorbed, stirring occasionally to prevent sticking.
- Once softened, use a potato masher or the back of a spoon to mash the apples into a chunky sauce.
- Stir in the 1 cup of packed brown sugar and 2 teaspoons of apple pie spice. Continue to simmer, uncovered, for another 10-15 minutes, stirring frequently, until any remaining liquid is absorbed and the sauce is thick.
- Remove from heat and let the apple filling cool completely. This can be done ahead of time and refrigerated.
- Prepare Cake Layers:
- Preheat your oven to 400°F (200°C).
- In a large bowl, using an electric mixer, cream the 1 cup softened butter and 2 cups granulated sugar until light and fluffy. This should take 5-7 minutes.
- Add the 2 large eggs, one at a time, beating well after each addition to fully incorporate. Beat in the 2 teaspoons vanilla extract.
- In a separate medium bowl, whisk together the 6 cups all-purpose flour, 3 teaspoons baking powder, and 1 teaspoon baking soda.
- Gradually add the dry ingredients to the creamed mixture alternately with the 1/2 cup buttermilk, beginning and ending with the dry ingredients. Beat well after each addition until just combined, being careful not to overmix. The dough will be stiff.
- Bake Cake Layers:
- Divide the cake dough into 8 equal portions. Shape each portion into a rough disk.
- Cut out eight 9-inch circles of parchment paper.
- On a lightly floured surface, use a floured rolling pin to roll out one dough disk to fit one of the parchment circles (about 1/8 to 1/4 inch thick).
- Carefully transfer the parchment paper with the rolled-out dough onto a baking sheet. Repeat with remaining dough, baking layers in batches if necessary (you’ll likely need 2-3 baking sheets).
- Bake in the preheated oven for 10-12 minutes, or until the edges are golden brown and the layers are lightly firm.
- Remove from pans to wire racks and let the cake layers cool completely. They will be crisp when warm but will soften later.
- Assemble and Chill Cake:
- Once all layers and filling are completely cool, place one cake layer on your desired serving plate.
- Spread about 2/3 cup of the cooled apple filling evenly over the first cake layer, spreading almost to the edge.
- Carefully place the next cake layer on top and repeat the process with the remaining layers and filling.
- Top with the final plain cake layer.
- Wrap the assembled cake tightly in plastic wrap (this is crucial for the layers to soften).
- Refrigerate the cake for 1-2 days. During this time, the moisture from the apple filling will seep into the cake layers, making them incredibly moist and tender.
- If desired, just before serving, lightly sprinkle the top of the cake with confectioners’ sugar.
Tips for Success
- Cool Everything Completely: Ensure both the apple filling and the cake layers are completely cool before assembly. Warm components will make a soggy cake.
- Don’t Overmix the Cake Dough: Overmixing can lead to tough cake layers. Mix until just combined.
- Roll Thinly & Evenly: Thin layers are characteristic of stack cake. Aim for consistent thickness so they bake evenly.
- Tight Plastic Wrap: This is the most critical step for softening the cake layers. The tighter the wrap, the better the moisture transfer.
- Patience is a Virtue: The 1-2 days of chilling are essential for the cake to transform from crisp layers to tender, moist ones. Don’t rush it!
Serving Suggestions and Pairings
Apple Stack Cake is a complete dessert on its own, its rustic charm and deep flavors speaking volumes. However, a few simple additions can enhance the experience:
- A simple cup of hot coffee or tea: The perfect warm beverage to complement the rich flavors.
- A small scoop of vanilla bean ice cream: While the cake softens beautifully, a touch of cold creaminess is always welcome.
- A glass of milk: A classic, comforting pairing for a slice of this old-fashioned cake.
Storage and Leftover Tips
This cake actually gets better with age (up to a point)!
- Refrigeration (After Chilling): Once the cake has softened for 1-2 days, it can remain tightly wrapped in the refrigerator for up to 5-7 days. The flavors will continue to meld.
- Freezing: You can freeze individual slices or the entire assembled cake (without confectioners’ sugar). Wrap tightly in plastic wrap, then a layer of foil. Freeze for up to 2-3 months. Thaw in the refrigerator overnight before serving. The texture may be slightly softer after thawing.
More Recipes You Will Love
If you loved the process and the comforting results of this Apple Stack Cake, you’ll definitely want to explore some of our other fantastic, easy-to-make desserts and treats:
- For another rich and indulgent baked good, our These Chocolate Chip Cookie Dough Brownie Bombs Are My Favorite Sweet Obsession are truly decadent.
- If you’re a fan of classic combinations, you absolutely must try The Best Peanut Butter Brownies I’ve Ever Made (And I’ve Made A Lot).
- For a seasonal fall treat that’s easy to make, check out These Caramel Apple Pie Cookies Are My Favorite Fall Treat In Bite-Sized Form.
- If you’re looking for a delightful no-bake option that’s perfect for autumn, our This Pumpkin Delight Dessert Is My Favorite No-Bake Fall Treat is a winner.
- And for a great way to use up ripe fruit in a comforting bake, our This Chocolate Chip Banana Bread Is My Favorite Way To Use Up Overripe Bananas is always a hit.
Final Thoughts
This Apple Stack Cake recipe is a wonderful journey into traditional baking, resulting in a unique and incredibly satisfying dessert. It’s a testament to the fact that some of the best flavors come from simple, wholesome ingredients and a little bit of patience. The anticipation of those moist, apple-infused layers is truly worth it!
Give this beautiful stack cake a try and bring a piece of comforting history to your table. What’s your favorite heirloom recipe that deserves a revival? Share your thoughts and feedback in the comments below! And for more amazing, easy-to-follow recipes that bring joy to your kitchen, be sure to visit Chefmaniac.com. Happy baking!


Leave a Reply