

Better Than Fried: Oven-Baked Chicken Chimichangas with Cheese & Spice
Print it, save it, or add it to your recipe binder.
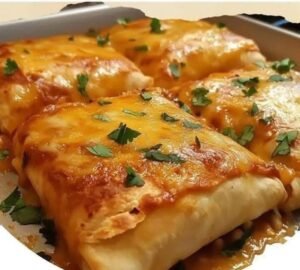
Baked Chicken Chimichangas Recipe
Introduction
Forget the deep fryer—these Baked Chicken Chimichangas bring all the crunchy satisfaction and rich flavor of the classic Tex-Mex dish, minus the mess. With a creamy, spicy filling and a golden, crisp shell, they’re the ultimate comfort food for busy nights or casual gatherings.
Why I Love This Recipe
This is one of those dishes that never lets me down. It’s simple, incredibly satisfying, and always gets rave reviews at the table. The combination of pepper jack cheese, cream cheese, shredded chicken, and taco seasoning makes for a luscious filling, while baking ensures the tortillas turn out crispy without frying. Plus, it’s super customizable!
Ingredients
For the Chimichangas:
- 1 (8 oz) package cream cheese, softened
- 1 (8 oz) block pepper jack cheese, shredded
- 1½ tablespoons taco seasoning
- 1 pound cooked chicken, shredded
- 8 flour tortillas (medium to large)
- Cooking spray
For Topping & Garnish:
- Shredded cheddar cheese
- Sliced green onions
- Sour cream
- Salsa
Swaps and Notes
- Chicken: Rotisserie chicken works beautifully here for convenience.
- Cheese: You can substitute pepper jack with Monterey Jack or a cheddar blend.
- Spice level: Add a chopped jalapeño or a dash of hot sauce to the filling if you like heat.
- Low-carb option: Use low-carb tortillas or large lettuce leaves for a lighter version.
Step-by-Step Instructions
1. Make the Filling
In a medium bowl, combine cream cheese, shredded pepper jack cheese, and taco seasoning. Stir until creamy. Fold in the shredded chicken until evenly coated.
2. Fill the Tortillas
Divide the chicken mixture evenly among the flour tortillas. Fold in the sides, then roll tightly to form a burrito shape.
3. Prep to Bake
Place the chimichangas seam-side down in a greased 9×13-inch baking dish. Spray the tops lightly with cooking spray for that golden finish.
4. Bake Until Crisp
Bake at 350°F (175°C) for 15 minutes. Flip each chimichanga and bake an additional 15 minutes until golden and crispy on all sides.
5. Garnish and Serve
Top with cheddar cheese, green onions, and your favorite sides like sour cream and salsa. Serve hot!
Tips for Success
- Crispier Finish: Brush tops lightly with olive oil or melted butter before baking for extra crispness.
- Freezer-Friendly: Assemble and freeze unbaked chimichangas. When ready to cook, bake from frozen, adding 10–15 minutes to the time.
- Don’t Overfill: Keep fillings manageable to avoid spillage during rolling or baking.
Serving Suggestions & Pairings
These chimichangas are filling on their own, but you can serve them with:
- A side of Spanish rice or refried beans
- A zesty lime slaw or chopped salad
- Dipping sauces like guacamole, chipotle mayo, or avocado crema
- And of course, a classic margarita or refreshing mojito
Storage & Leftover Tips
- Refrigerate: Store leftovers in an airtight container for up to 3 days. Reheat in the oven or air fryer to maintain crispness.
- Freeze: Wrap unbaked or baked chimichangas in foil and freeze up to 2 months.
More Recipes You’ll Love
If you’re a fan of these crispy baked chimis, you’ll also love:
- These Sheet Pan Quesadillas Are My Favorite Way to Feed a Crowd Fast
- This Crockpot Nacho Dip Is the Reason I Never Have Leftovers
- This Mexican Chicken and Rice Casserole Is My Favorite One-Pan Dinner That’s Always a Hit
- This Dorito Casserole Is My Favorite Weeknight Dinner Shortcut
- These Chicken Enchiladas Are My Go-To for Cozy, Crowd-Pleasing Dinners
Final Thoughts
These Baked Chicken Chimichangas are crispy, cheesy, and 100% satisfying. They’re a simple yet impressive dinner that never fails to wow. Whether you’re cooking for a crowd or just want to spice up Taco Tuesday, this is your new go-to.
If you try this recipe, I’d love to hear your thoughts! Leave a comment below or tag @chefmaniac on social media. Don’t forget to follow for more easy and flavorful recipes! 🌯✨
Better Than Fried: Oven-Baked Chicken Chimichangas with Cheese & Spice
This is one of those dishes that never lets me down. It’s simple, incredibly satisfying, and always gets rave reviews at the table. The combination of
Prep: min | Cook: min | Total: min
Servings:
Ingredients
- For the Chimichangas:
- 1 (8 oz) package cream cheese, softened
- 1 (8 oz) block pepper jack cheese, shredded
- 1½ tablespoons taco seasoning
- 1 pound cooked chicken, shredded
- 8 flour tortillas (medium to large)
- Cooking spray
- For Topping & Garnish:
- Shredded cheddar cheese
- Sliced green onions
- Sour cream
- Salsa
- Swaps and Notes:
- Chicken: Rotisserie chicken works beautifully here for convenience.
- Cheese: You can substitute pepper jack with Monterey Jack or a cheddar blend.
- Spice level: Add a chopped jalapeño or a dash of hot sauce to the filling if you like heat.
- Low-carb option: Use low-carb tortillas or large lettuce leaves for a lighter version.
- Step-by-Step Instructions:
- 1. Make the Filling:
- 2. Fill the Tortillas:
- 3. Prep to Bake:
- 4. Bake Until Crisp:
- 5. Garnish and Serve:
- Tips for Success:
- Crispier Finish: Brush tops lightly with olive oil or melted butter before baking for extra crispness.
- Freezer-Friendly: Assemble and freeze unbaked chimichangas. When ready to cook, bake from frozen, adding 10–15 minutes to the time.
- Don’t Overfill: Keep fillings manageable to avoid spillage during rolling or baking.
- Serving Suggestions & Pairings:
- A side of Spanish rice or refried beans
- A zesty lime slaw or chopped salad
- Dipping sauces like guacamole, chipotle mayo, or avocado crema
- And of course, a classic margarita or refreshing mojito
- Storage & Leftover Tips:
- Refrigerate: Store leftovers in an airtight container for up to 3 days. Reheat in the oven or air fryer to maintain crispness.
- Freeze: Wrap unbaked or baked chimichangas in foil and freeze up to 2 months.
- More Recipes You’ll Love:
- These Sheet Pan Quesadillas Are My Favorite Way to Feed a Crowd Fast
- This Crockpot Nacho Dip Is the Reason I Never Have Leftovers
- This Mexican Chicken and Rice Casserole Is My Favorite One-Pan Dinner That’s Always a Hit
- This Dorito Casserole Is My Favorite Weeknight Dinner Shortcut
Instructions
- Make the Filling: In a medium bowl, combine cream cheese, shredded pepper jack cheese, and taco seasoning. Stir until creamy. Fold in the shredded chicken until evenly coated.
- Fill the Tortillas: Divide the chicken mixture evenly among the flour tortillas. Fold in the sides, then roll tightly to form a burrito shape.
- Prep to Bake: Place the chimichangas seam-side down in a greased 9x13-inch baking dish. Spray the tops lightly with cooking spray for that golden finish.
- Bake Until Crisp: Bake at 350°F (175°C) for 15 minutes. Flip each chimichanga and bake an additional 15 minutes until golden and crispy on all sides.
- Garnish and Serve: Top with cheddar cheese, green onions, and your favorite sides like sour cream and salsa. Serve hot!
- Tips for Success: Crispier Finish: Brush tops lightly with olive oil or melted butter before baking for extra crispness.
- Freezer-: Friendly: Assemble and freeze unbaked chimichangas. When ready to cook, bake from frozen, adding 10–15 minutes to the time.
- Don’t Overfill: Keep fillings manageable to avoid spillage during rolling or baking.
- Serving Suggestions & Pairings: These chimichangas are filling on their own, but you can serve them with:
- A side of : Spanish rice or refried beans
- A zesty lime slaw or chopped salad
- Dipping sauces like guacamole, chipotle mayo, or avocado crema
- And of course, a classic margarita or refreshing mojito
- Storage & Leftover Tips: Refrigerate: Store leftovers in an airtight container for up to 3 days. Reheat in the oven or air fryer to maintain crispness.
- Freeze: Wrap unbaked or baked chimichangas in foil and freeze up to 2 months.
- More Recipes You’ll Love: If you’re a fan of these crispy baked chimis, you’ll also love:
- These : Sheet Pan Quesadillas Are My Favorite Way to Feed a Crowd Fast
- This : Crockpot Nacho Dip Is the Reason I Never Have Leftovers
- This : Mexican Chicken and Rice Casserole Is My Favorite One-Pan Dinner That’s Always a Hit
- This : Dorito Casserole Is My Favorite Weeknight Dinner Shortcut
- These : Chicken Enchiladas Are My Go-To for Cozy, Crowd-Pleasing Dinners
- Final Thoughts: These Baked Chicken Chimichangas are crispy, cheesy, and 100% satisfying. They’re a simple yet impressive dinner that never fails to wow. Whether you’re cooking for a crowd or just want to spice up Taco Tuesday, this is your new go-to.
- If you try this recipe, I’d love to hear your thoughts! Leave a comment below or tag @chefmaniac on social media. Don’t forget to follow for more easy and flavorful recipes! 🌯✨
Nutrition
- Calories:
- Fat:
- Carbs:
- Protein:
Rate This Recipe
Average Rating: 0 (0 votes)


Why 8 tortillas then only mention to fill 4?
says to fill the flour tortillas, you must of read it too fast.
Fill the Tortillas
Divide the chicken mixture evenly among the flour tortillas. Fold in the sides, then roll tightly to form a burrito shape.