Classic Baked Ziti – The Ultimate Comfort Food Pasta Bake
Print it, save it, or add it to your recipe binder.
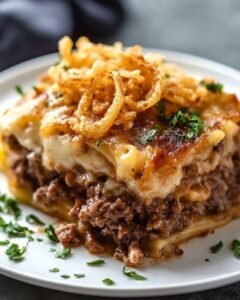
Baked Ziti
If you’re looking for the ultimate baked pasta recipe that brings cheesy layers, rich tomato flavor, and comforting nostalgia all in one bite—baked ziti is it. Whether you’re feeding a crowd or prepping for cozy leftovers, this dish checks every box. Ziti pasta gets layered with hearty meat sauce, creamy ricotta, and melty mozzarella for a bake that’s golden, bubbly, and irresistible.
Why I Love This Recipe
Baked ziti hits that perfect intersection of easy and indulgent. It’s like lasagna’s laid-back cousin—just as satisfying, but with a quicker assembly and no need to fuss with noodles that stick together. This dish is a classic for a reason: It’s adaptable, it’s freezer-friendly, and it brings people together. Serve it with something like blueberry lemonade or beer cheese dip, and you’ve got a full table of happy eaters.
🛒 Ingredients
- 1 pound ziti pasta
- 2 tablespoons olive oil
- 1 onion, chopped
- 3 cloves garlic, minced
- 1 pound ground beef
- 1 (28 oz) can crushed tomatoes
- 1 teaspoon dried basil
- 1 teaspoon dried oregano
- Salt and black pepper, to taste
- 1 (15 oz) container ricotta cheese
- 1 egg, beaten
- 2 cups shredded mozzarella cheese
- 1 cup grated Parmesan cheese
🍅 Ingredient Swaps & Notes
- Ground beef: Sub in ground turkey, sausage, or even lentils for a twist.
- Ricotta mix: Add fresh chopped basil or Italian seasoning for extra flavor.
- Want it saucier? Add ½ cup marinara or a splash of red wine to the tomato mix.
- Cheese lover? Add provolone slices between layers for an extra cheesy stretch.
🔥 Directions
1. Preheat Oven
Set oven to 375°F (190°C). Lightly grease or line a 9×13 inch baking dish.
2. Boil Pasta
Cook the ziti in salted boiling water until al dente, about 8 minutes. Drain and set aside.
3. Make the Sauce
Heat olive oil in a large skillet. Add onion and garlic; sauté until soft, about 5 minutes.
Add ground beef, cook until browned, then drain excess fat.
Stir in crushed tomatoes, basil, oregano, salt, and pepper. Simmer for 10 minutes.
4. Mix Ricotta
In a medium bowl, combine ricotta and beaten egg. Mix until smooth.
5. Assemble
Layer as follows in the baking dish:
- Half of the cooked ziti
- Half of the meat sauce
- Dollops of ricotta mixture
- Sprinkle half of mozzarella and Parmesan
Repeat layers with the remaining ingredients.
6. Bake
Cover with foil and bake for 25 minutes.
Remove foil and bake an additional 10 minutes or until the top is golden and bubbly.
💡 Tips for Success
- Undercook the pasta slightly so it doesn’t go mushy while baking.
- Let it rest for 5–10 minutes before slicing—this helps it hold together.
- Make it ahead: Assemble the dish, cover, and refrigerate up to 24 hours before baking.
- Want a crispier top? Broil for the last 2 minutes (just watch it closely!).
🍽 Serving Suggestions & Pairings
Round out your baked ziti night with:
- Beer cheese dip and crusty bread to start
- Blueberry lemonade for a bright, cool pairing
- Easy turkey wings or chicken enchiladas for a comfort food combo
- Walking taco bar for casual gatherings where variety rules
🧊 Storage & Make-Ahead Tips
- Leftovers: Store in the fridge for up to 4 days.
- Reheat: Warm in the oven at 350°F, covered with foil, for 15–20 minutes.
- Freezer-friendly: Assemble, cover tightly, and freeze unbaked for up to 2 months. Bake from frozen, adding 20–25 minutes to bake time.
🥄 More Recipes You’ll Love
- Easy Turkey Wings – a great side or second entrée
- Beer Cheese Dip – the starter everyone devours
- Blueberry Lemonade – refreshing and fruity
- Chicken Enchiladas – great for comfort food nights
- Walking Taco Bar – a party-ready build-your-own bar
Final Thoughts
Baked ziti is a staple in so many kitchens for good reason—it’s cozy, filling, and downright delicious. With its melty layers and savory sauce, this version will have your guests coming back for seconds (and thirds). Whether it’s a weeknight dinner or your next big gathering, this dish has your back.
Tried it? I’d love to see your cheesy masterpiece! Tag us, leave a review, and explore more pasta night inspiration at ChefManiac.com.

Classic Baked Ziti – The Ultimate Comfort Food Pasta Bake
If you’re looking for the ultimate baked pasta recipe that brings cheesy layers, rich tomato flavor, and comforting nostalgia all in one bite—
Prep: min | Cook: min | Total: min
Servings:
Ingredients
- 1 pound ziti pasta
- 2 tablespoons olive oil
- 1 onion, chopped
- 3 cloves garlic, minced
- 1 pound ground beef
- 1 (28 oz) can crushed tomatoes
- 1 teaspoon dried basil
- 1 teaspoon dried oregano
- Salt and black pepper, to taste
- 1 (15 oz) container ricotta cheese
- 1 egg, beaten
- 2 cups shredded mozzarella cheese
- 1 cup grated Parmesan cheese
Instructions
- Preheat Oven: Set oven to 375°F (190°C). Lightly grease or line a 9x13 inch baking dish.
- Boil Pasta: Cook the ziti in salted boiling water until al dente, about 8 minutes. Drain and set aside.
- Make the Sauce: Heat olive oil in a large skillet. Add onion and garlic; sauté until soft, about 5 minutes.Add ground beef, cook until browned, then drain excess fat.Stir in crushed tomatoes, basil, oregano, salt, and pepper. Simmer for 10 minutes.
- Mix Ricotta: In a medium bowl, combine ricotta and beaten egg. Mix until smooth.
- Assemble: Layer as follows in the baking dish:
- Half of the cooked ziti
- Half of the meat sauce
- Dollops of ricotta mixture
- Sprinkle half of mozzarella and : ParmesanRepeat layers with the remaining ingredients.
- Bake: Cover with foil and bake for 25 minutes.Remove foil and bake an additional 10 minutes or until the top is golden and bubbly.
Nutrition
- Calories:
- Fat:
- Carbs:
- Protein:
Rate This Recipe
Average Rating: 0 (0 votes)