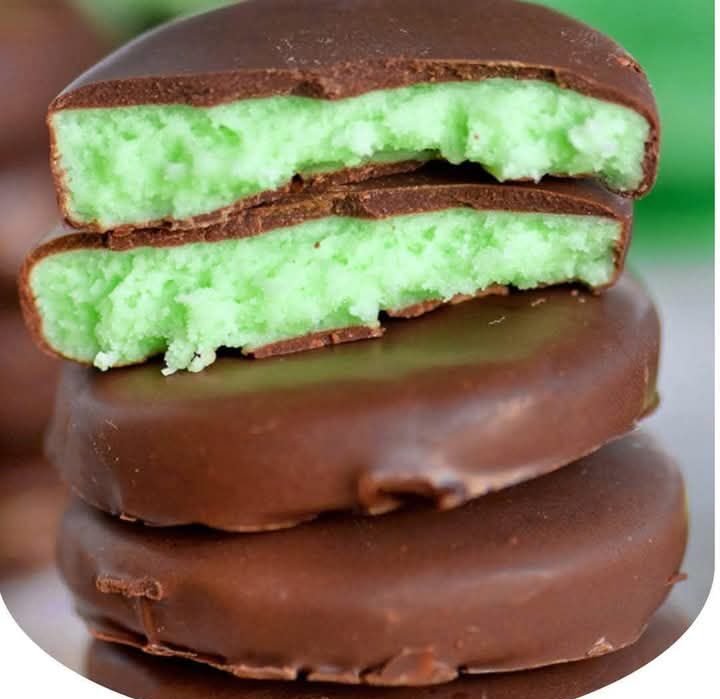
Homemade Mint Chocolate Patties
There’s something incredibly nostalgic about biting into a creamy mint chocolate patty — that cool peppermint center enveloped in smooth chocolate hits all the right notes. These Homemade Mint Chocolate Patties come together with just a few ingredients and zero baking. Whether you’re gifting them, serving at a party, or hoarding them for yourself (no judgment!), this recipe is a guaranteed win.
Why I Love This Recipe
This recipe takes me back to childhood holidays and that first box of Andes Mints from Grandma’s candy dish. But the best part? Unlike the store-bought versions, these are made fresh, and you can tweak the mint intensity and color to your liking. They also make adorable gifts or party favors — especially during the holidays.
Ingredients You’ll Need
- 1/3 cup light corn syrup – This gives the filling a smooth, chewy texture.
- 1/4 cup butter, softened – Adds creaminess to the mint center.
- 1 1/2 tsp mint extract – Adjust for desired minty punch.
- Pinch of salt – Enhances the flavor balance.
- Green food coloring – Optional, but adds that signature minty hue.
- 4 cups powdered sugar, sifted – Forms the base of the candy center.
- 12 oz chocolate candy coating – Smooth, melty exterior that sets beautifully.
Ingredient Swaps & Notes
- Corn Syrup Substitute: Use honey or agave syrup in a pinch, but the texture may vary slightly.
- Butter: Can be replaced with vegan butter for a dairy-free version.
- Chocolate Coating: Dark chocolate chips with 1 tsp coconut oil make a great homemade coating.
- Mint Flavoring: Try peppermint or spearmint extract depending on preference.
Step-by-Step Instructions
- Mix the Base
In a large bowl, beat together the corn syrup, butter, mint extract, and salt until smooth. - Add Color & Sugar
Stir in a few drops of green food coloring, then gradually add the sifted powdered sugar. Mix until a thick, pliable dough forms. - Shape the Patties
Roll the dough into 1-inch balls, then flatten into discs. Place them on a parchment-lined tray and chill in the freezer for 20–30 minutes. - Melt the Chocolate
In a microwave-safe bowl, melt the chocolate candy coating in 30-second intervals, stirring between bursts until smooth. - Dip and Set
Using a fork, dip each chilled mint patty into the melted chocolate. Let the excess drip off, then place them back on the tray. - Chill Again
Refrigerate until the chocolate is firm and glossy, about 15–20 minutes.
Tips for Success
- Chill Thoroughly: Cold centers make dipping in chocolate much easier.
- Use Forks for Dipping: They allow chocolate to drip off cleanly.
- Work in Batches: If it’s warm in your kitchen, only take a few patties out at a time for dipping.
Serving Suggestions & Pairings
Serve these minty treats alongside a creamy drink like this Brownie Batter Dip for double the dessert drama.
Or pair with a no-bake favorite like Edible Cookie Dough for a fun dessert board.
Hosting a cookie exchange? Add these to a platter with Coconut Macaroons and Neiman Marcus Chocolate Chip Cookies— guaranteed showstoppers.
Storage & Leftovers
- Fridge: Store in an airtight container for up to 2 weeks.
- Freezer: Freeze in a single layer, then transfer to a bag for longer storage (up to 3 months).
- Avoid Humidity: Moisture can cause the chocolate to bloom — keep cool and dry.
More Recipes You’ll Love
If you’re a dessert fanatic like me, don’t miss these other decadent bites:
- Chocolate Chip Cookie Dough Brownie Bombs
- Edible Cookie Dough
- Neiman Marcus Chocolate Chip Cookies
- Brownie Batter Dip
- Easy Coconut Macaroons
Final Thoughts
These Homemade Mint Chocolate Patties are a dream for mint-lovers and no-bake dessert fans alike. They’re simple, adaptable, and irresistibly refreshing. Whether you make them for holidays, parties, or just because — you’ll want to keep this recipe in rotation.
If you try this recipe, let me know how it turned out! I love hearing your feedback — and don’t forget to follow along at ChefManiac.com for more tasty ideas.


Leave a Reply