Introduction
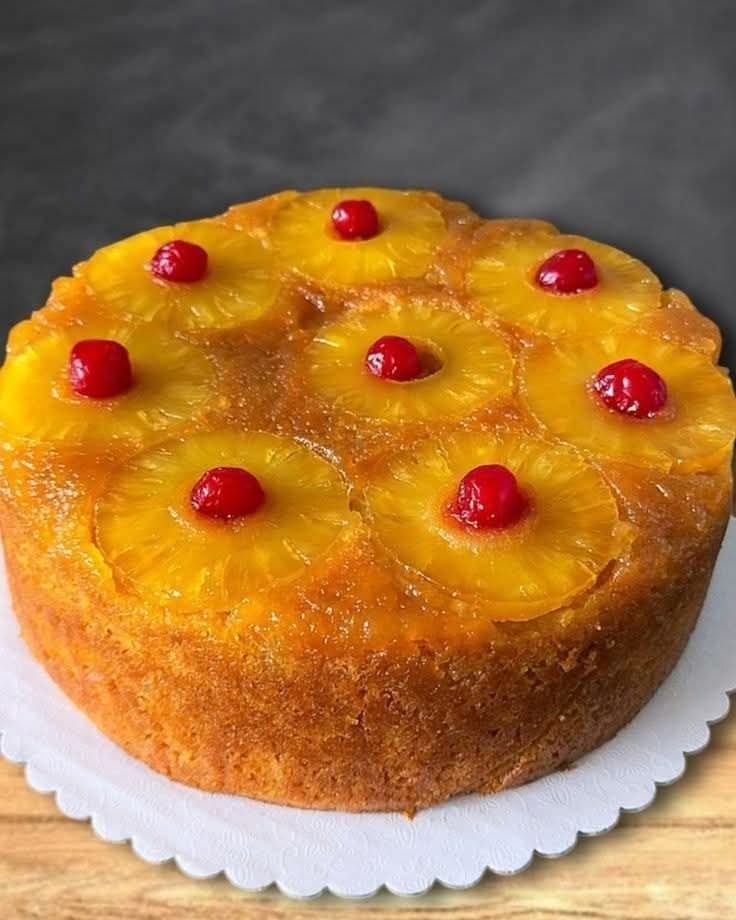
There is something undeniably nostalgic about a Pineapple Upside-Down Cake (or Gâteau renversé à l’ananas). It is the kind of dessert that feels like a warm hug from grandma’s kitchen, yet it always looks impressive enough to be the centerpiece of a summer dinner party. The magic happens in the bottom of the pan, where butter and brown sugar melt together to create a rich, gooey caramel that glazes the fruit as it bakes.
When you flip that pan over, you aren’t just revealing a cake; you’re revealing a masterpiece of golden pineapple rings and bright cherries nestled in a buttery sponge. In this version, I’ve refined the classic recipe to ensure the crumb is incredibly moist and tender by using a combination of milk and crème fraîche. If you love fruit-forward desserts that bring a bit of sunshine to the table, this is the recipe for you.
Why I Love This Recipe
I’ve made a lot of cakes over the years, from my Big Family Banana Pudding to elaborate holiday treats, but I keep coming back to this one for three reasons:
- The Texture: Most upside-down cakes can be a bit dry. The addition of crème fraîche (or Greek yogurt) makes this crumb velvety and rich.
- The Presentation: You don’t need to be a professional decorator. The fruit does all the work for you!
- The Versatility: It’s a sophisticated dessert for adults but sweet and fun enough that kids go crazy for it—much like my Cake Mix Cookies.
Ingredients List
For the Caramelized Topping:
- 1/4 cup (60g) Unsalted Butter: Melted to create the base of the glaze.
- 1/2 cup (100g) Brown Sugar: This creates that deep, molasses-infused caramel flavor.
- Pineapple Rings: 6–8 rings, either fresh or canned (pat them dry first!).
- Maraschino Cherries: Optional, but essential for that classic retro look.
For the Cake Batter:
- 2 cups (250g) All-Purpose Flour: Provides the structure for our sponge.
- 1 1/2 tsp Baking Powder & 1/2 tsp Baking Soda: Our leavening agents for a perfect rise.
- 1/2 tsp Salt: To balance the sweetness.
- 1/2 cup (115g) Unsalted Butter: Softened to room temperature.
- 1 cup (200g) Granulated Sugar: For a clean, sweet finish.
- 2 Large Eggs: To bind the batter and provide richness.
- 1 tsp Vanilla Extract: High-quality extract makes a world of difference.
- 1/2 cup (120ml) Whole Milk: For a soft, pourable batter.
- 1/2 cup (120g) Crème Fraîche or Yogurt: The secret to a moist, tangy crumb.
Swaps and Notes
- The Fruit: While pineapple is traditional, you can use the same method with thinly sliced apples or pears. If you enjoy tropical flavors, you might also like my 3-Ingredient Coconut Macaroons.
- Crème Fraîche Substitute: If you can’t find crème fraîche, full-fat Greek yogurt or sour cream work perfectly.
- Flour: You can use cake flour for an even finer, lighter texture, though all-purpose is the standard for a sturdy “upside-down” structure.
Step-by-Step Instructions
- Prep the Pan: Preheat your oven to 175°C (350°F). Grease an 8 or 9-inch round cake pan. Pour the melted butter into the bottom, then sprinkle the brown sugar evenly over it.
- Arrange the Fruit: Place your pineapple rings on top of the sugar layer. If you’re using cherries, pop one into the center of each ring and fill the gaps between the rings with extras.
- Mix Dry Ingredients: In a medium bowl, whisk together the flour, baking powder, baking soda, and salt.
- Cream Butter and Sugar: In a large bowl or stand mixer, beat the softened butter and granulated sugar until light and fluffy (about 3 minutes).
- Add Wet Ingredients: Beat in the eggs one at a time, followed by the vanilla extract and the crème fraîche.
- Combine: Gradually add the dry ingredients to the butter mixture, alternating with the milk. Start and end with the dry ingredients, mixing just until combined. Do not overmix!
- Bake: Carefully pour the batter over the pineapples, smoothing the top with a spatula. Bake for 40–45 minutes. A toothpick inserted into the center should come out clean.
- The Flip: This is the crucial part! Let the cake cool in the pan for exactly 10 minutes. Place a serving plate over the pan and, using oven mitts, quickly invert it. Let it sit for a few seconds so the caramel drips down, then gently lift the pan off.
Tips for Success
- Dry the Pineapple: If using canned pineapple, use paper towels to pat the rings dry. Excess moisture can make the top of the cake soggy.
- Room Temp Ingredients: Ensure your eggs, milk, and butter are at room temperature. This creates an emulsion that traps air, leading to a fluffier cake.
- The 10-Minute Rule: If you flip the cake too soon, it might fall apart. If you wait too long, the caramel will harden and the fruit will stick to the pan. 10 minutes is the “Goldilocks” zone.
Serving Suggestions and Pairings
This cake is best served slightly warm. I love pairing a slice with a big dollop of homemade whipped cream or a scoop of vanilla bean ice cream.
If you’re serving this at a summer party, it pairs beautifully with a Refreshing Blueberry Lemonade to cut through the richness of the caramel. For a cozy afternoon tea, serve it alongside a tray of Chocolate Chip Banana Bread for those who want a variety of flavors.
Nutritional Information (Per Serving)
- Calories: 385 kcal
- Total Fat: 18g
- Saturated Fat: 11g
- Cholesterol: 75mg
- Sodium: 210mg
- Carbohydrates: 52g
- Sugar: 34g
- Protein: 5g
Storage and Leftover Tips
- Countertop: This cake stays moist for up to 2 days if kept in an airtight container at room temperature.
- Refrigerator: You can store it in the fridge for up to 4 days. I recommend microwave-heating individual slices for 15 seconds before eating to soften the caramel.
- Freezing: You can freeze slices wrapped tightly in plastic wrap and foil for up to 3 months. Thaw in the fridge overnight.
More Recipes You Will Love
- Classic Banana Pudding for the Whole Family
- Easy 3-Ingredient Coconut Macaroons
- Soft and Chewy Cake Mix Cookies
Final Thoughts
I hope you enjoy baking this Gâteau renversé à l’ananas as much as I do! It’s a timeless recipe that never fails to put a smile on people’s faces. Cooking is all about sharing joy, so if you make this, I’d love to hear how it turned out.
What is your favorite retro dessert? Let me know in the comments below, and don’t forget to follow ChefManiac on social media for more daily recipe inspiration!


Leave a Reply