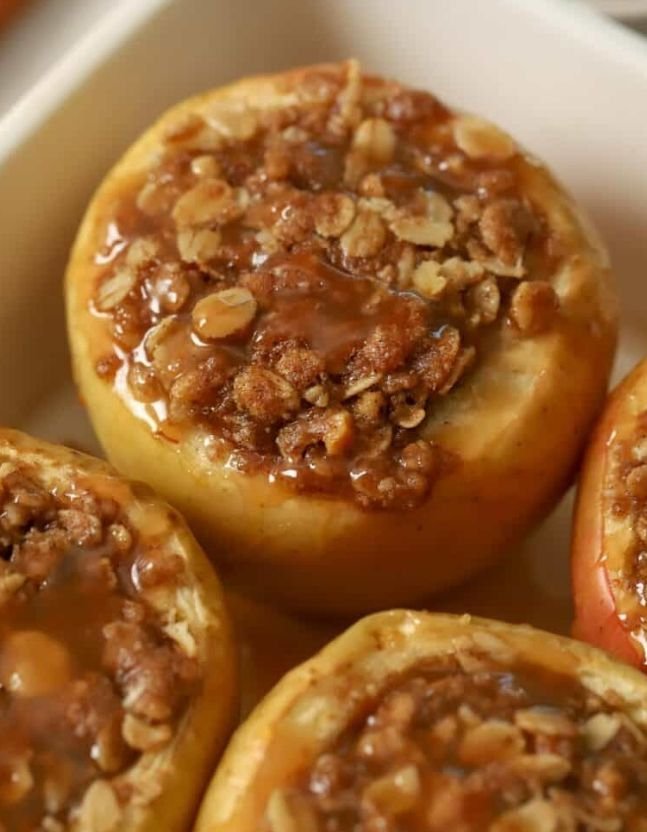
Tender Stuffed Baked Apples with Oat-Pecan Crumble
Author: Jason Griffith
There’s a certain magic that happens when the weather turns crisp. Suddenly, the kitchen feels warmer, and the cravings shift toward comfort food. And when I think of cozy, comforting desserts, nothing beats a classic Stuffed Baked Apple.
This isn’t just a dessert; it’s an experience. The smell of cinnamon, nutmeg, and caramelized sugar filling your home is enough to instantly transport you to a happy place. The apples bake until they are incredibly tender, practically melting in your mouth, while the brown sugar, oat, and pecan crumble topping turns perfectly golden and crunchy. Served warm with a scoop of vanilla ice cream and a drizzle of caramel sauce, it’s simple perfection.
Forget those complicated pies; this recipe is straightforward, requires minimal prep, and delivers maximum flavor. It’s the ideal treat for a Sunday afternoon, a holiday dessert, or just a simple weeknight indulgence.
Why I Love This Recipe
I’ve made dozens of fall desserts over the years, but this Stuffed Baked Apple recipe always brings me back. Here’s why I keep it on repeat:
- Simple Elegance: While it looks impressive, it’s one of the easiest desserts you can make. It truly is a 15-minute prep job before the oven does all the work.
- The Perfect Texture Contrast: You get the buttery, crunchy oat crumble topping paired with the soft, sweet, tender apple flesh. It’s a textural dream.
- Built-in Portion Control: Baking them individually means no messy slicing. Just grab an apple, top it with ice cream, and dig in!
- A Family Favorite: This dessert is a timeless classic that always makes people smile. For another impressive but easy crowd-pleaser, try my recipe for How this Unicorn Poke Cake Became My Favorite Party Trick.
Ingredients
| Item | Quantity | Notes |
| Apples | 4 medium sized | I use Honeycrisp for a good balance of sweet/tart, but Gala or Fuji also work well. |
| All-Purpose Flour | 41 cup | The binder for the crumble. |
| Light Brown Sugar | 31 cup | For that deep, molasses flavor. |
| Granulated Sugar | 2 Tablespoons | To help the topping caramelize. |
| Ground Cinnamon | 1 teaspoon | The star spice of the fall season. |
| Salt | 41 teaspoon | To balance the sweetness. |
| Pecans or Walnuts | 2 Tablespoons | Finely chopped for crunch. |
| Old Fashioned Oats | 21 cup | Gives the crumble a chewy, hearty texture. |
| Chilled Butter | 4 Tablespoons | Cubed. This is key for a truly crumbly topping. |
| For Serving | Vanilla ice cream and caramel sauce | Optional, but highly recommended! |
Export to Sheets
Swaps and Notes
- Apple Choice: Any firm, slightly tart apple works well. Granny Smith will offer the best tart contrast to the sweet filling, while Fuji or Gala will be sweeter.
- Nut-Free: You can easily omit the pecans or walnuts and replace them with an extra tablespoon of oats or just leave them out entirely.
- Spices: Feel free to swap a 41 teaspoon of the cinnamon for apple pie spice or a pinch of nutmeg and cloves for a deeper, warmer flavor.
- Vegan/Dairy-Free: Substitute the butter with a good quality plant-based butter alternative to make the recipe completely dairy-free.
Steps for the Recipe
Step 1: Prep the Oven and Apples
Preheat your oven to 350∘F. Take a moment to butter or grease a small baking dish that can fit the four apples.
Core each apple, leaving the bottom of the apple intact—you want to create a pocket for the filling that doesn’t leak. Use a small melon baller or spoon to scoop out a little bit of the top and inside flesh to form the cavity. Alternately: If you prefer to make “boats,” you can halve each apple lengthwise and use a melon baller or small spoon to scoop out the core and form a cavity.
Step 2: Make the Crumble Filling
In a medium bowl, combine the flour, both sugars (brown and granulated), cinnamon, salt, nuts, and oats.
Add the chilled, cubed butter. Using your fingers, rub the butter into the dry ingredients. You want to pinch and press the butter until the mixture resembles coarse, pea-sized crumbles.
Step 3: Fill and Bake
Divide the crumble filling evenly between the prepared apples, gently packing it into the cavity.
Place the apples in your prepared baking dish. Crucially, fill the bottom of the baking dish with about an inch of water. This creates steam, which helps the apples cook evenly and prevents them from drying out.
Cover the baking dish tightly with aluminum foil and bake for 30 minutes covered.
Uncover the dish and bake for an additional 30-40 minutes, until the topping is golden brown and the apples are tender but still holding their shape (the total time will depend on the size of your apples). A paring knife should slide easily into the apple flesh.
Step 4: Serve
Carefully remove the apples from the baking dish. Serve them immediately while warm, topped with a generous scoop of vanilla ice cream and a drizzle of caramel sauce.
Tips for Success
- Use Chilled Butter: This is essential for a good crumble topping. If your butter is too warm, it will blend into a paste instead of forming crumbles.
- The Water Bath is Key: Don’t skip the inch of water in the baking dish. It ensures your apples steam from the bottom while they bake, resulting in a perfectly tender interior.
- Check for Doneness: The bake time is an estimate. The apples are done when the skin looks slightly wrinkled and a knife slides in with little resistance. If the topping browns too fast, cover them loosely with foil and continue baking.
Serving Suggestions and Pairings
These baked apples are fantastic on their own, but they are absolutely glorious with a few additions.
- Dessert Toppings: The classic is vanilla ice cream and caramel sauce (you can buy this at any grocery store). You could also use a dollop of whipped cream, a scoop of pecan praline ice cream, or a dusting of powdered sugar.
- Dinner Pairings: If you are serving this as part of a meal, the sweet, savory, and spicy flavor of my Easy Cheesy Chicken Sliders with Marinara Garlic Butter would make a great main course before this dessert.
- Drinks: Balance the rich sweetness with a refreshing sip of This Blueberry Lemonade Is My Favorite Refreshing Drink for Sunny Days.
Nutritional Information Per Serving (Estimate)
- Calories: 320
- Total Fat: 12g
- Saturated Fat: 7g
- Cholesterol: 30mg
- Sodium: 150mg
- Total Carbohydrates: 55g
- Dietary Fiber: 5g
- Total Sugars: 38g
- Protein: 3g
Note: This is an estimate based on using Honeycrisp apples and does not include the optional ice cream and caramel sauce.
Storage and Leftover Tips
Baked apples are best served warm, fresh from the oven, but leftovers are still delicious!
- Storage: Store any cooled leftover baked apples in an airtight container in the refrigerator for up to 4 days.
- Reheating: To reheat, place them on a microwave-safe plate and microwave for 30-60 seconds, or put them in a toaster oven at 350∘F for about 10 minutes until warmed through.
- Leftover Filling: If you have any extra crumble filling, you can store it in the refrigerator for up to a week and sprinkle it over oatmeal, yogurt, or use it to make another fall favorite like my These Sheet Pan Quesadillas Are My Favorite Way to Feed a Crowd Fast.
More Recipes You Will Love
If you’re a fan of easy, cozy treats that deliver big on flavor, you should definitely check out these other favorites from the site:
- These Chocolate Chip Cookie Dough Brownie Bombs Are My Favorite Sweet Obsession
- How This Unicorn Poke Cake Became My Favorite Party Trick
- Easy Cheesy Chicken Sliders with Marinara Garlic Butter
Final Thoughts
These Stuffed Baked Apples are more than just a recipe; they are a tradition. They are the perfect way to bring the warm, inviting scents and flavors of the season right into your kitchen. Simple to make and impossible to resist, they are guaranteed to be a new favorite.
Give them a try this week, and let me know in the comments what your favorite apple variety was to use! Happy baking!


Leave a Reply