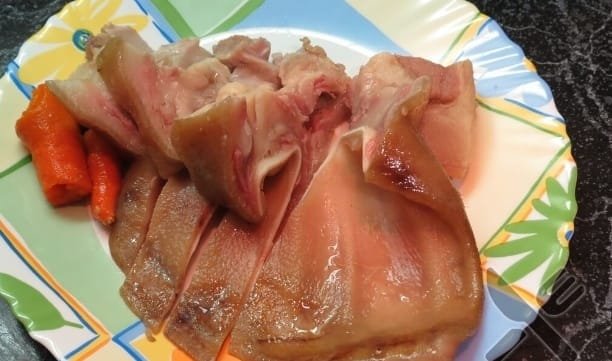
For those who appreciate classic Southern comfort food and nose-to-tail cooking, Country Boiled Pig Ears are a true delicacy. This traditional dish might sound adventurous to some, but it delivers an incredibly tender, flavorful, and uniquely satisfying experience. Slowly simmered until melt-in-your-mouth soft, then seasoned with aromatic spices and a touch of heat, these pig ears are a testament to simple ingredients transforming into something truly special.
Why I Love This Recipe
There’s an undeniable charm and deep-rooted tradition in recipes like Country Boiled Pig Ears. What I truly love about this dish is the way it embraces the philosophy of “waste not, want not,” transforming an often-overlooked cut into a star. The slow simmering process is key, rendering the pig ears incredibly tender and gelatinous, while absorbing all the rich flavors from the onion, peppers, and seasonings. The hint of hot sauce and vinegar cuts through the richness, creating a wonderfully balanced and savory bite. It’s not just food; it’s a taste of heritage, offering a unique texture and robust flavor that’s both comforting and adventurous for the palate.
Ingredients
Here’s what you’ll need to create these tender Country Boiled Pig Ears:
- Pig ears, as many as desired (start with 2-4 for a medium pot)
- Enough water to cover the ears
- 1 onion, sliced
- Red pepper flakes, to taste
- Seasoned salt, to taste
- Black pepper, to taste
- A splash or two of hot sauce (like Tabasco or your favorite)
- A splash or two of vinegar (white vinegar or apple cider vinegar)
- 1 heaping Tablespoon of lard
Swaps and Notes
- Pig Ears: Look for clean pig ears from your butcher or a well-stocked grocery store.
- Water: Use enough water to keep the ears fully submerged during the long simmer. You may need to add more hot water periodically.
- Onion: A yellow or white onion, sliced, adds a foundational aromatic flavor.
- Seasonings: The red pepper, seasoned salt, and black pepper are flexible. Adjust to your desired level of spice and saltiness. Some might also add a bay leaf or a pinch of garlic powder.
- Hot Sauce: A classic for a reason, it adds a lovely zing. Use your favorite brand and adjust the amount to your heat preference.
- Vinegar: White vinegar or apple cider vinegar brightens the flavor and helps tenderize the meat.
- Lard: The lard adds richness and contributes to the silky texture of the broth and ears. If you don’t have lard, a tablespoon of vegetable oil can be used, but lard is traditional.
Instructions
Let’s get these tender Country Boiled Pig Ears cooking!
- Prepare Pig Ears: Thoroughly rinse the pig ears under cold running water. Place the clean pig ears into a medium-sized pot or Dutch oven.
- Add Liquid and Aromatics: Add enough water to the pot to completely cover the pig ears. Add the sliced onion to the pot.
- Season: Add the red pepper flakes, seasoned salt, black pepper, a splash or two of hot sauce, a splash or two of vinegar, and 1 heaping tablespoon of lard to the pot. Stir gently to combine the seasonings.
- Boil & Simmer: Bring the pot to a rolling boil over high heat for 10 minutes. After 10 minutes, reduce the heat to a gentle simmer.
- Long Simmer: Cover the pot partially or fully, depending on how quickly water evaporates. Simmer for 3 hours. During this time, occasionally check to ensure the ears remain immersed in the water. Add more hot water if necessary to keep them covered.
- Check for Tenderness: The ears are done when they are very soft and tender – a fork should easily pierce through the skin. If they’re not soft enough, continue to simmer until they reach the desired tenderness.
- Serve: Carefully remove the pig ears from the pot. They are delicious served warm, either whole or sliced, with a bit of the flavorful broth.
Tips for Success
- Cleanliness: Ensure the pig ears are very clean before cooking.
- Submersion: Keeping the ears fully submerged during the long simmer is crucial for even cooking and maximum tenderness.
- Low and Slow: The long, slow simmer is key to breaking down the collagen and achieving that desirable soft, gelatinous texture. Don’t rush this step.
- Taste and Adjust: As with many traditional recipes, “to taste” is important. Adjust seasonings (salt, pepper, hot sauce, vinegar) during the last hour of simmering.
- Don’t Discard the Liquid: The cooking liquid (potlikker) is incredibly flavorful and can be enjoyed as a broth or used to moisten the ears.
Serving Suggestions and Pairings
Country Boiled Pig Ears are a rich and flavorful dish that can be enjoyed in various ways, often as part of a larger Southern meal:
- On Their Own: Served warm, often with a little of the seasoned broth.
- With Southern Sides: Pair them with classic sides like collard greens, cornbread (like our Spicy Jalapeño Cheddar Cornbread: Skillet Baked Perfection), black-eyed peas, or rice.
- Fried or Pickled: While this recipe focuses on boiling, perfectly boiled pig ears can also be chilled, sliced, and then pan-fried until crispy, or pickled for a tangy treat.
- As Part of a Feast: Integrate them into a hearty Southern spread that might include dishes like This Cajun Chicken Sausage Gumbo Is My Favorite Bowl Of Southern Comfort or These Easy Turkey Wings Are My Favorite Comfort Food For Lazy Sundays.
Storage and Leftover Tips
Boiled pig ears make great leftovers and can even be prepared ahead of time.
- Refrigeration: Store cooled, cooked pig ears and some of their cooking liquid in an airtight container in the refrigerator for up to 3-4 days. The liquid will likely gel when cold.
- Reheating: Reheat on the stovetop over low heat, adding a splash of water or broth if needed, until warmed through.
- Freezing: Cooked pig ears can be frozen. Place them in a freezer-safe container with some of their cooking liquid. Freeze for up to 2-3 months. Thaw in the refrigerator overnight before reheating.
More Recipes You Will Love
If you loved the rich, savory, and comforting nature of this traditional dish, you’ll definitely want to explore some of our other fantastic, Southern-inspired and hearty recipes:
- For another incredible bowl of Southern comfort, try our This Cajun Chicken Sausage Gumbo Is My Favorite Bowl Of Southern Comfort.
- If you enjoy quick and flavorful Southern-inspired dinners, check out This Tomato Skillet With Okra And Sausage Is My Favorite Quick Dinner Packed With Southern Flavor.
- For a fantastic party appetizer with big flavor, our This Beer Cheese Dip Is My Favorite Party Starter That Disappears In Minutes is always a hit.
- And for another easy, savory option, don’t miss This Baked Kosher Salami Is My Favorite Easy Appetizer With Big Flavor.
Final Thoughts
This Country Boiled Pig Ears recipe is a wonderful way to experience a piece of culinary history and savor a truly unique and comforting dish. The process is simple, yielding incredibly tender, flavorful results that are perfect for those who appreciate robust, traditional flavors.
Give this recipe a try and step into the delicious world of Southern comfort food! What are your favorite traditional or adventurous cuts of meat to cook? Share your ideas and feedback in the comments below! And for more amazing, easy-to-follow recipes that bring joy to your kitchen, be sure to visit Chefmaniac.com. Happy cooking!


Leave a Reply