
The Ultimate Classic Marble Cake: A Step-by-Step Guide to the Perfect Swirl
By Jason Griffith
Introduction
There’s something about a slice of Marble Cake that just feels like coming home. It’s the perfect blend of two worlds—the bright, comforting sweetness of vanilla meeting the deep, indulgent richness of chocolate. It’s sophisticated enough for a special occasion, yet humble enough for a simple afternoon treat.
Forget those dry, flavorless cakes of the past. This recipe focuses on creating an incredibly moist, tender crumb with a beautiful, striking marble pattern. It’s surprisingly easy, even for a novice baker, and the reaction you get when you slice into that perfectly swirled center is worth every minute of baking. Whether you’re making it for a birthday, a gathering, or just a Tuesday, this classic is a guaranteed winner.
Why I Love This Recipe
I’ve baked a lot of cakes over the years, and many of them have been overly complicated. What I adore about this Marble Cake is its simplicity and the high reward for minimal effort.
First, it’s a one-bowl wonder for the vanilla base, which cuts down on cleanup dramatically. Second, the swirlingtechnique is more art than science; there’s no way to mess it up! Every cake comes out with a unique, beautiful design. Finally, the combination of softened butter and milk ensures a texture that is light, fluffy, and never dry. It’s the kind of cake that makes people ask, “What’s your secret?” and the secret is simply using the best ingredients and a proven classic method.
Classic Marble Cake Recipe
This recipe is designed for a standard 9-inch round cake pan.
Ingredients
| Ingredient | Quantity | Notes |
| All-Purpose Flour | 2 cups | Use the “spoon and level” method for accuracy. |
| White Sugar | 1 cup | Granulated sugar works best for texture. |
| Milk | 1 cup | Whole milk or 2% is ideal for richness. |
| Large Eggs | 2 | Eggs should be at room temperature for the best blend. |
| Butter, softened | ½ cup (1 stick) | Should be truly soft—not melted. |
| Baking Powder | 2 teaspoons | Helps with the cake’s lift and tenderness. |
| Vanilla Extract | 1 teaspoon | Pure vanilla extract is recommended. |
| Salt | ½ teaspoon | Essential for balancing the sweetness. |
| Unsweetened Cocoa Powder | 2 Tablespoons | Standard baking cocoa. |
Export to Sheets
Swaps and Notes
- Dairy-Free Option: Use an equal amount of non-dairy milk (like almond or oat) and a plant-based butter substitute. The texture will be slightly different but still delicious.
- Gluten-Free Option: Swap the all-purpose flour for a good quality 1:1 gluten-free baking blend that includes xanthan gum.
- Dark Chocolate Swirl: For a richer, darker chocolate flavor, use Dutch-process cocoa powder instead of standard unsweetened cocoa.
- Extract Swap: Want a different flavor? Swap the vanilla for almond extract in the vanilla batter for a fun twist!
Steps for the Recipe
Prep Work
- Preheat and Prep: Preheat your oven to 350∘F (175∘C). Grease and lightly flour a 9-inch round cake pan, ensuring every surface is coated to prevent sticking.
Mix the Batter
- Combine Ingredients: In a large mixing bowl, place the flour, sugar, milk, eggs, softened butter, baking powder, vanilla extract, and salt.
- Mix: Begin mixing slowly with an electric mixer until the dry ingredients are just moistened. Then, increase the speed to medium and beat for about 2 minutes. Scrape down the sides of the bowl once or twice. The batter should be smooth and creamy.
- Reserve Batter: Measure out 3/4 cup of the vanilla batter and set it aside in a separate small bowl. Pour the remaining vanilla batter into your prepared cake pan, spreading it into an even layer.
Create the Swirl
- Make the Chocolate Batter: Stir the 2 Tablespoons of unsweetened cocoa powder into the reserved 3/4 cup of batter until the color is even and fully incorporated.
- Dollop and Swirl: Drop the chocolate batter by large spoonfuls (dollops) randomly on top of the vanilla batter in the pan.
- The Marbling: Take a table knife or a thin skewer and gently run it through the batter, creating S-shapes and figure-eights to swirl the chocolate into the vanilla. Do not over-swirl! You want distinct pockets of both colors, not a muddy brown. About 5-6 passes through the batter is usually enough.
Bake and Cool
- Bake: Place the cake in the preheated oven and bake for 30 to 35 minutes.
- Check for Doneness: The cake is done when a toothpick inserted into the center (in a vanilla section is easiest to see) comes out clean.
- Cool: Let the cake cool in the pan on a wire rack for about 10 minutes. Then, carefully invert the cake onto the wire rack to cool completely. Do not attempt to frost or slice until it is fully cooled.
Tips for Success
- Room Temperature Ingredients are Key: Having the eggs and butter at room temperature helps them emulsify (blend) better with the other ingredients, leading to a lighter, smoother, and more consistently textured batter.
- Do Not Overmix: Once the dry and wet ingredients are combined, only mix until just smooth. Overmixing develops too much gluten in the flour, resulting in a tough, dense cake.
- Grease and Flour Properly: This is a classic method for a reason! It guarantees easy release. Alternatively, you can line the bottom of the pan with parchment paper after greasing.
- The Swirl Technique: When marbling, the goal is to mix the colors no more than 50%. Gentle, deep sweeps are better than fast, shallow mixing. The chocolate batter should sink slightly into the vanilla to create that beautiful effect.
Serving Suggestions and Pairings
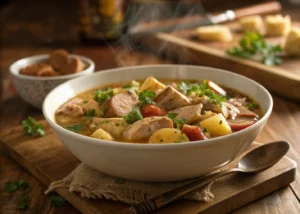
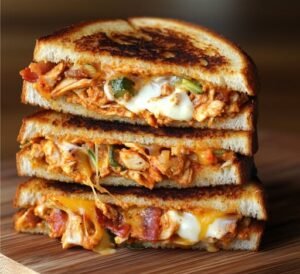
This classic cake is delicious on its own, but a simple dusting of powdered sugar or a light chocolate glaze makes it shine. For a full-meal pairing, try serving it after a hearty bowl of comfort food like this Cajun Chicken and Sausage Gumbo or a casual, fun dinner of Easy Cheesy Chicken Sliders with Marinara Garlic Butter.
For drinks, the rich chocolate and vanilla notes pair wonderfully with a refreshing beverage. Try a glass of iced coffee or this vibrant Blueberry Lemonade.
Nutritional Information Per Serving (Estimate)
Based on 12 servings of the cake, without frosting.
| Nutrient | Amount |
| Calories | 250−280 |
| Total Fat | 10−12g |
| Saturated Fat | 6−7g |
| Cholesterol | 40−50mg |
| Sodium | 160−180mg |
| Total Carbohydrates | 38−42g |
| Dietary Fiber | 1g |
| Total Sugars | 22−25g |
| Protein | 4g |
Export to Sheets
Disclaimer: These values are approximate and can vary based on specific ingredient brands and preparation methods.
Storage and Leftover Tips
- Room Temperature: If unfrosted, the cake can be stored in an airtight container at room temperature for up to 3 days. A domed cake saver is perfect for this.
- Refrigerated: If frosted with a buttercream or cream cheese frosting, store the cake in the refrigerator for up to 5 days. Let it come to room temperature for about 30 minutes before serving for the best flavor and texture.
- Freezing: This cake freezes beautifully! Once cooled, wrap the unfrosted cake tightly in plastic wrap, then an outer layer of aluminum foil. Freeze for up to 3 months. Thaw overnight in the refrigerator, then unwrap and bring to room temperature before serving or frosting.
More Recipes You Will Love
If you enjoyed this recipe, you’ll love these other treats from my kitchen that share the same comforting and crowd-pleasing vibe:
- For a sweet treat with a crunch, try baking a batch of The Best Peanut Butter Brownies I’ve Ever Made.
- If you’re making this for a holiday gathering, these Pecan Pie Bars are a fantastic make-ahead option.
Final Thoughts
Baking is meant to be a joyful, comforting experience, and this Marble Cake embodies that. It’s a simple recipe that yields a stunning result, proving you don’t need a pastry chef degree to create something truly special. The rich, moist crumb and the visual appeal of the swirl make it an instant favorite at any table.
Give this classic a try—I promise it will become your new go-to. If you make it, let me know how your swirl turned out in the comments below! What’s your favorite kind of frosting to pair with a marble cake? I’d love to hear your feedback and suggestions. Happy baking, and don’t forget to follow us for more classic recipes!


Ice cream cake is the perfect mix of creamy and sweet, combining smooth ice cream with soft cake for a delicious treat in every bite