Mini Candy Corn Cheesecakes: The Ultimate Festive Halloween Dessert
By Jason Griffith Published on Chefmaniac.com
Introduction
As a professional food writer, I’ve seen my share of holiday-themed desserts, but nothing brings a smile to my face quite like a perfectly executed, fun-sized treat. With Halloween just around the corner, it’s time to start planning a dessert spread that’s equal parts spooky and sweet. Enter these Mini Candy Corn Cheesecakes.
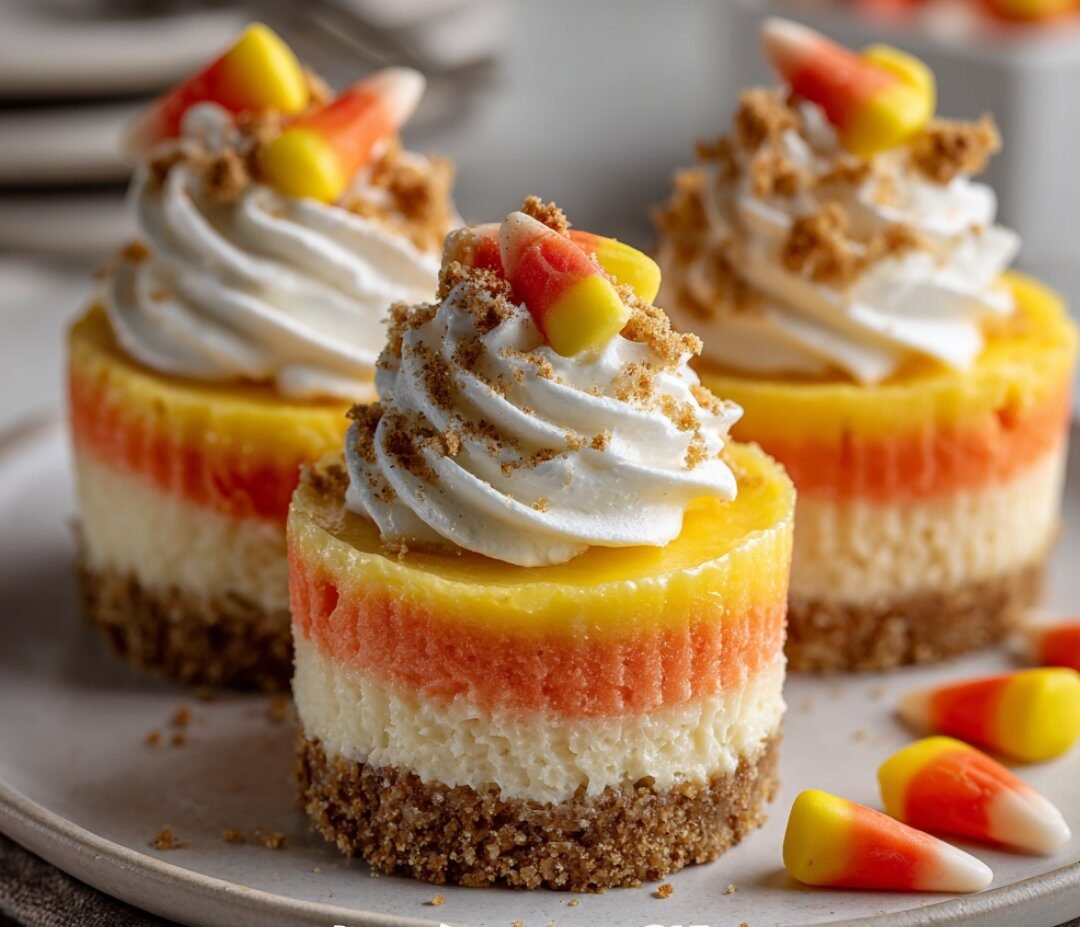
These aren’t your typical heavy, cumbersome cheesecake slices. Instead, we’re talking about individual, vibrant mini cheesecakes that capture the iconic look of candy corn with gorgeous, distinct layers of orange, yellow, and white. They are sweet, colorful, and perfectly portioned, making them the ultimate festive bite for any Halloween gathering. From the buttery graham cracker crust to the creamy, tangy filling, and the final flourish of whipped cream and a mini candy corn topping, this recipe is a guaranteed crowd-pleaser that looks way more complicated than it actually is. Trust me, once you see how easy they are to make, they’ll become your new favorite spooky season tradition.
Why I Love This Recipe
I’ve been making these Mini Candy Corn Cheesecakes for years, and they always disappear first at any party. Why do I love them so much?
- Picture Perfect: The three distinct, bright layers perfectly mimic the candy corn pattern, making them incredibly festive and Instagram-worthy. They genuinely look like they belong on a professional holiday spread.
- Portion Control: Baking them in a muffin tin means they’re perfectly portioned and easy to serve—no slicing or messy clean-up required. They’re great for a walking party or an easy-to-grab dessert buffet.
- Make-Ahead Magic: Cheesecake is one of those wonderful desserts that tastes even better after a night in the fridge, making this a fantastic make-ahead option. You can tackle the bulk of the work the day before the party!
- Simple Ingredients: Despite the impressive look, the ingredients list is standard for a classic cheesecake. Nothing complicated or hard to find—just simple, quality ingredients.
Ready to bake? Let’s dive into how you can create these irresistible Halloween treats.
Ingredients
Yields: 12 mini cheesecakes
Crust
- 1 ½ cups graham cracker crumbs
- ¼ cup granulated sugar
- ⅓ cup unsalted butter, melted
Filling
- 16 oz (450 g) cream cheese, fully softened (very important!)
- ½ cup granulated sugar
- 2 large eggs
- ½ cup sour cream (full-fat is best for richness)
- 1 teaspoon vanilla extract
- Yellow food coloring (gel preferred for vibrant color)
- Orange food coloring (gel preferred for vibrant color)
Topping & Garnish
- Whipped cream (store-bought or homemade)
- 12 mini candy corns
Swaps and Notes
- Crust Alternatives: For a darker, spookier crust, you can absolutely swap the graham crackers for Oreo cookie crumbs (about 2 cups of crushed Oreos with the filling removed).
- Cream Cheese: Ensure your cream cheese is at true room temperature. This is key to a smooth, lump-free batter. If it’s too cold, it will be hard to blend, leading to lumps.
- Sour Cream Substitute: Plain full-fat Greek yogurt can be used in a pinch, but sour cream adds that classic, slight tanginess that complements the creaminess so well.
- Food Coloring: I highly recommend using gel food coloring over liquid, as it delivers a much more vibrant color without thinning out the cheesecake batter.
Instructions
Step 1: Prep the Pan and Oven
Preheat your oven to 160∘C (325∘F). Line a standard 12-cup muffin tin with cupcake liners.
Step 2: Make the Crust
In a medium bowl, combine the graham cracker crumbs, 41 cup of sugar, and the melted butter. Mix until all the crumbs are evenly moistened. Press about 1 tablespoon of the mixture firmly into the bottom of each prepared cupcake liner.
Step 3: Make the Filling Base
In a large bowl using an electric mixer, beat the softened cream cheese and 21 cup of sugar until the mixture is completely smooth and fluffy. Scrape down the sides of the bowl. Beat in the eggs one at a time, mixing just until combined after each addition. Finally, mix in the sour cream and vanilla extract until just blended. Do not overmix, as this can cause the cheesecakes to crack.
Step 4: Color the Batter
Divide the batter evenly into three separate bowls.
- Bowl 1 (White Layer): Leave this bowl plain.
- Bowl 2 (Yellow Layer): Add a few drops of yellow food coloring and mix until the color is uniform.
- Bowl 3 (Orange Layer): Add a few drops of orange food coloring (or a mix of red and yellow) and mix until the color is uniform.
Step 5: Layer the Cheesecakes
Carefully layer the batter into each crust-lined cup, starting with the widest color and ending with the narrowest, just like a candy corn.
- Orange Layer: Spoon about 1 tablespoon of the orange batter over the crust.
- Yellow Layer: Gently spoon about 1 tablespoon of the yellow batter on top of the orange.
- White Layer: Finish by spooning about 1 tablespoon of the plain (white) batter on top of the yellow.
Step 6: Bake and Chill
Bake for 18–20 minutes, or until the edges of the cheesecakes look set and the centers are just slightly jiggly. Remove from the oven and let them cool completely in the muffin tin on a wire rack. Once cooled, transfer the tin to the refrigerator and chill for a minimum of 2–3 hours, or preferably overnight, to fully set.
Step 7: Garnish and Serve
Just before serving, peel off the cupcake liners. Top each mini cheesecake with a swirl of whipped cream and finish with one mini candy corn pressed gently into the top.
Tips for Success
- The Water Bath Hack: While not strictly necessary for minis, placing the muffin tin in a shallow pan of hot water while baking can help prevent cracking and ensure a creamier texture.
- Tap It Out: After dividing and layering the batter, gently tap the muffin tin on the counter a few times. This releases air bubbles and helps the layers settle nicely.
- Don’t Overbake: Overbaked cheesecake is dry and prone to cracks. The center should still have a slight jiggle. It will firm up completely while chilling.
- Cool Slowly: Avoid sudden temperature changes. Cool the cheesecakes gradually on the counter before moving them to the fridge to minimize cracking.
Serving Suggestions and Pairings
These festive cheesecakes are perfect on their own, but pairing them with the right beverage or meal can elevate the entire experience.
- Coffee Pairing: A simple, strong black coffee or an Iced Latte cuts through the richness of the cream cheese perfectly.
- Drink Pairing: Serve alongside a sparkling cider, or for an adult treat, try them with a classic Cream Soda or a vanilla-flavored liqueur.
- As Part of a Spread: Pair them with other holiday treats. They sit beautifully next to savory appetizers like a good Baked Brie Appetizer, or as part of a larger dessert table featuring items like my festive how this unicorn poke cake became my favorite party trick.
Nutritional Information Per Serving
(Estimates based on one mini cheesecake, crust and filling only, excluding toppings/garnish)
- Calories: 250–280 kcal
- Fat: 18g
- Saturated Fat: 11g
- Cholesterol: 65mg
- Sodium: 160mg
- Carbohydrates: 20g
- Sugar: 15g
- Protein: 5g
(Note: Nutritional information is an estimate and can vary based on specific ingredients and portion sizes.)
Storage and Leftover Tips
- Storage: Store leftover Mini Candy Corn Cheesecakes in an airtight container in the refrigerator for up to 4–5 days. They are best enjoyed within the first 2–3 days.
- Freezing: You can freeze the baked and fully cooled cheesecakes without the whipped cream topping. Once chilled, place them on a baking sheet to flash freeze for an hour, then transfer them to a freezer-safe bag or container. Thaw overnight in the refrigerator before adding the whipped cream and candy corn garnish. They will keep in the freezer for up to 1 month.
More Recipes You Will Love
If you loved the festive and delicious nature of these cheesecakes, you might want to try these other fantastic desserts:
- For another crowd-pleasing dessert that’s great for parties: these pecan pie bars are my favorite make-ahead holiday dessert.
- If you’re in the mood for a rich, chocolatey fix: the best peanut butter brownies I’ve ever made (and I’ve made a lot).
- For a fun, no-bake option: this grasshopper pie is my favorite no-bake dessert with a mint chocolate twist.
- For another indulgent bite-sized treat: these chocolate chip cookie dough brownie bombs are my favorite sweet obsession.
Final Thoughts
These Mini Candy Corn Cheesecakes are everything a holiday dessert should be: fun, eye-catching, and irresistibly delicious. They allow you to indulge in a little bit of the season’s whimsy without committing to a massive dessert. I love watching people’s faces light up when they realize what these little bites are!
Did you make this recipe? I would love to hear how your festive cheesecakes turned out! Drop a comment below with any tips or substitutions you tried. Happy Halloween baking!
— Jason Griffith
Don’t forget to follow me on social media for more holiday baking inspiration!


Leave a Reply