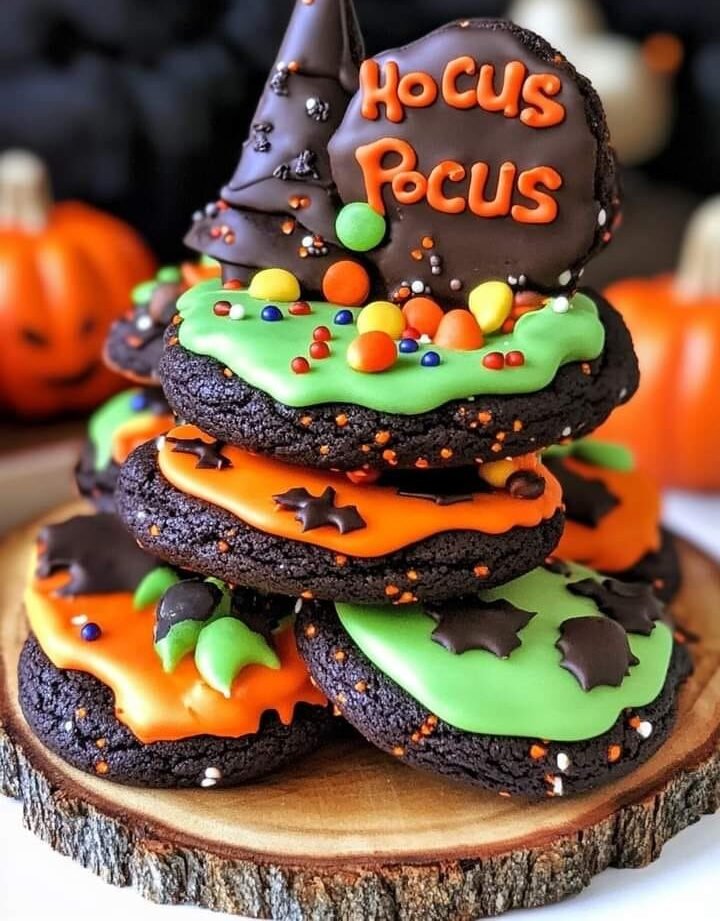
Unleash your inner witch or warlock with these enchanting “Hocus Pocus” Halloween Cookies! Inspired by the beloved Halloween classic, these soft, warmly spiced sugar cookies are perfect for casting a spell of deliciousness over your spooky celebrations. Simple to bake and incredibly fun to decorate with vibrant colors, edible glitter, and a touch of magic, these cookies are a fantastic project for families and a delightful addition to any Halloween party or autumnal gathering.
Why I Love This Recipe
These “Hocus Pocus” Halloween Cookies are pure joy! What I love most about them is how they combine the comforting taste of a classic, tender cookie with the playful spirit of Halloween. The touch of cinnamon and nutmeg in the dough adds a warm, inviting flavor that sets them apart from plain sugar cookies, making them feel extra special for the season. But the real fun begins with the decorating! The simple powdered sugar icing, combined with vibrant food coloring and a dusting of edible glitter, allows for endless creative possibilities, transforming each cookie into a mini work of art. They’re perfect for involving kids in the kitchen and creating lasting Halloween memories.
List of Ingredients
Here’s what you’ll need to create these enchanting “Hocus Pocus” Halloween Cookies:
For the Cookies:
- 1 cup (2 sticks) unsalted butter, softened
- 1 cup granulated sugar
- 1 cup packed light brown sugar
- 2 large eggs, at room temperature
- 2 teaspoons vanilla extract
- 4 cups all-purpose flour
- 1 teaspoon baking soda
- 1 teaspoon baking powder
- 1 teaspoon salt
- 1 teaspoon ground cinnamon
- 1 teaspoon ground nutmeg
For Decorating:
- 1 cup powdered sugar (confectioners’ sugar)
- 2-3 tablespoons milk (or water), as needed for consistency
- Food coloring gels (purple, green, orange, or other Halloween colors)
- Edible glitter (optional, gold, silver, or iridescent)
Swaps and Notes
- Butter: Unsalted butter is preferred to control the saltiness. Ensure it’s truly softened for proper creaming.
- Sugars: The combination of granulated and brown sugar gives these cookies a lovely balance of crispness and chewiness, along with a hint of molasses flavor from the brown sugar.
- Eggs & Vanilla: Ensure eggs are at room temperature for better emulsification. The vanilla extract is a key flavor enhancer.
- Flour: All-purpose flour is standard. For best results, spoon and level the flour, rather than scooping directly from the bag.
- Spices: Cinnamon and nutmeg add a warm, cozy flavor that is perfect for autumn and Halloween. You could also add a pinch of ground ginger or allspice.
- Nuts (Optional): While not in the original recipe, you could fold in 1/2 cup of finely chopped pecans or walnuts into the dough for added texture.
- Powdered Sugar (Icing): Sift the powdered sugar if it’s lumpy to ensure a smooth icing.
- Food Coloring: Gel food coloring provides more vibrant colors without thinning the icing too much, compared to liquid food coloring.
- Edible Glitter: This adds a magical, whimsical touch. Look for it in baking supply stores or craft stores with baking sections.
List of Steps for the Recipe
1. Preheat Oven and Prepare Baking Sheets:
- Preheat your oven to 350∘F (175∘C).
- Line two large baking sheets with parchment paper. This prevents sticking and makes cleanup easier.
2. Cream Butter and Sugars:
- In a large mixing bowl (using an electric mixer is recommended), cream together the 1 cup softened unsalted butter, 1 cup granulated sugar, and 1 cup packed light brown sugar. Beat on medium-high speed for 3-5 minutes until the mixture is light, fluffy, and pale. Scrape down the sides of the bowl as needed.
3. Add Eggs and Vanilla:
- Beat in the 2 large eggs one at a time, mixing well after each addition until fully incorporated.
- Stir in the 2 teaspoons vanilla extract until just combined.
4. Combine Dry Ingredients:
- In a separate medium bowl, whisk together the 4 cups all-purpose flour, 1 teaspoon baking soda, 1 teaspoon baking powder, 1 teaspoon salt, 1 teaspoon ground cinnamon, and 1 teaspoon ground nutmeg. Whisk thoroughly to ensure all ingredients are evenly distributed.
5. Combine Wet and Dry Mixtures:
- Gradually add the dry ingredients to the wet ingredients in the large bowl, mixing on low speed until just combined. Be careful not to overmix; mix only until no streaks of dry flour remain. Overmixing can lead to tough cookies.
6. Roll and Bake Cookies:
- Roll the dough into uniform balls, about 1 to 1.5 inches in diameter. Place the dough balls on the prepared baking sheets, leaving about 2 inches between them to allow for spreading.
- Bake for 10-12 minutes, or until the edges are lightly golden and the centers are set but still appear soft. They will firm up as they cool.
- Remove the baking sheets from the oven and let the cookies cool on the pans for 5 minutes before transferring them to a wire rack to cool completely. Cooling completely is crucial before decorating.
7. Prepare Icing and Decorate:
- Once the cookies are fully cooled, prepare the icing. In a small bowl, combine the 1 cup powdered sugar with 2-3 tablespoons of milk (or water). Start with 2 tablespoons and add more a tiny bit at a time until you reach a smooth, pourable but still thick consistency.
- Divide the icing into separate small bowls for each color of food coloring you plan to use (purple, green, orange, etc.). Add a few drops of food coloring to each bowl and stir until the desired vibrant shade is achieved.
- Dip the tops of the cooled cookies into the colored icing, or use a spoon to drizzle and spread the icing over the cookies.
- While the icing is still wet, sprinkle with edible glitter or other desired decorations.
8. Let Icing Set and Serve:
- Let the iced cookies sit at room temperature for at least 30-60 minutes, or until the icing has hardened completely.
- Once set, enjoy these spooky-sweet “Hocus Pocus” Halloween Cookies!
Tips for Success
- Room Temperature Ingredients: Ensure butter and eggs are at room temperature for the best creaming and batter consistency.
- Don’t Overmix Dough: Overmixing the dough develops gluten, which can make cookies tough. Mix just until combined.
- Scoop Uniformly: Use a cookie scoop or make sure your dough balls are roughly the same size for even baking.
- Don’t Overbake: Overbaked cookies will be dry and crumbly. Look for lightly golden edges and set centers. They will continue to set as they cool.
- Cool Completely Before Decorating: This is essential! If cookies are warm, the icing will melt and run off.
- Adjust Icing Consistency: Add milk to the powdered sugar slowly, just a tiny bit at a time, until you reach a smooth, spreadable consistency that isn’t too thin.
- Work Quickly with Glitter: Apply edible glitter or sprinkles while the icing is still wet so it adheres properly.
Serving Suggestions and Pairings
These “Hocus Pocus” Halloween Cookies are perfect for:
- Halloween Parties: A festive and thematic treat for any spooky celebration.
- Trick-or-Treating Alternative: A fun homemade treat for neighbors or friends.
- Fall Gatherings: The warm spices make them perfect for any autumnal occasion.
- Baking Project with Kids: Fun and easy for little hands to help with mixing and decorating.
- Coffee or Milk: Perfect with a hot cup of coffee or a cold glass of milk.
Nutritional Information
(Approximation per cookie, based on 24 servings. Values can vary significantly based on exact ingredients and portion sizes, and whether nuts/extra decorations are added.)
- Calories: Approximately 180-220 kcal
- Protein: Approximately 2-3 g
- Fat: Approximately 8-12 g (with 5-8 g saturated fat)
- Carbohydrates: Approximately 25-35 g (with 15-25 g sugars)
- Fiber: Approximately 0-1 g
- Sodium: Approximately 100-150 mg
- Cholesterol: Approximately 30-40 mg
Note: These values are estimates. For precise nutritional information, it’s recommended to use a nutritional calculator with your specific ingredients and exact portion sizes.
Storage and Leftover Tips
- Airtight Container: Store cooled and decorated cookies in an airtight container at room temperature for up to 3-5 days. If stacking, place parchment paper between layers to prevent sticking.
- Refrigeration: Not typically necessary, and refrigeration can sometimes cause cookies to dry out or affect the icing texture.
- Freezing (Unbaked Dough): You can freeze the cookie dough! Roll into balls, place on a baking sheet, and flash freeze until solid. Transfer to a freezer-safe bag and freeze for up to 3 months. Bake from frozen, adding a minute or two to the baking time.
- Freezing (Baked Cookies): Baked (unfrosted) cookies can be frozen. Once completely cool, wrap tightly in plastic wrap and then foil. Freeze for up to 2 months. Thaw at room temperature, then decorate. Frosted cookies can also be frozen, but flash freeze first to set the icing before wrapping.
Final Thoughts
These “Hocus Pocus” Halloween Cookies are more than just a sweet treat; they’re an invitation to infuse your Halloween celebrations with fun, flavor, and a touch of homemade magic. With their delightful taste and endless decorating possibilities, they’re sure to become a cherished part of your autumnal traditions. Get ready to bake up some spooky smiles!
We’d love to see your “Hocus Pocus” cookie creations! Share your decorating ideas or favorite Halloween treats in the comments below. Don’t forget to follow us for more delicious recipes and festive inspiration!


Leave a Reply