Introduction
There is something undeniably primal and comforting about the smell of fresh bread wafting through a home. However, for many of us, the traditional bread-making process—the kneading, the multiple rises, the hours of waiting—is a luxury our schedules simply don’t allow. That is exactly why I fell in love with this Herb & Cheese Quick Bread.
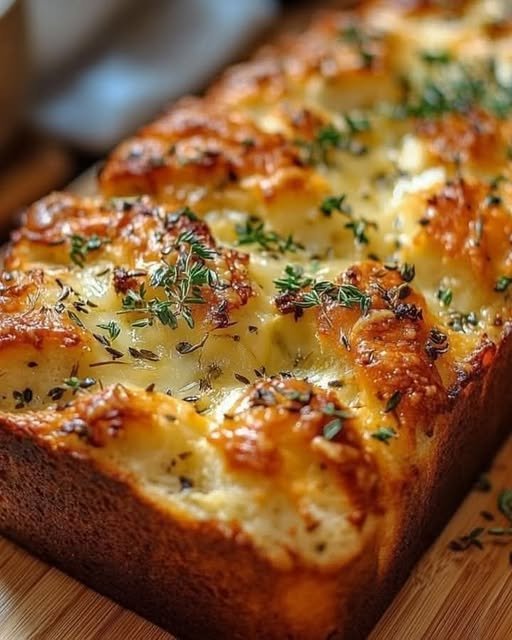
Unlike sourdough or traditional yeast loaves, this recipe relies on baking powder for its lift. This means you can go from a craving to a warm, buttery slice in just about an hour. It is a dense, savory, and incredibly flavorful loaf that feels much more “gourmet” than the effort level suggests. Whether you are a seasoned baker or someone who is intimidated by the thought of yeast, this recipe is designed to be foolproof and delicious.
Why I Love This Recipe
I’ve made plenty of breads in my time, but I keep coming back to this one for three specific reasons:
- Speed: No rising time means this is a “set it and forget it” side dish you can whip up while your main course is simmering.
- Texture: The combination of melted butter and two types of cheese creates a crust that is slightly crunchy and golden, while the inside remains tender and moist.
- Versatility: This bread is the ultimate “utility player” in the kitchen. It pairs beautifully with a hearty bowl of Cajun Chicken & Sausage Gumbo or serves as a perfect vessel for dipping into a skillet sauce.
Ingredients
To get that perfect savory profile, we use a blend of dried herbs and sharp cheeses. Here is what you’ll need:
- 2 cups all-purpose flour: The sturdy base for our loaf.
- 2 tsp baking powder: Our leavening agent that provides the lift.
- 1/2 tsp salt: To enhance all the savory flavors.
- 1 tsp dried oregano: Adds a Mediterranean earthy note.
- 1 tsp dried thyme: For a subtle, floral herbaceousness.
- 1/2 cup grated cheddar cheese: Use sharp cheddar for the best flavor payoff.
- 1/4 cup grated Parmesan cheese: Adds a salty, nutty depth.
- 1 cup milk: Provides moisture and creates a soft crumb.
- 1/4 cup melted butter: Essential for richness and that golden-brown crust.
- 1 egg: Acts as a binder and helps with the bread’s structure.
Swaps and Notes
- The Cheese: If you don’t have cheddar, Pepper Jack is a fantastic alternative if you want a little kick. Gruyère is another excellent choice for a more sophisticated, nutty flavor profile.
- The Herbs: While oregano and thyme are my “go-to” duo, you can easily swap them for rosemary or even a pre-mixed Italian seasoning. If using fresh herbs, triple the amount (use 1 tablespoon of fresh for every 1 teaspoon of dried).
- Flour: You can substitute 1/2 cup of the all-purpose flour with whole wheat flour for a heartier, more rustic texture, though the bread will be slightly more dense.
List of Steps
- Preheat and Prep: Start by preheating your oven to 375°F (190°C). Grease a standard 9×5-inch loaf pan generously with butter or non-stick spray.
- Mix Dry Ingredients: In a large mixing bowl, whisk together the flour, baking powder, salt, oregano, and thyme until well combined.
- Add the Cheese: Stir in the grated cheddar and Parmesan cheeses. Ensure the cheese is coated in flour; this prevents it from clumping together or sinking to the bottom.
- Whisk Wet Ingredients: In a separate medium bowl, whisk together the milk, melted butter (ensure it’s cooled slightly so you don’t scramble the egg!), and the egg.
- Combine: Pour the wet ingredients into the dry ingredients. Using a spatula, mix until just combined. Do not overmix! Overworking the batter will result in a tough, rubbery bread.
- Bake: Pour the thick batter into your prepared loaf pan, smoothing the top with your spatula. Bake for 45-50 minutes. You’re looking for a beautiful golden-brown top and a toothpick inserted into the center to come out clean.
- Cool and Serve: Let the bread cool in the pan for about 10 minutes before transferring it to a wire rack. Slice while still slightly warm for the best experience.
Tips for Success
- Measure Your Flour Correctly: Instead of scooping the flour directly with the measuring cup (which packs it down), use a spoon to fill the cup and level it off with a knife. Too much flour makes quick bread dry.
- Don’t Overmix: As soon as you no longer see streaks of white flour, stop mixing. A few lumps are perfectly fine.
- Freshness Matters: Since we aren’t using yeast, the “lift” comes entirely from the baking powder. Make sure yours isn’t expired!
Serving Suggestions and Pairings
This bread is a superstar when served alongside a protein-heavy meal. I highly recommend serving a warm slice with this Tomato Skillet with Okra and Sausage to soak up all that delicious Southern sauce.
If you are hosting a game day or a casual get-together, this bread makes a great side for Easy Cheesy Chicken Sliders. You can even slice it into thick “fingers” and serve it as a dipper for a Beer Cheese Dip.
Nutritional Information (Per Serving)
Serving Size: 1 slice (based on 10 slices per loaf)
- Calories: 185 kcal
- Total Fat: 9g
- Saturated Fat: 5g
- Cholesterol: 42mg
- Sodium: 310mg
- Total Carbohydrates: 20g
- Protein: 6g
Storage and Leftover Tips
- Room Temperature: Store in an airtight container or wrap tightly in plastic wrap for up to 2 days.
- Refrigerator: Quick bread stays moist longer in the fridge—up to 5 days.
- Freezing: This bread freezes beautifully! Wrap the entire loaf (or individual slices) in foil and place in a freezer bag. It will last for up to 3 months. Thaw at room temperature or toast directly from the freezer.
- The Best Way to Reheat: I always recommend toasting leftovers. A quick minute in the toaster oven or a pan-sear with a little butter makes the edges crispy and revives the cheesy aroma.
More Recipes You Will Love
If you enjoyed this savory bake, you have to try some of my other favorite party and dinner additions:
- Baked Brie Appetizer – The perfect elegant pairing for a bread basket.
- Cajun Chicken & Sausage Gumbo – Because every gumbo needs a side of bread for dipping!
Final Thoughts
This Herb & Cheese Quick Bread is proof that you don’t need all day to create something that tastes like it came from a professional bakery. It’s rustic, cheesy, and packed with herbal notes that elevate any meal. Give it a try this week and let me know how it turned out!
Did you make this recipe? I’d love to hear your thoughts! Leave a comment below or tag us on social media to show off your golden-brown loaves. Happy baking!


Leave a Reply