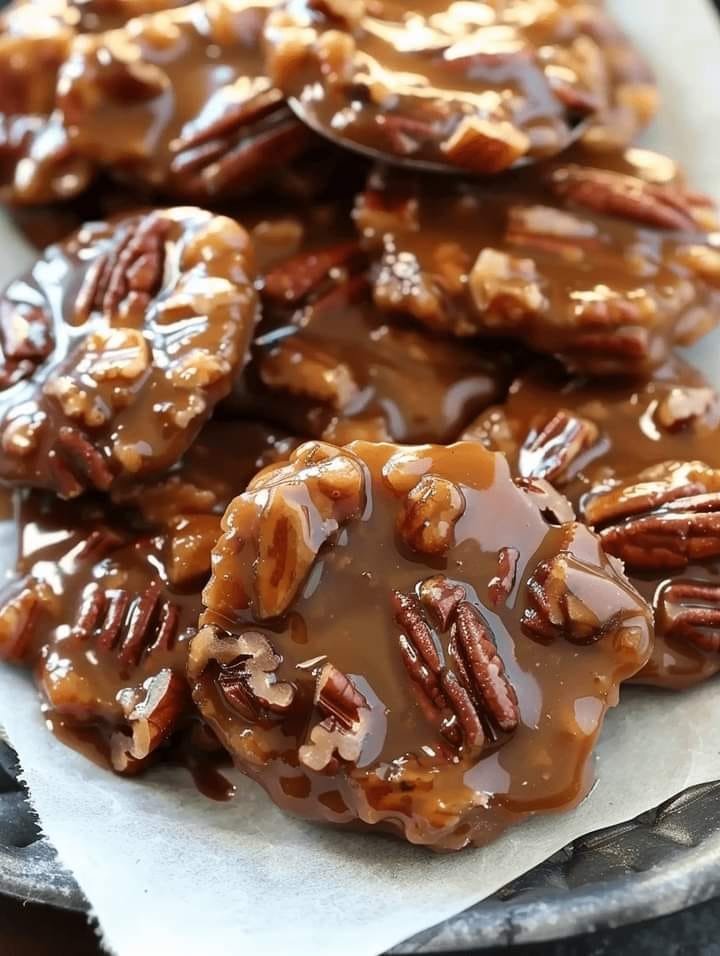
Step into the delightful world of Southern confectionery with these Easy Pecan Pralines! This recipe brings the beloved, buttery, nutty sweetness of traditional pralines right into your kitchen with surprising ease. Each bite offers a satisfyingly rich, slightly grainy, and melt-in-your-mouth texture, studded with crunchy pecans. Perfect as a homemade gift, a sweet treat for guests, or simply to satisfy your own candy cravings, these pralines are a true taste of Southern charm.
Why I Love This Recipe
There’s something incredibly enchanting about a good praline, and this recipe captures that magic perfectly. I love how straightforward it is, transforming simple pantry staples into a sophisticated and utterly delicious candy. The combination of the two sugars, whole milk, and butter creates a rich caramel base, while the pecans add a wonderful texture and earthy flavor that balances the sweetness. The process of watching the mixture thicken and then quickly dropping the candies is a fun, old-fashioned technique that truly feels like making candy from scratch. It’s a nostalgic treat that always brings a smile and satisfies that deep craving for something truly sweet and comforting.
List of Ingredients
Here’s what you’ll need to create these irresistible Easy Pecan Pralines:
- 1 ½ cups granulated sugar
- ¾ cup dark brown sugar, packed
- ½ cup whole milk
- 1 teaspoon vanilla extract
- 6 tablespoons unsalted butter, cut into small pieces
- 1 ½ cups pecans, coarsely chopped (lightly toasted for best flavor)
Swaps and Notes
- Sugars: The combination of granulated and dark brown sugar is crucial for the classic praline flavor and texture. Dark brown sugar provides a deeper, more molasses-like note. Do not substitute significantly.
- Whole Milk: Whole milk is essential for the richness and creamy texture of the pralines. Avoid using lower-fat milk, as it can affect the consistency.
- Vanilla Extract: Pure vanilla extract offers the best flavor.
- Butter: Real butter is non-negotiable for the rich, buttery flavor of authentic pralines. Unsalted butter allows you to control the overall sweetness.
- Pecans: Coarsely chopped pecans provide the ideal texture. For an enhanced nutty flavor, lightly toast the pecans in a dry skillet over medium heat for 3-5 minutes, stirring frequently, until fragrant, before adding them to the mixture.
- Corn Syrup (Optional but Recommended): While not in the original list, adding 1-2 tablespoons of light corn syrup at the beginning with the sugars can help prevent crystallization and make the pralines a bit smoother, though the recipe works without it. If using, add it with the sugars and milk.
- Candy Thermometer (Recommended): For consistent results, a candy thermometer is highly recommended. The ideal temperature for pralines is usually between 235∘F and 240∘F (113∘C and 116∘C) (soft ball stage), before removing from heat and stirring until thickened.
List of Steps for the Recipe
1. Prepare Your Work Surface:
- Before you begin cooking, prepare your work surface. Lay out a long sheet of wax paper (or parchment paper) on your counter or a flat table. Keep a tablespoon (the kind you would eat soup with, not a measuring spoon) handy near the wax paper, as you’ll need to work quickly.
2. Combine Ingredients in Saucepan:
- In a sturdy 4-quart saucepan (a heavy-bottomed one is best to prevent scorching), combine the 1 ½ cups granulated sugar, ¾ cup packed dark brown sugar, ½ cup whole milk, 1 teaspoon vanilla extract, and 6 tablespoons of real butter (cut into small pieces).
- Heat the mixture over low heat, stirring often with a wooden spoon. Continue stirring until the butter is completely melted and both sugars are fully dissolved. The mixture should be smooth with no grainy sugar crystals visible.
3. Boil the Mixture:
- Once the sugars are dissolved, increase the heat to medium-high. Bring the mixture to a full, rolling boil.
- Once boiling, let the mixture continue to boil for exactly 3 minutes. During this 3-minute boil, stir constantly with your wooden spoon. Be aware that the mixture will bubble up quite high, so ensure your saucepan is large enough to accommodate this. This boiling process is crucial for the sugar to reach the correct stage.
4. Thicken and Drop:
- After exactly 3 minutes of boiling and constant stirring, immediately remove the saucepan from the heat.
- Continue to stir the mixture constantly with your wooden spoon for precisely 2 minutes. During this stirring period off the heat, the mixture will begin to thicken significantly and may become slightly opaque. You’ll feel it resisting your spoon more.
- Work Quickly: As soon as the 2 minutes of stirring off-heat are complete, immediately begin to drop the pralines. Using your tablespoon, quickly scoop individual portions of the thickened mixture and drop them onto the prepared wax paper. Work swiftly as the mixture will continue to set and thicken in the pan. Aim for individual rounds, roughly 2-3 inches in diameter.
5. Cool and Store:
- Allow the dropped pralines to rest undisturbed on the wax paper for at least 15 minutes. During this time, they will set and harden as they cool.
- Once completely cooled and firm, carefully peel the pralines off the wax paper.
- Store the pralines in an airtight container at room temperature. They are best enjoyed within a few days. This recipe typically yields 12 to 14 pralines, depending on size.
Tips for Success
- Prep Before You Start: Having your wax paper and spoon ready before you begin cooking is vital, as the dropping stage requires speed.
- Use a Heavy-Bottomed Pan: This prevents scorching and helps distribute heat evenly, which is crucial for candy making.
- Do Not Increase Heat Too Much: While you need a boil, too high heat can cause the sugar to crystallize or burn. Stick to medium-high once boiling.
- Stir Constantly: Continuous stirring during the boiling and cooling phases is essential to prevent scorching and to achieve the correct texture and consistency.
- Work Quickly at the End: Once you remove the pan from the heat and stir for 2 minutes, the mixture will set rapidly. Have your wax paper ready and drop the pralines without delay.
- Test for Doneness (Optional but Recommended): If you’re unsure about the “exactly 3 minutes” boiling time, you can use the cold water test (for soft ball stage, 235∘F to 240∘F) for precision if you have a candy thermometer.
- Avoid Humidity: Humidity can cause pralines to be sticky or not set properly. Try to make them on a dry day if possible.
Serving Suggestions and Pairings
Easy Pecan Pralines are a delightful treat on their own, but they also make wonderful additions:
- Coffee or Tea: A perfect accompaniment to a hot cup of coffee, espresso, or a glass of iced tea.
- Dessert Topping: Crumble over vanilla ice cream, plain yogurt, or even a slice of apple pie for a crunchy, sweet addition.
- Gift Idea: Package a few pralines in a decorative box or bag for a thoughtful homemade gift.
- After-Dinner Treat: Offer them as a sweet bite after a rich meal.
Nutritional Information
(Approximation per serving, based on 14 pralines. Values can vary significantly based on exact ingredient amounts and size of pralines.)
- Calories: Approximately 200-250 kcal
- Protein: Approximately 1-2 g
- Fat: Approximately 10-15 g (with 5-8 g saturated fat)
- Carbohydrates: Approximately 30-40 g
- Fiber: Approximately 1-2 g
- Sodium: Approximately 50-70 mg
- Cholesterol: Approximately 15-20 mg
Note: These values are estimates. For precise nutritional information, it’s recommended to use a nutritional calculator with your specific ingredients and exact portion sizes.
Storage and Leftover Tips
- Airtight Container: Store cooled pralines in an airtight container at room temperature. This will help prevent them from drying out or becoming sticky.
- Separate Layers: If stacking pralines, you can place a piece of wax paper or parchment paper between layers to prevent them from sticking together.
- Shelf Life: Pralines are best consumed within 3-5 days for optimal freshness and texture. Over time, they may become harder or more crumbly.
- Refrigeration/Freezing: Not generally recommended. Refrigeration can cause condensation, leading to stickiness, and freezing can alter the texture. Keep them at cool room temperature.
Final Thoughts
These Easy Pecan Pralines are a testament to the simple joys of homemade candy. They capture the essence of Southern sweetness with their rich, buttery flavor and delightful pecan crunch. Whether you’re making them for a special occasion or just to treat yourself, this recipe is a rewarding journey into the art of candy making that yields utterly delicious results. Get ready to fall in love with these charming, melt-in-your-mouth confections!
We’d love to hear how your Easy Pecan Pralines turned out! Share your experiences or any tips for dropping perfect pralines in the comments below. Don’t forget to follow us for more delicious recipes and culinary inspiration!


Leave a Reply