The Ultimate Crispy, Cheesy Homemade Cheese Straws (A Southern Classic)
As an author for Chef Maniac, I’m constantly on the hunt for the perfect party appetizer—something that’s easy to make, has a satisfying crunch, and delivers a huge flavor payoff. And folks, when it comes to cheesy snacks, there is simply no beating a classic, homemade Cheese Straw.
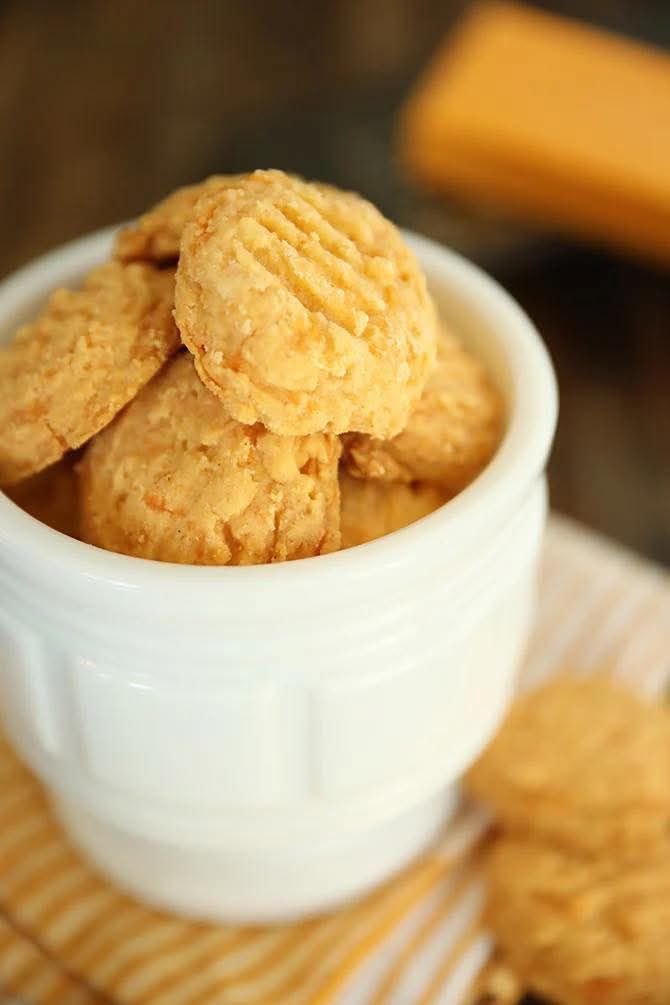
These aren’t those flimsy, store-bought versions. This recipe creates a perfectly buttery, sharp cheddar bite with just the right amount of spicy kick from the cayenne. They are crisp on the outside, potentially a little chewy on the inside (depending on how long you bake them), and utterly addictive. Whether you call them “cookies” or “straws” or just “the best thing on the table,” they are a classic Southern tradition for a reason.
Why I Love This Recipe
I grew up thinking cheese straws were reserved for fancy holiday parties, but this recipe is proof that they can be a weeknight snack staple. It’s so simple, the hardest part is waiting for them to cool!
- Effortless Elegance: They look fancy, but they’re just four main ingredients blended and baked. Talk about an effortless way to impress guests. For another easy appetizer that steals the show, check out this recipe for a decadent Baked Brie Appetizer.
- A Perfect Blend of Flavors: The richness of the sharp cheddar and butter is perfectly balanced by the smoky warmth of garlic powder and the heat of the cayenne. It’s savory, salty, and just a little spicy—the ultimate flavor combo.
- Customizable Crunch: You are in control! Bake them for less time for a slightly chewier center, or bake them longer for that satisfying all-crispy crunch that makes them great for dipping.
Ingredients
This recipe is simple and uses common pantry staples.
- 1 (8-ounce) block sharp cheddar cheese, shredded
- 43 cup unsalted butter, room temperature
- 1 teaspoon salt
- 21 teaspoon garlic powder
- 21 to 1 teaspoon cayenne powder (use more or less to taste)
- 2 cups all-purpose flour
Swaps and Notes
- Cheese: While sharp cheddar is classic, you can experiment! A mix of sharp cheddar and Monterey Jack will give you a slightly softer texture, and smoked Gouda will add an incredible depth of flavor. Just make sure the cheese is firm enough to shred.
- Cayenne: The 21 teaspoon is a mild background warmth. I usually push it closer to 1 full teaspoon for a real zing. If you are serving these to kids or those sensitive to heat, start with just 41 teaspoon.
- Butter Temperature: This is key! The butter must be at room temperature to blend smoothly with the cheese. If it’s too cold, you’ll have lumps.
Steps for the Perfect Cheese Straws
Follow these simple instructions for a perfect batch every time.
- Prep the Oven and Pan: Preheat the oven to 350∘F. Line a baking sheet with parchment paper or a silicone baking mat. This ensures easy cleanup and prevents sticking.
- Shred the Cheese: Use a box grater to shred the sharp cheddar cheese. Pro Tip: Freshly shredded cheese melts and incorporates better than the pre-shredded stuff.
- Cream the Base: Use a stand mixer or hand mixer to blend the softened cheese and butter together until the mixture is smooth and creamy. Scrape down the sides of the bowl as needed.
- Add the Spices: Add the salt, garlic powder, and cayenne and mix until just combined.
- Mix in the Flour: Gradually add the flour to the mixture. Mix well until a cohesive, slightly stiff dough forms. Be careful not to overmix at this stage.
- Shape the Dough: Use a 121-tablespoon cookie scoop to scoop the dough and place the mounds about 2 inches apart on the prepared pan. This makes them look like small, round cheese “cookies,” which is the easiest way to make them at home.
- Optional: For a more traditional straw look, you can press the dough into a cookie press fitted with a star or strip disk.
- Final Press: If desired, use a fork to gently press the tines into the top of each cookie. Dipping the fork in water will help prevent the dough from sticking.
- Bake: Bake for 20 to 30 minutes or until golden brown.
- 20-25 minutes: Crispy exterior with a slightly chewy, softer interior.
- 25-30 minutes: Crispy throughout, the best texture for long-term storage or dipping.
- Cool: Cool for about 10 minutes on the baking sheet before moving the cheese straws to a wire rack to finish cooling.
- Batch and Store: Continue working in batches until all the dough has been cooked.
Tips for Success
- Use Freshly Grated Cheese: Seriously, it makes a huge difference in the texture and flavor. The anti-caking agents in pre-shredded cheese can change the way the dough binds.
- Don’t Overmix the Flour: Once the flour is added, mix only until the dough comes together. Overmixing can develop the gluten, leading to a tougher, less tender final product.
- Ensure Butter is Soft: If your butter is too cold, the dough will be lumpy and harder to mix. If you forget to set it out, cut it into small cubes and microwave for 10-15 seconds—just until soft, not melted.
Serving Suggestions and Pairings
Cheese straws are the ultimate savory snack and pair beautifully with so many things.
- Dips: The sharp, spicy flavor is perfect for dipping. Serve them alongside a creamy favorite like this Crockpot Nacho Dip or this crowd-pleasing Beer Cheese Dip.
- Soup and Salad: Use them as a crunchy, savory alternative to croutons atop a simple tomato soup or a Caesar salad.
- Cocktails & Drinks: Their salty nature begs for a refreshing beverage pairing. A cold, crisp lager is excellent, as is a classic Margarita or a vibrant Blueberry Lemonade for a non-alcoholic option.
Nutritional Information (per serving, estimated)
| Component | Value |
| Calories | 145 kcal |
| Total Fat | 10 g |
| Saturated Fat | 6 g |
| Cholesterol | 30 mg |
| Sodium | 180 mg |
| Total Carbs | 10 g |
| Protein | 4 g |
Export to Sheets
Note: Nutritional information is an estimate based on approximately 36 total servings from the recipe.
Storage and Leftover Tips
- Storage: Once completely cool, store the cheese straws in an airtight container at room temperature for up to one week. They maintain their crispness surprisingly well.
- Freezing Dough: You can prepare the dough, scoop it onto a lined baking sheet, and flash freeze the portions. Once solid, transfer the dough balls to a freezer bag. Bake directly from frozen, adding a few extra minutes to the bake time.
- Freezing Baked Straws: Fully baked and cooled straws can be frozen in an airtight container for up to 3 months. Thaw at room temperature and refresh in a 300∘F oven for 5-10 minutes to restore their crunch.
More Recipes You Will Love
If you’re a fan of cheesy appetizers and crowd-pleasing snacks, you’ll definitely want to try these other favorites:
- This Crockpot Nacho Dip Is the Reason I Never Have Leftovers
- This Beer Cheese Dip Is My Favorite Party Starter That Disappears in Minutes
- This Baked Brie Appetizer Is My Favorite Effortless Way to Impress Guests
Final Thoughts
These cheese straws are a perfect example of how a few simple, high-quality ingredients can come together to create something truly spectacular. They are savory comfort food at its best, and I promise once you start making them at home, you’ll never go back to store-bought.
Give this recipe a try and let me know in the comments if you prefer the chewy centers or the all-crispy crunch! And don’t forget to follow Chef Maniac for more quick, delicious, and crowd-pleasing recipes. Happy baking! – Jason Griffith


Leave a Reply