Chocolate Rainbow Dreamcatcher: The Magical Dessert Cocktail You Need to Try
By Jason Griffith
Introduction
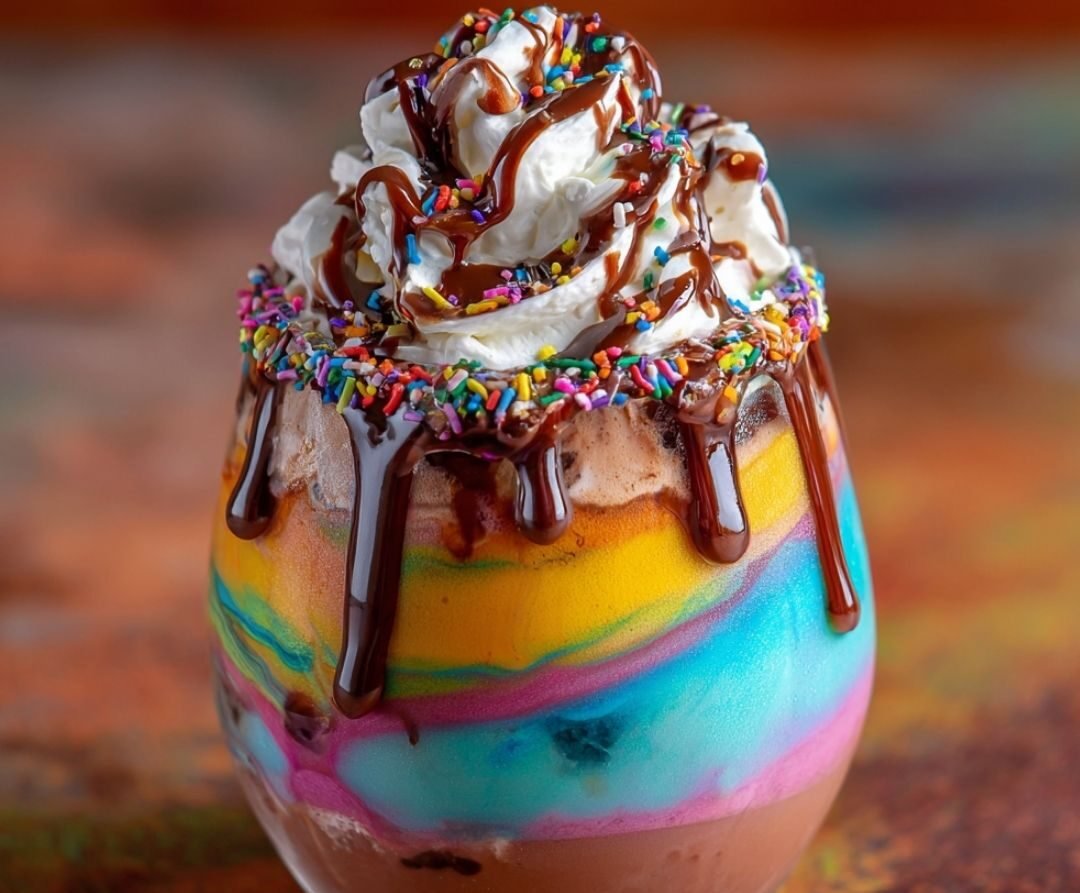
There are cocktails, and then there are experiences. The Chocolate Rainbow Dreamcatcher falls squarely into the latter category. Sweet, creamy, and impossibly vibrant, this layered drink is the ultimate showstopper for any celebration, or even just a Tuesday when you need a little magic in your life. It combines the indulgent comfort of a chocolate dessert with the fun, whimsical flair of a rainbow, creating a sip that is truly unforgettable.
I’m Jason Griffith, and I’ve been chasing the perfect dessert drink for years. While I love a classic The Slippery Drank is my favorite sweet sipper for dessert inspired vibes, this Dreamcatcher takes things to a new level. It’s a labor of love when it comes to layering, but the payoff—a gorgeous, multi-hued drink topped with clouds of whipped cream and a cascade of sprinkles—is absolutely worth the effort. Get ready to mix up something truly special.
Why I Love This Recipe
I first whipped up the Chocolate Rainbow Dreamcatcher for a friend’s birthday party, and the reaction was immediate: everyone wanted the recipe. What I love most is the deceptive complexity. It looks incredibly intricate, but at its heart, it’s a simple combination of chocolate liqueur, vanilla vodka, and cream, elevated by bright layers of grenadine and blue curaçao.
- It’s a Visual Masterpiece: The distinct layers of red, creamy chocolate, and blue are stunning. It truly looks like a liquid rainbow.
- The Perfect Dessert Drink: It satisfies that post-dinner sweet tooth without being heavy or overly rich.
- Celebration Ready: Whether you’re hosting a themed party (pair it with a How This Unicorn Poke Cake Became My Favorite Party Trick!) or just celebrating the weekend, this drink brings instant festivity.
🍸 Ingredients: Chocolate Rainbow Dreamcatcher
This recipe makes one serving. Double or triple the ingredients for a batch!
For the Cocktail
- 121 oz Chocolate Liqueur (like Godiva or a similar creamy brand)
- 1 oz Vanilla Vodka
- 1 oz Heavy Cream or whole milk
- 21 oz Grenadine
- 21 oz Blue Curaçao
- Ice cubes
For the Garnish
- Whipped Cream (from a can is easiest, or freshly made)
- Rainbow Sprinkles
- Chocolate Syrup for drizzling
Swaps and Notes
| Ingredient | Swap/Note |
| Vanilla Vodka | Use plain vodka if vanilla is unavailable, or a whipped cream vodka for extra sweetness. |
| Heavy Cream | Whole milk or half-and-half works, but cream provides the richest, thickest texture for the middle layer. |
| Chocolate Liqueur | For a non-alcoholic version, swap the liqueur and vodka for a rich, high-quality chocolate milk and omit the cream. |
| Blue Curaçao | This is essential for the blue color and a hint of citrus. Don’t skip it if you want the rainbow effect! |
Export to Sheets
📝 How to Make the Chocolate Rainbow Dreamcatcher
The key to this cocktail is the layering technique. You need liquids with different sugar densities to stack correctly. Grenadine is the heaviest, followed by the creamy chocolate mixture, and finally, the blue curaçao.
Step 1: Prep the Chocolate Base
In a cocktail shaker, combine the chocolate liqueur, vanilla vodka, and heavy cream. Fill the shaker halfway with ice cubes. Seal and shake vigorously for about 15-20 seconds until the outside of the shaker is frosty cold. This ensures the mixture is perfectly chilled and slightly aerated.
Step 2: Build the First Layer (Red)
Take a tall, clear glass (a hurricane or highball glass works best to show off the layers). Carefully pour the 21 oz of grenadine directly into the bottom of the glass. The grenadine is the densest ingredient and will form the beautiful red base.
Step 3: Add the Second Layer (Creamy Chocolate)
This step requires a steady hand. Slowly pour the chilled chocolate mixture from the shaker over the back of a spoonheld just above the grenadine layer. Pouring it slowly over the spoon helps break the liquid’s flow and prevents it from mixing too quickly with the layer below. The creamy mixture should float atop the red grenadine.
Step 4: Finish with the Third Layer (Blue)
Gently pour the 21 oz of blue curaçao over the back of the spoon, similar to Step 3. Since the blue curaçao is slightly less dense than the creamy mixture, it will create a vibrant blue layer on the very top, completing your beautiful rainbow gradient.
Step 5: Garnish and Serve
Top the drink generously with a swirl of whipped cream. Drizzle the top with chocolate syrup and finish with a liberal shower of rainbow sprinkles. Serve immediately and watch the magic happen!
✨ Tips for Success
- Use the Spoon Trick: Seriously, this is the most critical step for layering. Use a bar spoon or a small teaspoon. Hold the back of the spoon against the inside wall of the glass, just above the liquid line, and pour the next layer slowly over the rounded back of the spoon.
- Temperature Matters: Make sure your creamy chocolate base is very cold from shaking with ice. Colder liquids mix less easily than warmer ones, helping the layers hold.
- Clear Glass Only: The whole point of this cocktail is the visual effect! Use the clearest glass you can find to show off the rainbow layers.
- Have Fun with Sprinkles: If you’re going for a themed party, lean into the whimsical nature. You could even make a batch of These Rainbow Sprinkle Cookies are my favorite way to bake up instant joy for an ultimate matching dessert spread.
Serving Suggestions and Pairings
This rich, dessert-style cocktail is best served as a decadent finale to a meal. For pairings, you want something equally fun and over-the-top:
- Sweet Treats: Pair this with a no-bake treat like a platter of This Unicorn Poop Bark is the magical treat that’s always a hit with kids or a slice of vanilla cake.
- Appetizer Pairing: If serving as an early evening treat, pair it with something salty to cut the sweetness, like pretzel sticks or Baked Brie Appetizer.
- Themed Party Menu: Serve alongside other colorful drinks like a batch of This Rainbow Sangria is my favorite colorful drink for any celebration for a full rainbow beverage menu.
📊 Nutritional Information Per Serving
Disclaimer: This is an approximate estimate based on common commercial brands and ingredients. Exact values may vary.
| Metric | Estimate |
| Calories | 250 – 300 kcal |
| Carbohydrates | 25g – 35g |
| Sugar | 20g – 30g |
| Alcohol Content | Approx. 14 – 18% ABV |
Export to Sheets
Storage and Leftover Tips
Since this is a chilled, layered cocktail, it is not suitable for storage. The layers will mix over time, and the whipped cream garnish will dissolve. It should be made right before serving for the best visual appeal and flavor.
If you are prepping for a party, you can mix a large batch of the chocolate base (chocolate liqueur, vanilla vodka, and cream) and keep it chilled in a pitcher in the refrigerator. When it’s time to serve, simply shake the base mixture one last time, pour the grenadine layer, then the chocolate layer, and top with the blue curaçao.
More Recipes You Will Love
If you love sweet, fun, and visually impressive recipes, check out these other favorites from the Chef Maniac kitchen:
- Dessert Drinks: For another indulgent sweet sipper, try The Slippery Drank is my favorite sweet sipper for dessert inspired vibes.
- Rainbow Fun: Planning a colorful party? You absolutely must make How This Unicorn Poke Cake Became My Favorite Party Trick.
- Baked Goods: Need a whimsical cookie? These Rainbow Sprinkle Cookies are my favorite way to bake up instant joy are always a hit.
Final Thoughts
The Chocolate Rainbow Dreamcatcher is more than just a cocktail; it’s a moment of pure, adult-friendly fun. It’s an easy recipe to master, but the stunning visual payoff makes you look like a world-class mixologist. Don’t be afraid to practice the layering technique—it’s the secret sauce to this whole experience!
Have you tried making a layered cocktail before? I’d love to hear your feedback or any variations you might try!


Leave a Reply