Introduction
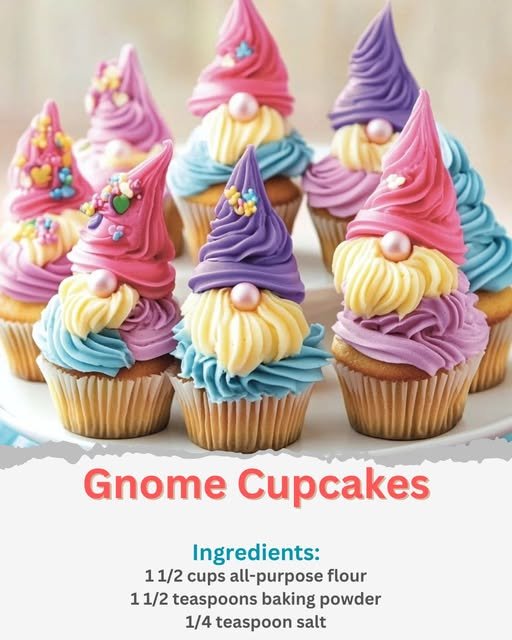
There is something inherently magical about a gnome. Whether they are guarding a garden or tucked away in a fairytale forest, these little bearded fellows bring a sense of wonder wherever they go. That is exactly why I decided to bring that magic into the kitchen with these Gnome Cupcakes.
Baking shouldn’t just be about satisfying a sweet tooth; it should be an experience. These cupcakes are more than just a snack—they are edible pieces of art that double as a conversation starter. If you’ve ever wanted to create a dessert table that looks like it was plucked straight from a storybook, you’ve come to the right place. Much like how this unicorn poke cake became my favorite party trick, these gnomes have a way of stealing the spotlight every single time.
Why I Love This Recipe
I am a huge fan of “personality baking.” These cupcakes allow for so much creativity. You aren’t just following a recipe; you’re character-building!
- The Texture: The base is a classic, moist vanilla sponge that holds up perfectly under the weight of the frosting.
- The Customization: You can change the hat colors to match any season—red and green for Christmas, or pastel shades for spring.
- Kid-Friendly: This is a fantastic project for little ones. Letting them choose the “nose” or add the sprinkles is half the fun.
- Visual Appeal: They look professionally made, but the piping techniques are actually very beginner-friendly.
If you enjoy making treats that lean into a magical theme, you’ll find these just as delightful as this unicorn poop bark.
Ingredients List
For the Cupcakes:
- 1 1/2 cups all-purpose flour: The sturdy base for our gnomes.
- 1 1/2 teaspoons baking powder: To give our cupcakes the perfect lift.
- 1/4 teaspoon salt: To balance the sweetness.
- 1/2 cup unsalted butter, softened: Provides that rich, bakery-style crumb.
- 3/4 cup granulated sugar: For the perfect level of sweetness.
- 2 large eggs: Room temperature is best for even mixing.
- 2 teaspoons vanilla extract: Don’t skimp on the quality here!
- 1/2 cup whole milk: Adds moisture and richness.
For the Buttercream Frosting:
- 1 cup unsalted butter, softened: The foundation of a fluffy frosting.
- 4 cups powdered sugar: Sifted to ensure no lumps in your gnomes’ beards.
- 2 teaspoons vanilla extract: For flavor.
- 3 tablespoons heavy cream (or milk): To reach the perfect piping consistency.
- Food coloring: Gel colors work best for vibrant hats and snowy white beards.
For Decoration:
- Round white candy pearls: These make the perfect “button” noses.
- Small fondant flowers or sprinkles: For a touch of garden charm.
- Piping tips: You will need a star tip (for the beard) and a round tip (for the hat).
Swaps and Notes
- The Flour: You can use a 1:1 gluten-free baking flour if you have dietary restrictions.
- The Butter: If you only have salted butter, omit the extra 1/4 teaspoon of salt from the dry ingredients.
- Shortcut Alert: If you are short on time, you can always use a box mix. I often use these cake mix cookies as a reminder that shortcuts are totally okay in a busy kitchen!
- The Noses: If you can’t find candy pearls, a mini marshmallow or even a butterscotch chip works great as a nose.
Step-by-Step Instructions
1. Bake the Cupcake Base
Preheat your oven to 350°F (175°C) and line your muffin tin. In a medium bowl, whisk together your flour, baking powder, and salt. In a separate large bowl, cream the butter and sugar until it’s light and fluffy—this usually takes about 3 minutes of beating. Add the eggs one at a time, followed by the vanilla. Gradually alternate adding the dry ingredients and the milk. Fill your liners and bake for 18-20 minutes.
2. Cool Completely
This is the most important step! If the cupcakes are even slightly warm, your gnome’s beard will melt right off his face. Let them cool on a wire rack until they reach room temperature.
3. Whip Up the Frosting
Beat the softened butter until creamy. Slowly add the powdered sugar one cup at a time. Pour in the vanilla and heavy cream, then whip on high until the frosting is stiff enough to hold a peak.
4. Color Your World
Divide the frosting into bowls. Keep one bowl white for the beards. Use the other bowls to create vibrant colors for the hats—think deep blues, bright reds, or forest greens.
5. Decorate the Gnomes
- The Beard: Fit a piping bag with a star tip and pipe “stars” or downward strokes on the bottom half of the cupcake.
- The Hat: Fit another bag with a round tip. Starting just above the beard, pipe a spiral that gets smaller as it goes up, creating a tall, pointed cone.
- The Nose: Gently press a white candy pearl right at the junction where the hat meets the beard.
- Final Flourish: Add a tiny sprinkle or flower to the hat for extra personality.
Tips for Success
- Gel over Liquid: Always use gel food coloring. Liquid coloring can thin out the frosting, making the hats slump.
- The “Chill” Factor: If your hands are warm and the frosting is getting soft, pop the piping bag in the fridge for 5-10 minutes.
- Consistency is Key: If the frosting is too soft, add more sugar. If it’s too stiff to pipe, add a teaspoon of cream.
- Practice Your Stars: Pipe a few practice beards on a piece of parchment paper before moving to the actual cupcakes.
Serving Suggestions and Pairings
These cupcakes are a visual delight and deserve a stage! Serve them on a wooden moss-covered platter for a “woodland” theme.
They pair beautifully with other colorful treats. For a full dessert spread, I love serving these alongside these rainbow sprinkle cookies or some spring flower pretzel bites.
Nutritional Information (Per Serving)
- Calories: 320 kcal
- Total Fat: 14g
- Cholesterol: 55mg
- Sodium: 150mg
- Total Carbohydrates: 48g
- Sugars: 38g
- Protein: 3g
Storage and Leftover Tips
- Room Temperature: Store in an airtight container for up to 2 days.
- Refrigeration: You can keep them in the fridge for up to 5 days, but let them sit at room temperature for 20 minutes before serving so the buttercream softens.
- Freezing: You can freeze the un-iced cupcakes for up to 3 months. I do not recommend freezing the fully decorated gnomes as the colors may bleed during thawing.
More Recipes You Will Love
If you enjoyed these whimsical gnomes, check out these other favorites from the blog:
Final Thoughts
Baking should be an adventure, and these Gnome Cupcakes are the perfect companions for your next kitchen journey. They bring a smile to everyone’s face, from the youngest kids to the oldest “kids at heart.”
Did you make these? I’d love to see your gnome creations! Tag me on social media or leave a comment below with the colors you chose for your gnome hats. Don’t forget to follow for more whimsical recipes and kitchen tips!


Leave a Reply