
")
How to Make 2-Ingredient Pepperoni Pizza Bites (Crispy & Low Carb!)
Print it, save it, or add it to your recipe binder.
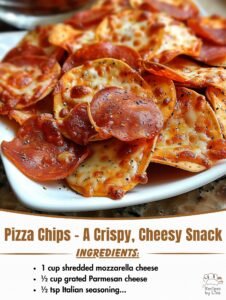
The Ultimate Crispy Pepperoni Cheese Chips
When that craving for a greasy, salty, cheesy slice of pepperoni pizza hits, you usually have two choices: order delivery and wait 45 minutes, or spend an hour kneading dough. But what if I told you that you could have all those iconic pizza flavors in a crunchy, snackable form in under 10 minutes?
Enter: Pepperoni Cheese Chips. These are essentially the “gold” of the pizza—that crispy, lacey cheese that overflows onto the crust—turned into a standalone snack. Whether you are following a keto lifestyle, looking for a gluten-free appetizer, or just want something better than a bag of greasy potato chips, this recipe is a total game-changer.
Why I Love This Recipe
There are three main reasons this recipe stays on my weekly rotation:
- The Crunch Factor: Using a blend of mozzarella and Parmesan creates a structural integrity that stays crispy even after cooling.
- Minimal Effort: You don’t need a culinary degree for this. If you can drop a spoonful of cheese onto a tray, you’ve mastered the technique.
- Versatility: These work as a standalone snack, a salad topper (think “pizza croutons”), or a side dish for a larger spread. They pair beautifully with other finger foods like Easy Cheesy Chicken Sliders with Marinara.
Ingredients You’ll Need
To get that perfect “snap,” quality ingredients matter. Here is what you’ll need to gather:
The Base
- 1½ cups shredded low-moisture mozzarella cheese: Ensure it is low-moisture so the chips don’t turn out soggy.
- ½ cup shredded Parmesan cheese: This adds the salty “bite” and helps the chips firm up.
- ½ cup mini pepperoni slices: You can also use standard pepperoni, just chop them into quarters.
The Seasoning Blend
- 1 teaspoon Italian seasoning: The herb backbone of the pizza flavor.
- ¼ teaspoon garlic powder: For that savory, mouth-watering aroma.
- ¼ teaspoon onion powder: Adds depth to the cheese base.
- ¼ teaspoon crushed red pepper flakes (optional): For those who like a little “zip.”
Optional Toppings & Dipping
- Toppings: Crumbled bacon, sliced jalapeños, or dried basil.
- Dips: Marinara sauce, Beer Cheese Dip, or ranch dressing.
Swaps and Notes
- Cheese Substitutes: While mozzarella is traditional, you can swap it for Provolone for a smokier finish or Sharp Cheddar for a bolder, more “cheez-it” style snack. Just keep the Parmesan in the mix, as it acts as the binding agent that creates the crunch.
- Vegetarian: Simply omit the pepperoni! You can replace it with finely diced sun-dried tomatoes or a pinch of smoked paprika to keep that “meaty” depth without the actual meat.
- Spice Level: If you love heat, press a thin slice of fresh jalapeño into the center of the cheese mound before baking.
Step-by-Step Instructions
1. Preheat and Prep
Set your oven to 400°F (200°C). This high heat is crucial for “frying” the cheese on the pan. Line a large baking sheet with parchment paper or a silicone baking mat. Do not try to bake these directly on the metal, or you’ll be scrubbing cheese off your pans for a week!
2. Mix the “Dough”
In a medium mixing bowl, toss together the mozzarella, Parmesan, Italian seasoning, garlic powder, onion powder, and red pepper flakes. Mix it well so the spices are evenly distributed; you don’t want one chip to be a garlic bomb and the next to be bland.
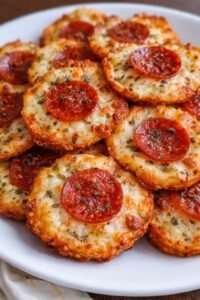
3. Form the Mounds
Drop tablespoon-sized portions of the cheese mixture onto your prepared baking sheet. Space them at least 2 inches apart—they will spread! Flatten each mound slightly with the back of a spoon to ensure even cooking.
4. Add the Toppings
Place 1 or 2 mini pepperoni slices in the center of each mound. If you’re feeling fancy, add a tiny sliver of black olive or a sprinkle of bacon. Press them down gently so they “fuse” to the cheese as it melts.
5. Bake to Perfection
Slide the tray into the oven for 8–10 minutes. Watch them like a hawk after the 7-minute mark. You are looking for the edges to turn a deep golden brown and the centers to stop bubbling vigorously.
6. The “Cool Down” Rule
This is the hardest part: wait. Let the chips sit on the baking sheet for 2–3 minutes. As the fat solidifies, they transform from floppy cheese puddles into rigid, crispy chips. Transfer them to a cooling rack to finish.
Tips for Success
- Avoid “Fresh” Mozzarella: The kind that comes in a ball of water is delicious, but it has way too much moisture for this recipe. Use the pre-shredded bag or grate a block of low-moisture mozzarella yourself.
- Degrease if Needed: Pepperoni releases oil. If your chips look a bit shiny, feel free to dab the tops with a paper towel while they are still warm.
- Don’t Overcrowd: If the cheese mounds touch, they’ll form one giant “pizza sheet.” While still tasty, it’s much harder to eat as a chip!
Serving Suggestions and Pairings
These chips are the perfect companion for a movie night or a “snack-inner” (snack dinner).
- The Dip Duo: Serve these alongside a bowl of warm marinara and a side of spicy garlic butter.
- The Party Platter: Arrange them on a board with Sheet Pan Quesadillas for a high-energy finger food spread.
- The Salad Crunch: Crumble them over a Caesar salad instead of croutons for a gluten-free, keto-friendly punch of flavor.
Nutritional Information (Per Serving)
Estimate based on 4-5 chips per serving
- Calories: 145 kcal
- Fat: 11g
- Carbs: 2g
- Protein: 10g
- Sodium: 420mg
Storage and Leftover Tips
- Room Temp: Store in an airtight container for up to 2 days.
- Re-Crisping: If they lose their snap, pop them back in a 350°F oven for 2–3 minutes.
- Pro Tip: Avoid the fridge! The humidity in a refrigerator is the enemy of crispy cheese. Keep them in a cool, dry pantry instead.
More Recipes You Will Love
If you enjoyed this savory snack, you have to try these other ChefManiac favorites:
- The Ultimate Dorito Casserole – For when you want that crunch in a full meal.
- Baked Kosher Salami Appetizer – Another salty, crispy meat snack that guests obsess over.
- Sheet Pan Quesadillas – The best way to feed a crowd without standing over a stove.
Final Thoughts
These Pepperoni Cheese Chips prove that you don’t need a lot of ingredients to make a massive impact. They are fast, flavorful, and incredibly satisfying. If you make these, I’d love to hear how they turned out! Did you add jalapeños? Did you dip them in ranch?
Leave a comment below or tag us on social media with your creations! Happy snacking!
How to Make 2-Ingredient Pepperoni Pizza Bites (Crispy & Low Carb!)
The Ultimate Crispy Pepperoni Cheese Chips
Prep: min | Cook: min | Total: min
Servings:
Ingredients
Instructions
Nutrition
- Calories: 145 kcal
- Fat: 11g
- Carbs:
- Protein: 10g
Rate This Recipe
Average Rating: 0 (0 votes)

")
")