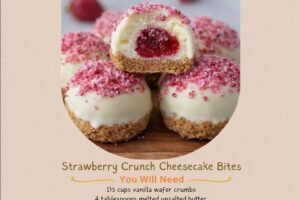
No-Bake Strawberry Cheesecake Bites with a Crispy Graham Cracker Coating
Print it, save it, or add it to your recipe binder.
Introduction
There is something undeniably nostalgic about the combination of creamy vanilla and tart strawberry crunch. If you grew up chasing the ice cream truck for a strawberry shortcake bar, these Strawberry Crunch Cheesecake Bites are about to become your new favorite obsession. They capture that exact same magic—velvety, rich cheesecake on the inside and a satisfying, buttery fruit crunch on the outside—all without needing to turn on your oven.
As a food writer for Chefmaniac, I’m always looking for recipes that balance “gourmet feel” with “weekday effort.” These bites are the definition of a crowd-pleaser. Whether you are hosting a summer backyard bash or just need a sweet treat to keep in the freezer for late-night cravings, these mini-desserts deliver a punch of flavor in every single mouthful.
Why I Love This Recipe
I’ve made my fair share of elaborate desserts, but I keep coming back to these bites for three main reasons:
- No-Bake Convenience: During the warmer months, the last thing I want to do is heat up the kitchen. This recipe stays cool from start to finish.
- Texture Contrast: You get the airy, whipped texture of the cheesecake filling against the sandy, buttery strawberry crumble. It’s a sensory delight.
- Portion Control (Or Not!): They are perfectly bite-sized, making them ideal for parties where people like to graze. They look like professional truffles but are surprisingly simple to assemble.
If you love the ease of no-bake treats, you should also check out this easy ice cream sandwich cake, which is another one of my favorite cooling summer desserts.
Ingredients
Cheesecake Filling
- 8 ounces (225 g) cream cheese: Ensure this is fully softened to room temperature to avoid lumps.
- ¼ cup powdered sugar: Provides sweetness without the graininess of granulated sugar.
- ½ teaspoon vanilla extract: A high-quality extract makes a huge difference here.
- ½ cup heavy whipping cream: This is the secret to the light, mousse-like texture.
Crunch Coating
- 1 cup graham cracker crumbs: You can buy these pre-crushed or pulse whole crackers in a food processor.
- ½ cup crushed freeze-dried strawberries: This provides that intense, natural pink color and concentrated berry flavor. (Fresh strawberries can be used if patted very dry, but freeze-dried is best for “crunch”).
- ¼ cup melted unsalted butter: The binder that makes the coating stick.
- 2–3 tablespoons granulated sugar: Optional, for those who want an extra crystalline crunch.
Optional Add-ins / Toppings
- Fresh strawberry pieces: For a beautiful garnish.
- Lemon zest: Mix into the filling for a “strawberry lemonade” vibe.
- Mini white-chocolate chips: Fold these into the filling for extra texture.
Swaps and Notes
- The Strawberry Element: If you can’t find freeze-dried strawberries, you can use crushed strawberry-flavored wafers or even a bit of strawberry gelatin powder mixed with the graham crackers.
- Dairy-Free: You can substitute the cream cheese and heavy cream with plant-based alternatives, though the chilling time may need to be longer to ensure they set properly.
- Sugar-Free: Use a powdered erythritol or monk fruit sweetener in the filling to lower the sugar content.
For those looking for a quicker breakfast-style “treat,” my 3-ingredient egg wrap is a great way to start the day before diving into dessert prep.
Step-by-Step Instructions
1. Prepare the Cheesecake Filling
In a large mixing bowl, beat the softened cream cheese with an electric mixer until smooth. It should look like silk. Add the powdered sugar and vanilla extract; beat again until well combined.
2. Whip it Up
Pour in the heavy whipping cream. Continue to whip on medium-high speed. You are looking for the mixture to thicken and hold “soft peaks.” This means when you lift the beaters, the mixture stands up but the tip curls over.
3. Chill the Filling
Place the bowl in the fridge for about 10–15 minutes. This brief rest makes the “dough” less sticky and much easier to handle.
4. Form the Bites
Using a small cookie scoop (about 1 tablespoon size), portion out the mixture. Roll them gently between your palms to form smooth spheres. Place them on a baking sheet lined with parchment paper.
5. Freeze to Set
This is a crucial step! Freeze the cheesecake balls for 1–2 hours. If they aren’t firm, the coating process will be a messy disaster.
6. Create the Strawberry Crunch
While the bites freeze, combine graham cracker crumbs, crushed strawberries, melted butter, and sugar in a shallow bowl. It should look like wet sand.
7. The Final Coating
Roll each frozen cheesecake ball into the crunch mixture. Press gently so the crumbs adhere to all sides.
8. Final Chill
Let them rest in the fridge for 30 minutes to allow the flavors to meld before serving.
Tips for Success
- Softened Cream Cheese is Non-Negotiable: If your cream cheese is cold, you will have tiny white lumps in your bites. If you’re in a hurry, microwave the unwrapped block for 15 seconds.
- Freeze-Dried is King: Using freeze-dried strawberry powder gives you a vibrant color without adding moisture that could make the coating soggy.
- Uniformity: Use a scoop! It ensures all your chocolate chip cookie bites and cheesecake bites look uniform and professional.
Serving Suggestions and Pairings
These bites are best served cold. For a beautiful presentation, place each bite in a mini paper cupcake liner.
Pairing Ideas:
- Drinks: Pair these with a cold glass of refreshing blueberry lemonade to lean into the summer berry theme.
- Dessert Boards: Place these alongside some unicorn poke cake for a colorful, kid-friendly dessert spread.
Nutritional Information (Per Serving)
Estimate based on 16 servings
- Calories: 145 kcal
- Fat: 11g
- Carbohydrates: 10g
- Protein: 2g
- Sugar: 6g
Storage and Leftover Tips
Refrigerator: Keep them in an airtight container for up to 4 days. Freezer: These actually taste amazing frozen! Store them in a freezer bag for up to 1 month. Just let them sit at room temperature for 5 minutes before eating so you don’t chip a tooth.
More Recipes You Will Love
- Unicorn Poke Cake
- Chocolate Chip Cookie Bites
- 3-Ingredient Egg Wrap
- Blueberry Lemonade
- Ice Cream Sandwich Cake
Final Thoughts
These Strawberry Crunch Cheesecake Bites are a nostalgic trip in every bite. They are simple, elegant, and punch way above their weight class in terms of flavor. I’d love to hear how yours turned out! Did you add the white chocolate chips, or stick to the classic crunch?
Leave a comment below and don’t forget to follow Chefmaniac for more easy, crowd-pleasing recipes!
No-Bake Strawberry Cheesecake Bites with a Crispy Graham Cracker Coating
There is something undeniably nostalgic about the combination of creamy vanilla and tart strawberry crunch. If you grew up chasing the ice cream truck for a strawberry shortcake bar, these
Prep: min | Cook: min | Total: min
Servings:
Ingredients
Instructions
Nutrition
- Calories: 145 kcal
- Fat: 11g
- Carbs: 10g
- Protein: 2g
Rate This Recipe
Average Rating: 0 (0 votes)