Christmas Meringue Wreaths: The Light, Crisp Holiday Treat That’s Perfect for Parties
Print it, save it, or add it to your recipe binder.
🎁 Christmas Meringue Wreaths: The Light, Crisp Holiday Treat That’s Perfect for Parties
By Jason Griffith
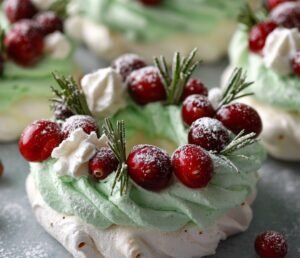
The holidays are a time for big, decadent flavors, but sometimes, a light, ethereal dessert is exactly what the spread needs. Enter the Christmas Meringue Wreath. These aren’t just pretty—they’re a textural masterpiece: perfectly crisp on the outside, delightfully chewy and soft inside, and dressed up with just a hint of festive green color and vibrant holiday toppings.
This recipe is my secret weapon for holiday gatherings. They look incredibly complicated, yet they are surprisingly simple to execute. The low, slow bake time is what ensures that iconic melt-in-your-mouth texture, turning simple egg whites and sugar into a culinary work of art.
Why I Love This Recipe
I’ll be honest, my holiday baking usually leans toward the rich and comforting, like making a massive batch of my family’s famous Big Family Banana Pudding. But the meringue wreath offers something different: elegance without effort.
- The Texture is King: That contrast between the delicate, crunchy shell and the soft, cloud-like center is addictive.
- A Stunning Presentation: The wreath shape, the bright green hue, and the red and white toppings make this dessert an instant centerpiece. Guests are always asking how I made them!
- Make-Ahead Magic: They hold up beautifully, meaning I can bake them the day before and just focus on the fun decorating part right before the party. Less stress means more time for holiday cheer.
📋 Ingredients List
This recipe relies on simple, pantry-friendly ingredients, but quality is key here, especially for the egg whites.
| Ingredient | Quantity | Notes |
| Egg Whites | 4 | Must be at room temperature for maximum volume. |
| Granulated Sugar | 1 cup | Fine sugar dissolves better for a glossy meringue. |
| Vanilla Extract | 1 tsp | Use pure vanilla for the best flavor. |
| Green Gel Food Coloring | A few drops | Gel coloring is crucial—liquid coloring can ruin the meringue consistency. |
| Whipped Cream | For topping | Freshly whipped or high-quality canned cream. |
| Fresh Cranberries or Cherries | 1/2 cup | The bright red provides a perfect holiday contrast. |
| Rosemary Sprigs (optional) | 4-5 | Small tips for garnish—they look like little pine needles! |
| Powdered Sugar | For dusting | Optional, but adds a snowy, finishing touch. |
Export to Sheets
Swaps and Notes
- Flavor: Swap vanilla extract for 1/2 tsp of peppermint extract for a minty twist.
- Coloring: If you prefer, omit the green coloring for bright white wreaths, or use red food coloring for a festive pink.
- Toppings: Try using chopped pistachios (green color!) or finely grated dark chocolate instead of fresh berries.
- Altitude: If you live at a high altitude, you may need to reduce the sugar slightly or bake for a longer time at the low temperature.
👩🍳 Step-by-Step Instructions
The secret to a perfect meringue is patience—specifically during the whipping and baking stages.
Step 1: Prep the Eggs and Oven
Preheat your oven to a low 200°F (95°C). Line two large baking sheets with parchment paper. Ensure your mixing bowl and whisk attachment are completely grease-free. Separate the room-temperature egg whites into the bowl.
Step 2: Whip the Egg Whites
Begin beating the egg whites on medium-high speed. Continue whipping until they form soft peaks—when you lift the whisk, the peaks gently droop over.
Step 3: Add Sugar and Achieve Stiffness
Gradually, a tablespoon at a time, add the granulated sugar while the mixer is running. This slow addition is critical for a stable meringue. Increase the speed to high and continue whipping until you achieve stiff, glossy peaks. When you rub a small amount of meringue between your fingers, it should feel smooth, not gritty.
Step 4: Add Color and Flavor
Gently mix in the vanilla extract. Then, add 2-3 drops of the green gel food coloring. Mix briefly, just until the color is uniformly incorporated and the meringue is a pale, festive green.
Step 5: Pipe the Wreaths
Transfer the meringue into a piping bag fitted with a large star tip (like an open star or French tip). On the prepared parchment paper, pipe the meringue into small wreath shapes (about 3-4 inches wide). You can pipe a full circle, or pipe small, adjacent stars to create the wreath shape.
Step 6: Bake and Cool
Place the baking sheets in the preheated oven. Bake for 1.5 hours. The low temperature is a drying process, not a cooking one, which gives the meringue its crisp shell. After 1.5 hours, turn off the oven and leave the meringues inside to cool completely (at least 1 hour, or even overnight) without opening the door.
Step 7: Decorate and Serve
Once cooled, carefully peel the meringue wreaths off the parchment paper. Top each wreath with a dollop of fresh whipped cream, then arrange the cranberries/cherries and small rosemary sprigs on top. Finish with a light dusting of powdered sugar. Serve immediately.
💡 Tips for Success
- Room Temperature is Non-Negotiable: Cold egg whites don’t whip to the necessary volume. Leave them on the counter for 30 minutes before starting.
- Grease is the Enemy: Any trace of fat (from oil, butter, or even egg yolk) will prevent the egg whites from whipping properly. Ensure your bowl and tools are spotless.
- Low and Slow Baking: This is the key. Baking too hot will cause the meringues to brown, crack, and become sticky. You are essentially drying them out, not baking them.
- Listen to the Meringue: If the meringue is weeping or sticky after cooling, it means the sugar didn’t dissolve properly. Next time, mix for longer.
🍽️ Serving Suggestions and Pairings
These delicate wreaths are best enjoyed fresh, but they are also versatile. I love serving them alongside a warm holiday beverage.
- Warm Drinks: Pair them with a strong coffee, an espresso, or a cozy mug of rich hot chocolate. You could even try them with the decadent flavors of these Hot Chocolate Cookie Cups.
- Complementary Desserts: They offer a welcome lightness next to a denser dessert, like rich chocolate truffles or a slice of pecan pie. For a different kind of sweet bite, you could also plate them with These Chocolate Chip Cookie Bites.
- Wine Pairing: For a light dessert like this, look for a slightly sparkling or sweet white wine. An Italian Moscato d’Asti or a French Sauternes would offer a beautiful, fruity compliment.
📊 Nutritional Information Per Serving (Estimate)
- Calories: ~110-130 kcal
- Protein: ~2g
- Fat: ~5g
- Carbohydrates: ~18g
- Sugar: ~16g
Note: This is an estimate based on 1/12th of the recipe, including 1 tbsp of full-fat whipped cream and minimal fruit/garnish.
❄️ Storage and Leftover Tips
Meringues are a fantastic make-ahead dessert, but they are very sensitive to moisture.
- Un-topped Storage: You can bake and cool the plain meringue wreaths up to 2 days in advance. Store them in an airtight container at room temperature in a cool, dry place. Do not refrigerate the plain meringues, as the moisture will make them sticky and soft.
- Topped Storage: Once topped with whipped cream, they must be served within 1-2 hours. The cream will begin to dissolve the meringue quickly.
- Leftovers: If you have leftover topped wreaths, they will likely be soft the next day. They will still taste great, but the texture won’t be as crisp.
🌟 More Recipes You Will Love
If you enjoyed these festive and easy meringues, you might want to check out these other crowd-pleasing desserts that are perfect for the holiday season or any sweet craving:
- Make-Ahead Holiday Dessert: These Pecan Pie Bars are just as impressive as a full pie but much easier to serve to a large group.
- No-Bake Treat: For a quick, indulgent snack, whip up a batch of this S’mores Bark.
Final Thoughts
The Christmas Meringue Wreath is more than just a dessert—it’s a joyful, festive statement on a plate. It brings a touch of light elegance to any holiday spread and is a refreshing counterpoint to heavier dishes. I hope these simple steps bring this spectacular result to your own kitchen this season.
Did you try adding a different color or unique topping? I’d love to hear your creative spin in the comments below!
Christmas Meringue Wreaths: The Light, Crisp Holiday Treat That’s Perfect for Parties
The holidays are a time for big, decadent flavors, but sometimes, a light, ethereal dessert is exactly what the spread needs. Enter the
Prep: min | Cook: min | Total: min
Servings:
Ingredients
- Swaps and Notes:
- Flavor: Swap vanilla extract for 1/2 tsp of peppermint extract for a minty twist.
- Coloring: If you prefer, omit the green coloring for bright white wreaths, or use red food coloring for a festive pink.
- Toppings: Try using chopped pistachios (green color!) or finely grated dark chocolate instead of fresh berries.
- Altitude: If you live at a high altitude, you may need to reduce the sugar slightly or bake for a longer time at the low temperature.
Instructions
- The secret to a perfect meringue is patience—specifically during the whipping and baking stages.
- Step 1: Prep the Eggs and Oven: Preheat your oven to a low 200°F (95°C). Line two large baking sheets with parchment paper. Ensure your mixing bowl and whisk attachment are completely grease-free. Separate the room-temperature egg whites into the bowl.
- Step 2: Whip the Egg Whites: Begin beating the egg whites on medium-high speed. Continue whipping until they form soft peaks—when you lift the whisk, the peaks gently droop over.
- Step 3: Add Sugar and Achieve Stiffness: Gradually, a tablespoon at a time, add the granulated sugar while the mixer is running. This slow addition is critical for a stable meringue. Increase the speed to high and continue whipping until you achieve stiff, glossy peaks. When you rub a small amount of meringue between your fingers, it should feel smooth, not gritty.
- Step 4: Add Color and Flavor: Gently mix in the vanilla extract. Then, add 2-3 drops of the green gel food coloring. Mix briefly, just until the color is uniformly incorporated and the meringue is a pale, festive green.
- Step 5: Pipe the Wreaths: Transfer the meringue into a piping bag fitted with a large star tip (like an open star or French tip). On the prepared parchment paper, pipe the meringue into small wreath shapes (about 3-4 inches wide). You can pipe a full circle, or pipe small, adjacent stars to create the wreath shape.
- Step 6: Bake and Cool: Place the baking sheets in the preheated oven. Bake for 1.5 hours. The low temperature is a drying process, not a cooking one, which gives the meringue its crisp shell. After 1.5 hours, turn off the oven and leave the meringues inside to cool completely (at least 1 hour, or even overnight) without opening the door.
- Step 7: Decorate and Serve: Once cooled, carefully peel the meringue wreaths off the parchment paper. Top each wreath with a dollop of fresh whipped cream, then arrange the cranberries/cherries and small rosemary sprigs on top. Finish with a light dusting of powdered sugar. Serve immediately.
Nutrition
- Calories:
- Fat:
- Carbs:
- Protein:
Rate This Recipe
Average Rating: 0 (0 votes)