Air Fryer Philly Cheesesteak Wraps: The 15-Minute Dinner Shortcut
Print it, save it, or add it to your recipe binder.
Crispy Air Fryer Philly Cheesesteak Wraps: The 15-Minute Dinner Shortcut
(Author: Jason Griffith)
Introduction
There are times when you crave the rich, savory satisfaction of a classic Philly Cheesesteak—tender steak, caramelized onions, sweet peppers, and that irresistible blanket of gooey cheese. But let’s be honest, standing over a hot griddle for a weeknight dinner isn’t always in the cards. That’s where the Air Fryer comes in to save the day (and your sanity).
I took all the best components of the iconic sandwich and wrapped them up tightly in a flour tortilla, transforming it into a crispy, handheld delight: the Air Fryer Philly Cheesesteak Wrap. It’s faster, easier to eat, and delivers a next-level crunch thanks to the magic of forced hot air. From prep to plate, you’re looking at about 15 minutes of work. This recipe is a guaranteed crowd-pleaser that proves comfort food doesn’t have to be complicated.
Why I Love This Recipe
This recipe is a game-changer for several reasons, but here are the top three:
- Speed and Convenience: The whole thing is finished in under 20 minutes. It’s the ultimate weeknight dinner when time is tight, or a perfect quick lunch option.
- That Air Fryer Crunch: Forget soggy tortillas or greasy frying. The air fryer crisps the exterior of the wrap to golden perfection while the inside stays juicy and cheesy. It gives you the satisfying texture of a fried item without all the added oil.
- Minimal Cleanup: Everything is cooked in one skillet before being transferred to the air fryer, which means fewer dishes. Less scrubbing and more eating? Sign me up.
Ingredients
This recipe calls for simple, high-impact ingredients you can easily find at any grocery store.
| Ingredient | Quantity | Notes |
| Thinly sliced beef | 1 pound | Ribeye or top sirloin works best. Ask your butcher to slice it thin! |
| Yellow Onion | 1 large | Sliced thinly. |
| Bell peppers | 2 (mixed colors) | Sliced thinly. Green, red, or a mix of colors for visual appeal. |
| Provolone cheese | 8 slices | Provolone is traditional, but you can swap it for white American or even mozzarella. |
| Flour tortillas | 8 (medium size) | Use fajita or medium-sized tortillas for best wrapping. |
| Olive oil or butter | 1 tablespoon | For sautéing the beef and vegetables. |
| Salt and Pepper | To taste | Don’t be shy with the seasoning! |
Export to Sheets
Swaps and Notes
- Protein: Don’t have beef? You can easily make a chicken cheesesteak version! Use thinly sliced chicken breast or shredded rotisserie chicken. For an easy swap, try making these easy cheesy chicken sliders with marinara garlic butter instead.
- Cheese: While provolone is classic, Swiss, Monterey Jack, or even pepper jack (for a spicy kick) are delicious alternatives.
- Tortillas: You can use whole wheat or low-carb tortillas, but note that the cooking time might need a slight adjustment as they crisp up faster.
- Seasoning: For extra flavor, sprinkle in a teaspoon of garlic powder and a pinch of dried oregano while the beef and veggies are sautéing.
- Spice Level: Add a dash of red pepper flakes to the sauté for some subtle heat.
Step-by-Step Instructions
Step 1: Prep the Filling
- In a large skillet, heat 1 tablespoon of olive oil or butter over medium-high heat.
- Add the thinly sliced onions and bell peppers. Sauté for 5-7 minutes, stirring occasionally, until they are soft and beginning to caramelize. Remove the vegetables and set them aside.
- Add the thinly sliced beef to the same skillet. Season generously with salt and pepper. Cook for 3-4 minutes, breaking it up with a spoon, until the beef is fully browned.
- Return the sautéed vegetables to the skillet with the beef. Stir everything together to combine, then remove the skillet from the heat.
Step 2: Assemble the Wraps
- Lay out a flour tortilla on a clean surface.
- Spoon a generous amount of the beef and vegetable mixture down the center of the tortilla.
- Top the filling with one slice of provolone cheese, tearing it into smaller pieces so it covers the entire filling area.
- Tightly Wrap: Fold in the sides of the tortilla first, then tightly roll it up from the bottom, creating a neat, sealed package. Repeat with the remaining tortillas and filling.
Step 3: Air Fry to Perfection
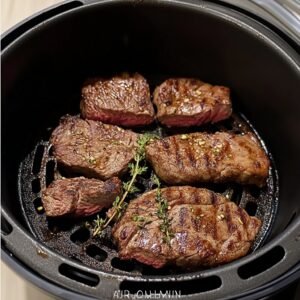
- Preheat your air fryer to 360∘F (180∘C).
- Place the assembled wraps in the air fryer basket, ensuring they do not touch. You will likely need to cook them in batches.
- Air fry at 360∘F for about 4-6 minutes, flipping halfway through, or until the tortillas are golden brown, crispy, and the cheese is completely melted and gooey.
- Remove carefully, slice diagonally (optional), and serve immediately!
Tips for Success
- Thin Meat is Key: The hallmark of a good cheesesteak is thin meat. If you can’t get it pre-sliced, place your cut of beef in the freezer for about 30 minutes before slicing it yourself—it will firm up and be much easier to slice super thin.
- Don’t Overcrowd the Basket: This is crucial for all air fryer recipes. Overcrowding traps moisture and prevents that amazing crispy crust from forming. Work in batches for the best results.
- Seal the Deal: Make sure your wraps are tightly rolled and the edges are secured underneath. This prevents the filling from spilling out during the air frying process. If needed, you can use a dab of water on the edge of the tortilla to help it stick.
Serving Suggestions and Pairings
These crispy wraps are great on their own, but a quick dip takes them to the next level!
- Dips: Serve with a side of classic ketchup, a tangy sriracha mayo, or a creamy ranch dressing.
- Side Dishes: Pair them with a simple side salad to cut through the richness, or for a true comfort meal, try them alongside a small bowl of chili or a quick pasta salad.
- Beverage: A frosty glass of iced tea or a cold pilsner is the perfect accompaniment.
Nutritional Information (Per Serving)
Note: This is an estimated nutritional breakdown for one wrap, excluding added sauces or side dishes. Calculations assume 1/8th of the meat/veg filling.
| Metric | Estimated Value |
| Calories | 320 kcal |
| Protein | 25 g |
| Fat | 14 g |
| Carbohydrates | 25 g |
| Fiber | 2 g |
Export to Sheets
Storage and Leftover Tips
Storage: Leftover filling can be stored separately from the tortillas in an airtight container in the refrigerator for up to 3 days.
Reheating: If you have leftover assembled wraps, the best way to reheat them is back in the air fryer at 350∘F for 3-4 minutes. This will restore the crispiness. A microwave will make the tortilla soft and chewy.
More Recipes You Will Love
If you enjoyed these speedy, cheesy wraps, you’ll love these other quick and easy savory recipes from Chef Maniac:
- For another crowd-pleasing wrap, try our amazing Sheet Pan Quesadillas that Feed a Crowd Fast.
- If you love chicken and cheese, don’t miss these incredible Chicken Enchiladas—a cozy dinner classic.
- For a comforting bowl of flavor, check out my favorite Cajun Chicken and Sausage Gumbo.
- Need another quick chicken and rice dish? This Mexican Chicken and Rice Casserole is a one-pan wonder.
Final Thoughts
The Air Fryer Philly Cheesesteak Wrap is everything you love about the classic sandwich, simplified and served with an unbeatable crispy crust. It’s perfect for game days, busy weeknights, or anytime a serious comfort food craving hits. Give it a try this week—I promise you won’t regret it!
Did you try this recipe? Let me know how it turned out in the comments below!

Air Fryer Philly Cheesesteak Wraps: The 15-Minute Dinner Shortcut
I took all the best components of the iconic sandwich and wrapped them up tightly in a flour tortilla, transforming it into a crispy, handheld delight: the
Prep: min | Cook: min | Total: min
Servings:
Ingredients
- Swaps and Notes:
- Protein: Don't have beef? You can easily make a chicken cheesesteak version! Use thinly sliced chicken breast or shredded rotisserie chicken. For an easy swap, try making these easy cheesy chicken sliders with marinara garlic butter instead.
- Cheese: While provolone is classic, Swiss, Monterey Jack, or even pepper jack (for a spicy kick) are delicious alternatives.
- Tortillas: You can use whole wheat or low-carb tortillas, but note that the cooking time might need a slight adjustment as they crisp up faster.
- Seasoning: For extra flavor, sprinkle in a teaspoon of garlic powder and a pinch of dried oregano while the beef and veggies are sautéing.
- Spice Level: Add a dash of red pepper flakes to the sauté for some subtle heat.
- Step-by-Step Instructions:
- Step 1: Prep the Filling:
- In a large skillet, heat 1 tablespoon of olive oil or butter over medium-high heat.
- Add the thinly sliced onions and bell peppers. Sauté for 5-7 minutes, stirring occasionally, until they are soft and beginning to caramelize. Remove the vegetables and set them aside.
- Add the thinly sliced beef to the same skillet. Season generously with salt and pepper. Cook for 3-4 minutes, breaking it up with a spoon, until the beef is fully browned.
- Return the sautéed vegetables to the skillet with the beef. Stir everything together to combine, then remove the skillet from the heat.
- Step 2: Assemble the Wraps:
- Lay out a flour tortilla on a clean surface.
- Spoon a generous amount of the beef and vegetable mixture down the center of the tortilla.
- Top the filling with one slice of provolone cheese, tearing it into smaller pieces so it covers the entire filling area.
- Tightly Wrap: Fold in the sides of the tortilla first, then tightly roll it up from the bottom, creating a neat, sealed package. Repeat with the remaining tortillas and filling.
- Step 3: Air Fry to Perfection:
- Preheat your air fryer to 360∘F (180∘C).
- Place the assembled wraps in the air fryer basket, ensuring they do not touch. You will likely need to cook them in batches.
- Air fry at 360∘F for about 4-6 minutes, flipping halfway through, or until the tortillas are golden brown, crispy, and the cheese is completely melted and gooey.
- Remove carefully, slice diagonally (optional), and serve immediately!
- Tips for Success:
- Thin Meat is Key: The hallmark of a good cheesesteak is thin meat. If you can’t get it pre-sliced, place your cut of beef in the freezer for about 30 minutes before slicing it yourself—it will firm up and be much easier to slice super thin.
- Don't Overcrowd the Basket: This is crucial for all air fryer recipes. Overcrowding traps moisture and prevents that amazing crispy crust from forming. Work in batches for the best results.
- Seal the Deal: Make sure your wraps are tightly rolled and the edges are secured underneath. This prevents the filling from spilling out during the air frying process. If needed, you can use a dab of water on the edge of the tortilla to help it stick.
- Serving Suggestions and Pairings:
- Dips: Serve with a side of classic ketchup, a tangy sriracha mayo, or a creamy ranch dressing.
- Side Dishes: Pair them with a simple side salad to cut through the richness, or for a true comfort meal, try them alongside a small bowl of chili or a quick pasta salad.
- Beverage: A frosty glass of iced tea or a cold pilsner is the perfect accompaniment.
- Nutritional Information (Per Serving):
- Storage and Leftover Tips:
- More Recipes You Will Love:
- For another crowd-pleasing wrap, try our amazing Sheet Pan Quesadillas that Feed a Crowd Fast.
- If you love chicken and cheese, don't miss these incredible Chicken Enchiladas—a cozy dinner classic.
- For a comforting bowl of flavor, check out my favorite Cajun Chicken and Sausage Gumbo.
- Need another quick chicken and rice dish? This Mexican Chicken and Rice Casserole is a one-pan wonder.
- Final Thoughts:
Instructions
- Step 1: Prep the Filling: In a large skillet, heat 1 tablespoon of olive oil or butter over medium-high heat.
- Add the thinly sliced onions and bell peppers. Sauté for 5-7 minutes, stirring occasionally, until they are soft and beginning to caramelize. Remove the vegetables and set them aside.
- Add the thinly sliced beef to the same skillet. Season generously with salt and pepper. Cook for 3-4 minutes, breaking it up with a spoon, until the beef is fully browned.
- Return the sautéed vegetables to the skillet with the beef. Stir everything together to combine, then remove the skillet from the heat.
- Step 2: Assemble the Wraps: Lay out a flour tortilla on a clean surface.
- Spoon a generous amount of the beef and vegetable mixture down the center of the tortilla.
- Top the filling with one slice of provolone cheese, tearing it into smaller pieces so it covers the entire filling area.
- Tightly : Wrap: Fold in the sides of the tortilla first, then tightly roll it up from the bottom, creating a neat, sealed package. Repeat with the remaining tortillas and filling.
- Step 3: Air Fry to Perfection: Preheat your air fryer to 360∘F (180∘C).
- Place the assembled wraps in the air fryer basket, ensuring they do not touch. You will likely need to cook them in batches.
- Air fry at 360∘F for about 4-6 minutes, flipping halfway through, or until the tortillas are golden brown, crispy, and the cheese is completely melted and gooey.
- Remove carefully, slice diagonally (optional), and serve immediately!
- Tips for Success: Thin Meat is Key: The hallmark of a good cheesesteak is thin meat. If you can’t get it pre-sliced, place your cut of beef in the freezer for about 30 minutes before slicing it yourself—it will firm up and be much easier to slice super thin.
- Don't : Overcrowd the Basket: This is crucial for all air fryer recipes. Overcrowding traps moisture and prevents that amazing crispy crust from forming. Work in batches for the best results.
- Seal the : Deal: Make sure your wraps are tightly rolled and the edges are secured underneath. This prevents the filling from spilling out during the air frying process. If needed, you can use a dab of water on the edge of the tortilla to help it stick.
- Serving Suggestions and Pairings: These crispy wraps are great on their own, but a quick dip takes them to the next level!
- Dips: Serve with a side of classic ketchup, a tangy sriracha mayo, or a creamy ranch dressing.
- Side : Dishes: Pair them with a simple side salad to cut through the richness, or for a true comfort meal, try them alongside a small bowl of chili or a quick pasta salad.
- Beverage: A frosty glass of iced tea or a cold pilsner is the perfect accompaniment.
- Nutritional Information (Per Serving): Note: This is an estimated nutritional breakdown for one wrap, excluding added sauces or side dishes. Calculations assume 1/8th of the meat/veg filling.
- Export to : Sheets
- Storage and Leftover Tips: Storage: Leftover filling can be stored separately from the tortillas in an airtight container in the refrigerator for up to 3 days.
- Reheating: If you have leftover assembled wraps, the best way to reheat them is back in the air fryer at 350∘F for 3-4 minutes. This will restore the crispiness. A microwave will make the tortilla soft and chewy.
- More Recipes You Will Love: If you enjoyed these speedy, cheesy wraps, you’ll love these other quick and easy savory recipes from Chef Maniac:
- For another crowd-pleasing wrap, try our amazing Sheet Pan Quesadillas that Feed a Crowd Fast.
- If you love chicken and cheese, don't miss these incredible Chicken Enchiladas—a cozy dinner classic.
- For a comforting bowl of flavor, check out my favorite Cajun Chicken and Sausage Gumbo.
- Need another quick chicken and rice dish? This Mexican Chicken and Rice Casserole is a one-pan wonder.
- Final Thoughts: The Air Fryer Philly Cheesesteak Wrap is everything you love about the classic sandwich, simplified and served with an unbeatable crispy crust. It’s perfect for game days, busy weeknights, or anytime a serious comfort food craving hits. Give it a try this week—I promise you won't regret it!
- Did you try this recipe? Let me know how it turned out in the comments below!
Nutrition
- Calories:
- Fat:
- Carbs:
- Protein:
Rate This Recipe
Average Rating: 0 (0 votes)