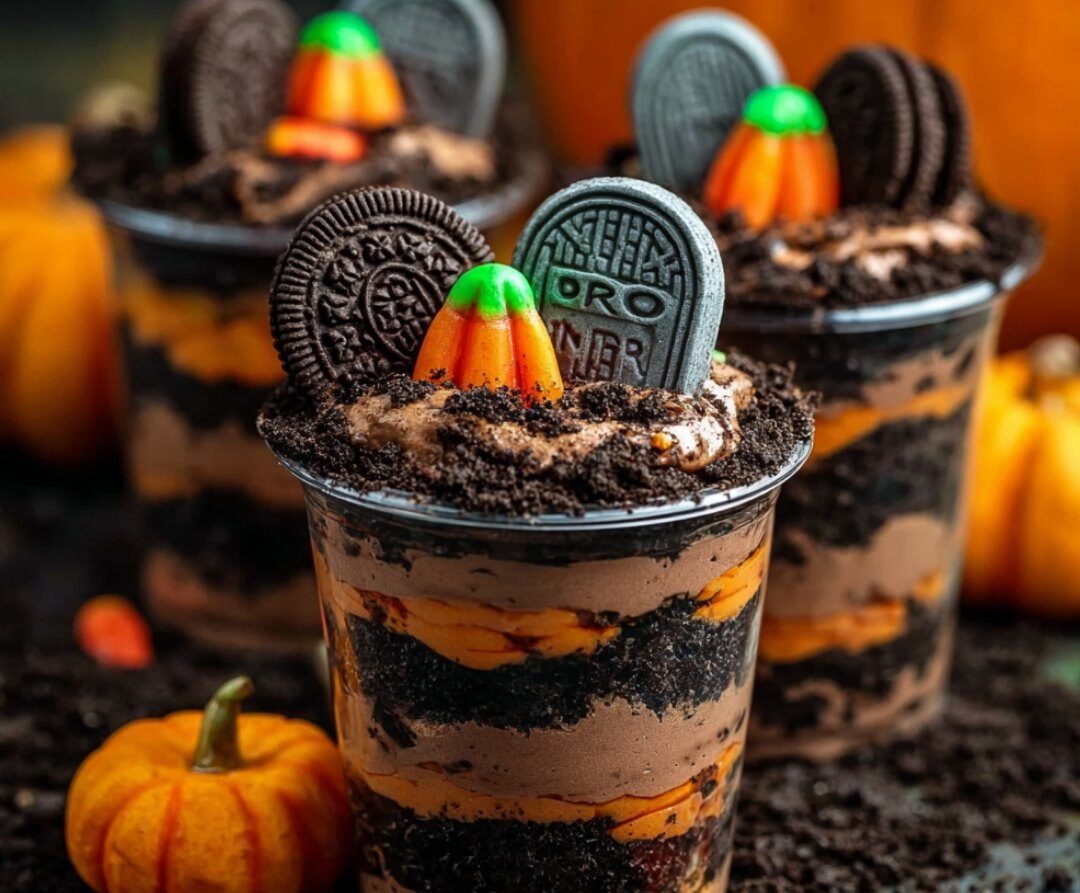
Halloween Graveyard Dirt Cups: The Creepy, No-Bake Treat That’s Always a Party Hit
There’s a special kind of magic that happens when food is fun, and let me tell you, these Halloween Graveyard Dirt Cups are pure, spooky alchemy. Forget complicated cakes or finicky pastries. When the leaves turn and the ghosts come out to play, what you really need is an easy, no-bake dessert that delivers on flavor and major visual impact.
These aren’t just a nostalgic throwback to the “dirt and worms” cups you might remember from childhood; this is the leveled-up, perfectly themed, creamy, crunchy, and absolutely addictive version. We’re talking rich chocolate puddingfolded with airy whipped topping, layers of Oreo “dirt,” and the most charmingly spooky edible gravestones you ever did see.
It’s the perfect make-ahead project for a party, a low-stress activity for the kids, or just a delightfully creepy treat to eat while watching a scary movie. Trust me, once you see the delighted faces when you bring these out, they’ll become your new favorite Halloween tradition.
Why I Love This Recipe
As a professional food writer, I’ve seen my share of impressive, but ridiculously time-consuming, Halloween treats. I love these Graveyard Dirt Cups because they are the rare exception where maximum fun requires minimum effort.
- No Oven Required: Seriously, no baking involved! This is an entirely no-bake operation, which is perfect when you have a million other party prep tasks.
- A Crowd-Pleaser: It hits all the right texture notes: creamy, cool pudding, light whipped topping, and crunchy, chocolatey cookie crumbs. Kids go nuts for the gummy worms, and adults appreciate the rich flavor.
- Highly Customizable: You can swap out the candies, change the pudding flavor (vanilla or white chocolate work great!), or even add a splash of espresso for a more adult-leaning mocha flavor. The concept remains the same, but you can put your own twist on the spooky theme.
- Nostalgia Factor: It’s a classic for a reason. These cups instantly transport you back to being a kid, but they look sophisticated enough for any adult gathering.
Ingredients List
This recipe makes 6–8 delightful, spooky cups.
| Ingredient | Quantity | Notes |
| Cold Milk | 2 cups | Whole milk works best for richness, but any milk is fine. |
| Instant Chocolate Pudding Mix | 1 box (3.9 oz) | Make sure it’s instant! |
| Whipped Topping (like Cool Whip) | 1 cup | Thawed. This makes the pudding lighter and fluffier. |
| Oreo Cookies | 20 cookies | Crushed fine to create the “dirt.” Use the whole cookie—cream and all! |
| Milano Cookies or Graham Crackers | 6–8 cookies | These will be your edible gravestones. |
| Black Gel Icing | As needed | For writing “R.I.P.” or other spooky messages. |
| Gummy Worms or Candy Pumpkins | As needed | For a final spooky garnish. |
Export to Sheets
Swaps and Notes
- Pudding Base: Not a fan of chocolate? Swap the instant chocolate pudding for vanilla or even a seasonal pumpkin spice pudding mix if you can find one.
- Dairy-Free Option: Use an instant pudding mix suitable for a non-dairy liquid (like almond or soy milk) and a non-dairy whipped topping. The result is just as creamy!
- The “Dirt”: If you want a more complex “dirt” flavor, try a mix of crushed Oreos and crushed chocolate wafers. For a little crunch, add a layer of crushed pretzels or toffee bits to the cookie crumb layer.
- Spice it Up: For an adult-only version, whisk a splash of Kahlúa or Irish Cream into the pudding mixture after it thickens.
- Gravestones: Instead of Milano cookies, you can use Nutter Butter cookies or even shortbread and trim them to look like little headstones.
Step-by-Step Instructions
Follow these easy steps to bring your graveyard to life!
Step 1: Prep the Pudding Base
In a large mixing bowl, whisk together the 2 cups of cold milk and the instant chocolate pudding mix for about 2 minutes until the mixture thickens slightly. Don’t overmix.
Step 2: Fold in the Whipped Topping
Gently fold in the 1 cup of thawed whipped topping using a rubber spatula until it’s fully incorporated and the mixture is light and uniform in color. This step is key for that fluffy, light texture!
Step 3: Crush the “Dirt”
Place the 20 Oreo cookies into a resealable plastic bag and use a rolling pin or the bottom of a heavy cup to crush them into fine crumbs—the finer, the better for that realistic “dirt” texture. You can also use a food processor for a faster, finer crumb.
Step 4: Assemble the Cups
Choose clear cups or small mason jars to show off your layers. Start by adding a layer of Oreo cookie “dirt” to the bottom of each cup (about 1–2 tablespoons). Next, spoon or pipe a layer of the chocolate pudding mixture over the cookie base. Top the pudding with another layer of Oreo “dirt.” Repeat the process until the cups are nearly full, ending with a generous layer of “dirt” on top.
Step 5: Make the Gravestones
Using the black gel icing, write “R.I.P.” or a funny, spooky message like “BOO!” or “Got Dirt?” on the flat side of your Milano cookies or graham crackers.
Step 6: Garnish and Chill
Gently insert a gravestone cookie into the top layer of “dirt” in each cup. Tuck a few gummy worms so they look like they’re crawling out of the “dirt” or add a small candy pumpkin next to the gravestone. Chill the finished cups in the refrigerator for at least 30 minutes to allow the pudding to firm up and the flavors to meld.
Tips for Success
- Chill is Key: Make sure your milk is ice-cold. This helps the instant pudding set up properly and quickly.
- The Right Tool for the Job: Use a fork or a whisk to mix the pudding, but always use a rubber spatula for folding in the whipped topping. This keeps the air in the mixture, ensuring a light and airy result.
- Use Clear Cups: Presentation is everything here! Using clear cups, jars, or even wine glasses makes the layers pop and really sells the graveyard theme.
- Don’t Over-Garnish: A few gummy worms and a gravestone are plenty. You want the spooky scene to look intentional, not cluttered.
Serving Suggestions and Pairings
These Graveyard Dirt Cups are a dessert centerpiece all on their own, but they pair wonderfully with other spooky snacks and drinks.
- Spooky Sips: A Classic Margarita or a fun, non-alcoholic punch like a sparkling cranberry-grape juice mixture will cut through the richness of the chocolate perfectly. For something sweet, try this Rainbow Sangria.
- Party Food Pairing: If you’re looking for savory snacks to serve alongside, try some Sheet Pan Quesadillas or a decadent, cheesy Crockpot Nacho Dip to balance the sweetness.
Nutritional Information Per Serving
Based on 8 servings
| Component | Estimate |
| Calories | ∼310 |
| Fat | ∼15g |
| Saturated Fat | ∼7g |
| Carbohydrates | ∼40g |
| Sugar | ∼28g |
| Protein | ∼4g |
Export to Sheets
Note: This is an approximation and can vary based on the specific brands of cookies, pudding mix, and milk used.
Storage and Leftover Tips
Because these are a no-bake, pudding-based dessert, they store beautifully!
- Refrigerator: The assembled dirt cups can be stored in the refrigerator, covered loosely with plastic wrap, for up to 3 days. The cookies will soften slightly, but they will still be delicious.
- Make-Ahead: You can completely assemble these the day before your party. Just be sure to wait until a few hours before serving to add the delicate gravestones and gummy worms so they stay crisp and firm.
- Pudding Base Only: If you want to prep even further in advance, make the chocolate pudding mixture (Steps 1 & 2) and store it in an airtight container in the fridge for up to 4 days. Assemble the cups on the day you plan to serve.
More Recipes You Will Love
If you’re a fan of easy, no-bake desserts and fun, over-the-top treats, then you’re in the right place! Here are a few more favorites from my kitchen:
- For another easy dessert that screams comfort, check out this No-Bake Oreo Cream Pie
- Need another classic no-fail cookie that requires no oven? I’ve made these Old School No-Bake Cookies 100 times, and they always deliver.
- For the chocolate and peanut butter lovers, you have to try these incredibly decadent Chocolate Chip Cookie Dough Brownie Bombs.
- If you’re craving a treat but want something quick and customizable, my recipe for Edible Cookie Dough is a game-changer for late-night cravings.
- Getting ready for the fall holidays? This creamy, layered Pumpkin Delight Dessert is another stellar no-bake option.
Final Thoughts
There is absolutely no reason for entertaining to be stressful, especially when it comes to the dessert table. These Graveyard Dirt Cups are the perfect example of a recipe that allows you to be playful and creative without having to fuss over oven temperatures or tricky techniques. They are as fun to make as they are to eat, and they bring an immediate smile (and maybe a little shiver!) to everyone who sees them.
I’d love to know what spooky creatures you put in your graveyard! Did you go with gummy worms or candy spiders? Leave a comment below with your favorite way to dress up this fun Halloween classic. And don’t forget to follow ChefManiac on social media for more holiday-ready recipes!
Happy Haunting! — Jason Griffith


Leave a Reply