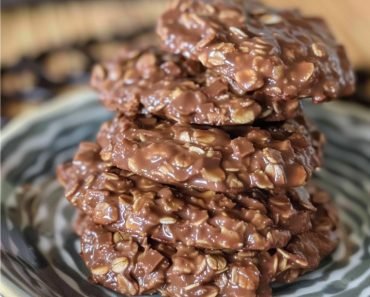
In the world of cookies, there’s a special place for those delightful treats that don’t require turning on the oven. Enter the Chocolate Oatmeal No-Bake Cookie. This isn’t just any cookie; it’s a nostalgic bite of childhood, a quick fix for a sudden sweet craving, and an absolute lifesaver on hot days when the thought of baking is just too much. With a rich, fudgy chocolate base studded with hearty oats, these cookies are incredibly satisfying and surprisingly simple to make.

Originating from the mid-20th century, no-bake cookies gained popularity for their convenience and delicious taste. They’re a testament to the fact that you don’t need complicated techniques or fancy equipment to create something truly magical in the kitchen. If you’re looking for a foolproof recipe that delivers maximum flavor with minimal effort, you’ve come to the right place. Get ready to whip up a batch of these irresistible chocolate oatmeal no-bakes and relive some sweet memories!
Why I Love This Recipe
As a food writer, I’m constantly experimenting with complex recipes, but sometimes, the simplest dishes bring the most joy. That’s precisely why I adore this Chocolate Oatmeal No-Bake Cookie recipe. It’s incredibly forgiving, making it perfect for novice bakers or even involving little helpers in the kitchen. The magic happens in a single saucepan, and within minutes, you have a rich, gooey chocolate mixture ready to transform into delightful cookies.
What truly stands out is the perfect balance of textures and flavors. The chewy oats provide a wonderful contrast to the smooth, rich chocolate and peanut butter (if using) base. They’re also wonderfully customizable, allowing for creative twists while staying true to their comforting roots. When I need a quick dessert that always impresses, or a sweet treat for a school bake sale, these no-bakes are my absolute go-to. They remind me of my own childhood, and I love creating new memories with them today.
List of Ingredients
Here’s what you’ll need to make these delicious and easy no-bake cookies:
- 2 cups granulated sugar
- 1/2 cup (1 stick) unsalted butter
- 1/2 cup milk (any kind works: whole, 2%, skim)
- 1/4 cup unsweetened cocoa powder
- 1/2 teaspoon vanilla extract
- 1/4 teaspoon salt
- 1/2 cup creamy peanut butter (optional, but highly recommended for flavor and texture)
- 3 cups old-fashioned rolled oats (quick oats can be used, but old-fashioned provide better chew)
Swaps and Notes
- Sugar: While granulated sugar is standard, you can experiment with half brown sugar for a slightly deeper, more caramel-like flavor.
- Butter: Salted butter can be used, just reduce the added salt in the recipe to 1/8 teaspoon.
- Milk: Any type of milk works. For a richer cookie, use whole milk. Non-dairy milk alternatives like almond or oat milk can also be used if you need a dairy-free option.
- Cocoa Powder: Use good quality unsweetened cocoa powder for the best chocolate flavor. Dutch-processed cocoa will give a darker color and a milder chocolate taste.
- Vanilla Extract: Don’t skip the vanilla! It enhances the chocolate flavor beautifully.
- Peanut Butter: This is optional, but highly recommended. It adds a wonderful depth of flavor, creaminess, and helps bind the cookies. If you have a peanut allergy, you can omit it or use sunbutter/almond butter, though the flavor will change.
- Oats: Old-fashioned rolled oats are preferred for their texture. They provide a nice chew. Quick oats can be used in a pinch, but the cookies might be a bit softer and less chewy. Do not use steel-cut oats, as they won’t soften sufficiently.
- Add-ins (Optional): Feel free to get creative! A handful of shredded coconut, chopped nuts (like pecans or walnuts), or mini chocolate chips can be stirred in with the oats for extra flavor and texture.
List of Steps for the Recipe
- Prepare Your Workspace: Line two baking sheets with parchment paper or wax paper. This is crucial for easy removal of the cookies.
- Combine Wet Ingredients: In a large, heavy-bottomed saucepan, combine the granulated sugar, butter, milk, and unsweetened cocoa powder.
- Boil the Mixture: Place the saucepan over medium heat. Bring the mixture to a full, rolling boil, stirring constantly to prevent sticking and burning. Once it reaches a full boil, allow it to boil for exactly 1 minute, continuing to stir. This step is critical for the cookies to set properly.
- Remove from Heat & Add Flavorings: Immediately remove the saucepan from the heat. Stir in the vanilla extract and salt. If using, stir in the creamy peanut butter until it’s completely melted and smoothly incorporated into the chocolate mixture.
- Add the Oats: Quickly add the 3 cups of old-fashioned rolled oats to the saucepan. Stir vigorously until the oats are fully coated and evenly distributed throughout the chocolate mixture. Work quickly, as the mixture will begin to set as it cools.
- Drop Cookies: Using a tablespoon or a small cookie scoop, drop spoonfuls of the mixture onto the prepared baking sheets. Work fairly quickly, shaping them into mounds if desired.
- Cool and Set: Allow the cookies to cool completely at room temperature for at least 30-60 minutes, or until they are firm. For faster setting, you can place them in the refrigerator for 15-20 minutes.
- Enjoy! Once set, carefully peel them off the parchment or wax paper and enjoy!
Tips for Success
- Accurate Boiling Time: The most critical step for no-bake cookies is boiling the mixture for exactly 1 minute. Boiling for too short a time will result in cookies that don’t set; boiling for too long will make them crumbly and dry. Set a timer!
- Work Quickly: Once you add the oats, the mixture will start to cool and set very fast. Have your baking sheets ready and be prepared to scoop quickly.
- Even Scoops: Use a cookie scoop or two spoons to create uniform cookies. This ensures they cool and set at a similar rate.
- Parchment/Wax Paper is Key: Do not skip lining your baking sheets! These cookies are sticky and will adhere to an unlined sheet.
- Humidity Matters: No-bake cookies can be finicky in high humidity. On very humid days, they might take longer to set or remain a bit softer. If this happens, refrigerate them longer.
- Don’t Rush Cooling: Resist the urge to eat them too soon! They need ample time to cool and firm up properly for the best texture.
Serving Suggestions and Pairings
Chocolate Oatmeal No-Bake Cookies are fantastic on their own, but here are some ideas to make them even more special:
- With Milk: There’s no better classic pairing than a tall, cold glass of milk.
- Coffee or Tea: Enjoy them with your morning coffee or an afternoon cup of tea for a delightful pick-me-up.
- Ice Cream Topping: Crumble a few cookies over a scoop of vanilla or chocolate ice cream for an instant sundae.
- Dessert Platter: Arrange them on a dessert platter with other treats like fresh berries, brownies, or mini cheesecakes for a variety of textures and flavors.
- As Gifts: Package them in pretty tins or bags as thoughtful homemade gifts for friends, family, or neighbors.
Nutritional Information
Understanding the nutritional content of your treats can be helpful, though values will vary based on exact ingredient brands and portion sizes. Here’s an approximate breakdown per cookie (assuming 24 cookies from the batch, with peanut butter):
- Calories: 180-220 kcal
- Carbohydrates: 25-35g
- Sugars: 18-25g
- Fiber: 2-3g
- Fat: 8-12g
- Saturated Fat: 4-6g
- Protein: 3-5g
- Sodium: 60-90mg
These cookies are a calorie-dense treat, offering quick energy from sugars and carbohydrates, along with some healthy fats and fiber from the oats and peanut butter. Enjoy them in moderation as part of a balanced diet.
Storage and Leftover Tips
These no-bake cookies are fantastic for making ahead and storing:
- Room Temperature: Once fully set, store the cookies in an airtight container at room temperature for up to 3-4 days. For best results, place parchment or wax paper between layers to prevent sticking.
- Refrigerator: For a firmer texture and extended freshness, store them in an airtight container in the refrigerator for up to 1 week. This is especially recommended in warmer, more humid climates.
- Freezing: Yes, you can freeze no-bake cookies! Place the fully cooled and set cookies in a single layer on a baking sheet and freeze for about 1-2 hours until solid. Then transfer them to a freezer-safe airtight container or freezer bag, with parchment paper between layers. They can be frozen for up to 2-3 months. Thaw at room temperature for about 15-20 minutes before serving.
Final Thoughts
The Chocolate Oatmeal No-Bake Cookie is a timeless classic for a reason. It’s an effortless way to satisfy your sweet tooth, perfect for unexpected guests, or simply a delightful treat to have on hand. The combination of rich chocolate, creamy peanut butter, and hearty oats creates a texture and flavor profile that’s simply irresistible. Give this recipe a try, and you’ll quickly understand why it remains a beloved favorite for generations.
What are your go-to no-bake treats? Share your thoughts and any clever variations you’ve tried in the comments below! And be sure to follow Chefmaniac.com for more delicious recipes and culinary inspiration. Happy no-baking!


Leave a Reply