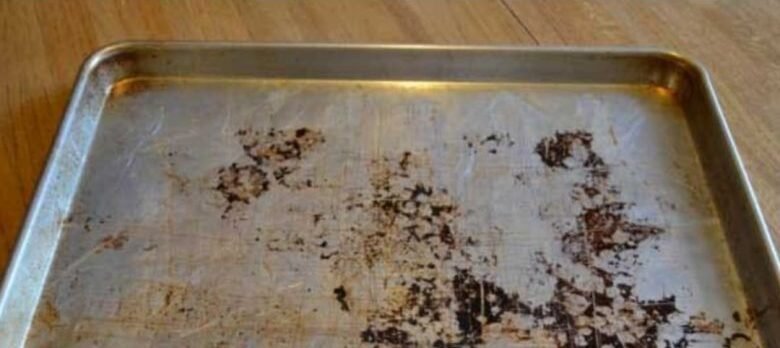
Do you remember that pristine, shiny baking sheet you once owned? The one that effortlessly released cookies and roasted vegetables to golden perfection? Chances are, if you’re like me, it’s now a distant memory, replaced by a battle-scarred veteran covered in stubborn, dark stains and mysterious burnt-on residues. But fear not, fellow home cooks! I’m here to tell you that those seemingly ruined baking sheets don’t need to be banished to the back of the cupboard or, worse yet, the trash can. With a little elbow grease and some common household ingredients, you can bring them back from the brink.
Why I Love This Restoration Method
For years, I just accepted that baking sheets got progressively uglier with each use. I’d scrub and scrub, only to be met with disappointing results. Then, I discovered these simple yet incredibly effective methods for restoring them, and it was a game-changer. Not only does it save money by extending the life of my bakeware, but there’s a certain satisfaction in seeing those dark stains vanish, revealing the shiny metal underneath. It feels like magic, and it makes me want to bake even more! Plus, a clean baking sheet truly performs better, distributing heat more evenly for superior results, whether you’re making a batch of cookies or roasting ingredients for a delicious Mexican Chicken and Rice Casserole.
Ingredients You’ll Need
For Baking Soda & Peroxide Method:
- 1/2 cup baking soda
- 2-3 tablespoons hydrogen peroxide (3%)
- Large sink or basin
- Non-scratch sponge or soft brush
- Dish soap
- Warm water
For Baking Soda & Vinegar Method:
- 1/2 cup baking soda
- 1/4 cup white vinegar
- Large sink or basin
- Non-scratch sponge or soft brush
- Dish soap
- Warm water
For Cream of Tartar Method (for aluminum sheets):
- 2 tablespoons cream of tartar
- 1 cup water
- Non-scratch sponge or soft brush
- Dish soap
- Warm water
Swaps and Notes
- Hydrogen Peroxide: Make sure you’re using standard 3% hydrogen peroxide, readily available at drugstores. Do not use stronger concentrations.
- White Vinegar: Any standard white distilled vinegar will work.
- Cream of Tartar: This is particularly good for aluminum sheets as it’s less abrasive.
- Gloves: While not strictly necessary, wearing rubber gloves can protect your hands, especially if you have sensitive skin.
- Scrubbing Tools: Avoid abrasive scrubbers like steel wool on most baking sheets, as they can scratch the surface and make it more prone to sticking in the future. Opt for a non-scratch sponge, a silicone scrubber, or even a soft-bristled brush.
- Safety: Always ensure good ventilation when working with these cleaning agents.
Steps for Restoring Your Baking Sheets
Here’s how to tackle those stubborn stains, depending on the method you choose:
Method 1: Baking Soda & Hydrogen Peroxide (My Go-To for Tough Stains)
- Prep Your Sheet: Rinse the baking sheet under warm water to remove any loose crumbs or food particles.
- Make the Paste: In a small bowl, combine 1/2 cup baking soda with 2-3 tablespoons of hydrogen peroxide. Mix until you form a thick paste. Adjust the amount of peroxide as needed to get a good consistency.
- Apply the Paste: Spread the paste evenly over the stained areas of your baking sheet. Make sure the burnt bits are thoroughly covered.
- Let it Sit: This is where the magic happens! Let the paste sit on the baking sheet for at least 2-4 hours, or even overnight for very tough stains. The longer it sits, the better it works.
- Scrub Away: Once the time is up, use a non-scratch sponge or brush to vigorously scrub the paste and the loosened stains. You’ll be amazed at how easily the grime comes off!
- Rinse and Wash: Rinse the baking sheet thoroughly with warm water, then wash it with dish soap as you normally would. Dry completely to prevent water spots.
Method 2: Baking Soda & White Vinegar (Great for Everyday Grime)
- Sprinkle Baking Soda: Sprinkle a generous layer of baking soda over the entire stained surface of your baking sheet.
- Pour Vinegar: Slowly pour white vinegar over the baking soda. You’ll see a fizzing reaction – this is good! The chemical reaction helps to lift the stains.
- Let it Sit: Let the mixture sit and bubble for at least 30 minutes to an hour. For tougher stains, you can let it sit longer.
- Scrub and Rinse: After the sitting time, use a non-scratch sponge or brush to scrub away the loosened grime. Rinse thoroughly with warm water and wash with dish soap.
Method 3: Cream of Tartar (Best for Aluminum Sheets)
- Create a Solution: In a large sink or basin, add enough warm water to cover your baking sheet. Add 2 tablespoons of cream of tartar to the water and stir to dissolve.
- Soak: Submerge your aluminum baking sheet in the cream of tartar solution and let it soak for 30 minutes to an hour.
- Scrub Gently: Use a non-scratch sponge to gently scrub away any remaining stains. Cream of tartar is a mild abrasive, so it’s effective without being too harsh on aluminum.
- Rinse and Dry: Rinse the baking sheet thoroughly with warm water and dry it completely.
Tips for Success
- Patience is Key: For heavily stained sheets, don’t rush the sitting time. The longer the cleaning agents can work, the easier the scrubbing will be.
- Spot Treat: For isolated burnt spots, you can make a thicker paste and apply it directly to those areas.
- Regular Cleaning: To prevent future build-up, always wash your baking sheets promptly after use.
- Lining is Your Friend: Consider using parchment paper or silicone baking mats for messy recipes. This not only makes cleanup a breeze but also protects your baking sheets from future stains.
Serving Suggestions and Pairings
While this article is about cleaning, a clean baking sheet means more delicious food! Once your bakeware is sparkling, you can use it to create an array of fantastic dishes. Think about roasting vegetables alongside a juicy chicken for your Easy Cheesy Chicken Sliders with Marinara Garlic Butter, or baking up a batch of perfect cookies. A clean baking sheet is also essential for even heat distribution when making a family-favorite like Classic Spaghetti with Homemade Sauce(perhaps for the garlic bread!). And for those casual gatherings, you’ll need a clean sheet to bake up some chips for a warm, gooey Crockpot Nacho Dip. Don’t forget dessert! A pristine sheet is perfect for baking The Best Peanut Butter Brownies I’ve Ever Made.
Storage and Leftover Tips
Once your baking sheets are clean and dry, store them in a way that prevents them from getting scratched or dinged. Vertical storage using a pan organizer is ideal, but if stacking, place a sheet of paper towel or a thin cloth between each sheet to protect the surface.
More Recipes You Will Love
Now that your baking sheets are looking brand new, why not put them to good use? Explore some of these other fantastic recipes from Chefmaniac:
- Easy Cheesy Chicken Sliders with Marinara Garlic Butter
- Classic Spaghetti Recipe with Homemade Sauce
- This Crockpot Nacho Dip Is The Reason I Never Have Leftovers
- The Best Peanut Butter Brownies I’ve Ever Made (And I’ve Made A Lot)
- This Mexican Chicken and Rice Casserole Is My Favorite One-Pan Dinner That’s Always A Hit
Final Thoughts
Don’t let burnt and stained baking sheets dampen your culinary spirit. With these simple yet effective methods, you can restore your bakeware to its former glory and continue to create delicious meals and treats for years to come. It’s a small effort that yields big results!
Have you tried these methods, or do you have a secret trick for restoring your baking sheets? I’d love to hear about it in the comments below! Be sure to follow Chefmaniac for more tips, tricks, and delicious recipes.


Leave a Reply